Module 20: Cryptography
Overview of Cryptography
“Cryptography” comes from the Greek words kryptos, meaning “concealed, hidden, veiled, secret, or mysterious,” and graphia, “writing”; thus, cryptography is “the art of secret writing.”
Cryptography is the practice of concealing information by converting plain text (readable format) into cipher text (unreadable format) using a key or encryption scheme: it is the process of the conversion of data into a scrambled code that is sent across a private or public network.
There are two types of cryptography, determined by the number of keys employed for encryption and decryption:
Symmetric Encryption: Symmetric encryption (secret-key, shared-key, and private-key) uses the same key for encryption as it does for decryption
Asymmetric Encryption: Asymmetric encryption (public-key) uses different encryption keys for encryption and decryption; these keys are known as public and private keys
Lab 1: Encrypt the Information using Various Cryptography Tools
Lab Scenario
As a professional ethical hacker and penetration tester, you should use various cryptography techniques or tools to protect confidential data against unauthorized access. Cryptography protects confidential data such as email messages, chat sessions, web transactions, personal data, corporate data, e-commerce applications, and many other kinds of communication. Encrypted messages can at times be decrypted by cryptanalysis (code breaking), although modern encryption techniques are virtually unbreakable.
The labs in this exercise demonstrate how you can use various cryptography tools to encrypt important information in the system.
Overview of Cryptography Tools
System administrators use cryptography tools to encrypt system data within their network to prevent attackers from modifying the data or misusing it in other ways. Cryptography tools can also be used to calculate or decrypt hash functions available in MD4, MD5, SHA-1, SHA-256, etc.
Cryptography tools are used to convert the information present in plain text (readable format) into cipher text (unreadable format) using a key or encryption scheme. The converted data are in the form of a scrambled code that is encrypted and sent across a private or public network.
Task 1: Calculate One-way Hashes using HashCalc
Hash functions calculate a unique fixed-size bit string representation, called a message digest, of any arbitrary block of information. Message digest (One-way Hash) functions distill the information contained in a file (small or large) into a single fixed-length number, typically between 128 and 256 bits. If any given bit of the function’s input is changed, every output bit has a 50% chance of changing. Given an input file and its corresponding message digest, it should be nearly impossible to find another file with the same message digest value, as it is computationally infeasible to have two files with the same message digest value.
HashCalc enables you to compute multiple hashes, checksums, and HMACs for files, text, and hex strings. It supports the Secure Hash Algorithm family: MD2, MD4, MD5, SHA1, SHA2 (SHA256, SHA384, SHA512), RIPEMD160, PANAMA, TIGER, CRC32, ADLER32, and the hash used in the peer-to-peer file sharing applications, eDonkey and eMule.\
Open HashCalc by searching for it on the Desktop and selecting "Open" in the search results.
Prepare a test file by creating a new text file named
Test.txton the Desktop, writing "Hello World !!" in it, saving, and closing it.Calculate initial hash values by setting Data Format to "File" in HashCalc, selecting the
Test.txtfile, ensuring MD5, SHA1, RIPEMD160, and CRC32 are selected, and clicking "Calculate".Modify the test file by reopening
Test.txt, changing the content to "Modified File ...!!!", saving, and closing it. Recalculate hash values by repeating Step 3.Compare the hash values before and after modification to document the changes and demonstrate file integrity verification using HashCalc.
Task 2: Calculate MD5 Hashes using MD5 Calculator
MD2, MD4, MD5, and MD6 are message digest algorithms used in digital signature applications to compress documents securely before the system signs it with a private key. The algorithms can be of variable length, but the resulting message digest is always 128 bits.
The MD5 algorithm is a widely used cryptographic hash function that takes a message of arbitrary length as input and outputs a 128-bit (16-byte) fingerprint or message digest of the input. The MD5 algorithm is used in a wide variety of cryptographic applications and is useful for digital signature applications, file integrity checking, and storing passwords.
MD5 Calculator is a simple application that calculates the MD5 hash of a given file, and it can be used with large files (e.g., multiple gigabytes). It features a progress counter and a text field from which the final MD5 hash can be easily copied to the clipboard. MD5 calculator can be used to check the integrity of a file.
Here, we will use the MD5 Calculator tool to calculate MD5 hashes.
Open MD5 Calculator by searching for "MD5 Cal" on the Desktop and selecting "Open" in the search results.
Calculate the initial MD5 hash by clicking "Add Files" in the MD5 Calculator window, selecting
Test.txtfrom the Desktop, clicking "Open," then "Calculate," copying the MD5 value, and clearing the MD5 value with "Remove Files."Modify the test file by opening
Test.txtfrom the Desktop, changing the content to "Hello World…!!!", saving, and closing the file.Recalculate the MD5 hash by repeating step 2.
Compare the MD5 hashes by pasting the previous hash value in the Verify MD5 Value field, clicking "Compare," and observing if the values match to determine file integrity.
Task 3: Calculate MD5 Hashes using HashMyFiles
HashMyFiles is a small utility that allows you to calculate the MD5 and SHA1 hashes of one or more files in your system: you can easily copy the MD5/SHA1 hashes list into the clipboard, or save them into text/html/xml file. HashMyFiles can also be launched from the context menu of Windows Explorer, and can display the MD5/SHA1 hashes of the selected file or folder.
Here, we will use the HashMyFiles tool to calculate MD5 hashes.
Open HashMyFiles by navigating to
E:\CEH-Tools\CEHv12 Module 20 Cryptography\MD5 and MD6 Hash Calculators\HashMyFilesand double-clickingHashMyFiles.exe. Click "Run" if prompted by the Open File - Security Warning pop-up.Add a folder by clicking "File" from the menu bar and selecting "Add Folder."
Select the
Sample Filesfolder fromE:\CEH-Tools\CEHv12 Module 20 Cryptography\MD5 and MD6 Hash Calculators\HashMyFilesand click "OK."Select hash types by clicking "Options" from the menu bar, choosing "Hash Types," unselecting SHA-256, SHA-512, and SHA-384, and then clicking the "Refresh" icon.
Review the MD5, SHA1, and CRC32 hash values for the files in the folder.
You can also use other MD5 and MD6 hash calculators such as
MD6 Hash Generator (https://www.browserling.com)
All Hash Generator (https://www.browserling.com)
MD6 Hash Generator (https://convert-tool.com)
md5 hash calculator (https://onlinehashtools.com)
Task 4: Perform File and Text Message Encryption using CryptoForge
CryptoForge is a file encryption software for personal and professional data security. It allows you to protect the privacy of sensitive files, folders, or email messages by encrypting them with strong encryption algorithms. Once the information has been encrypted, it can be stored on insecure media or transmitted on an insecure network—such as the Internet—and remain private. Later, the information can be decrypted into its original form.
The encryption of a file involves navigating to the appropriate directory, right-clicking the file, selecting the encrypt option, and entering a passphrase. Decrypting the file on a different machine requires the same passphrase. For message encryption, the user types a message in CryptoForge Text, encrypts it with a passphrase, and saves it. The encrypted message is then shared, and the recipient decrypts it using the same passphrase. This ensures that sensitive information can be securely shared and accessed only by authorized individuals.
Task 5: Encrypt and Decrypt Data using BCTextEncoder
BCTextEncoder simplifies encoding and decoding text data. Plain text data are compressed, encrypted, and converted to text format, which can then be easily copied to the clipboard or saved as a text file. This utility software uses public key encryption methods and password-based encryption, as well as strong and approved symmetric and public key algorithms for data encryption.
You can also use other cryptography tools such as
AxCrypt (https://www.axcrypt.net)
Microsoft Cryptography Tools (https://docs.microsoft.com)
Concealer (https://www.belightsoft.com)
Lab 2: Create a Self-signed Certificate
Overview of Self-signed Certificate
In cryptography and computer security, a self-signed certificate is an identity certificate signed by the same entity whose identity it verifies. However, the term is unrelated to the identity of the person or organization that actually performs the signing procedure.
Task 1: Create and Use Self-signed Certificates
Self-signed certificates are widely used for testing servers. In self-signed certificates, a user creates a pair of public and private keys using a certificate creation tool such as Adobe Acrobat Reader, Java’s keytool, Apple’s Keychain, etc. and signs the document with the public key. The recipient requests the private key from the sender in order to verify the certificate. However, certificate verification rarely occurs due to the necessity of disclosing the private key: this makes self-signed certificates useful only in a self-controlled testing environment.
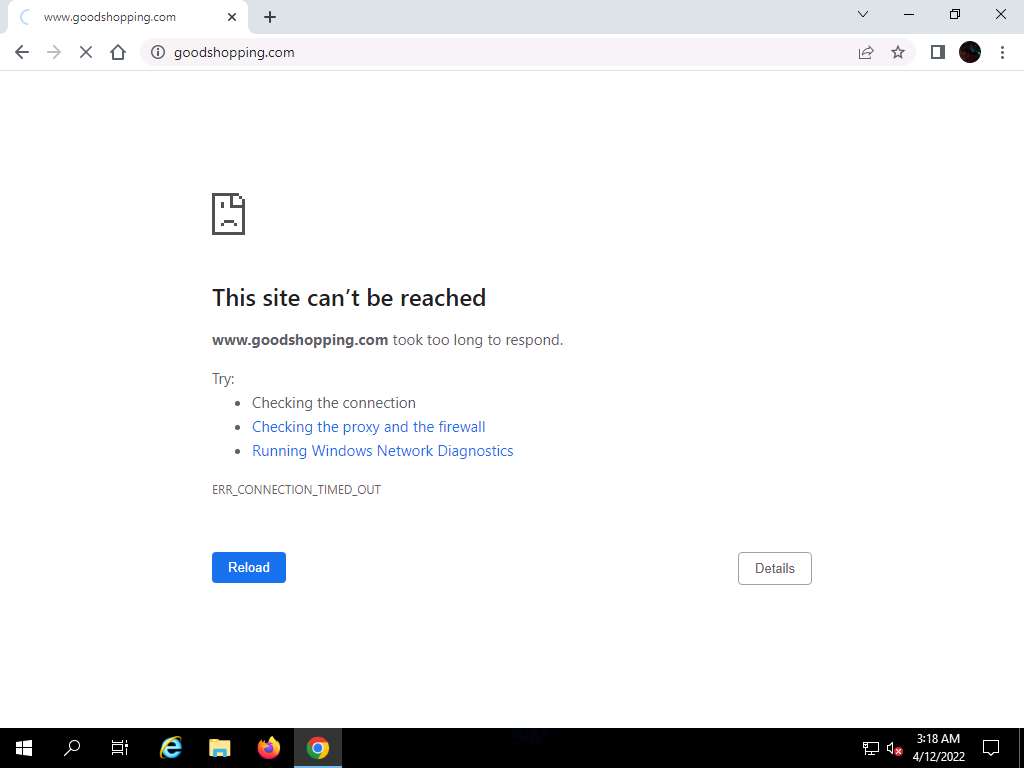
Launch any web browser (here, Google Chrome), place the cursor in the address bar and type https://www.goodshopping.com, and press Enter.
As you are using an https channel to browse the website, it displays a page stating that This site can’t be reached.
As the site does not have a self-signed certificate, it displays a connection refused message, as shown in the screenshot. Close the web browser.
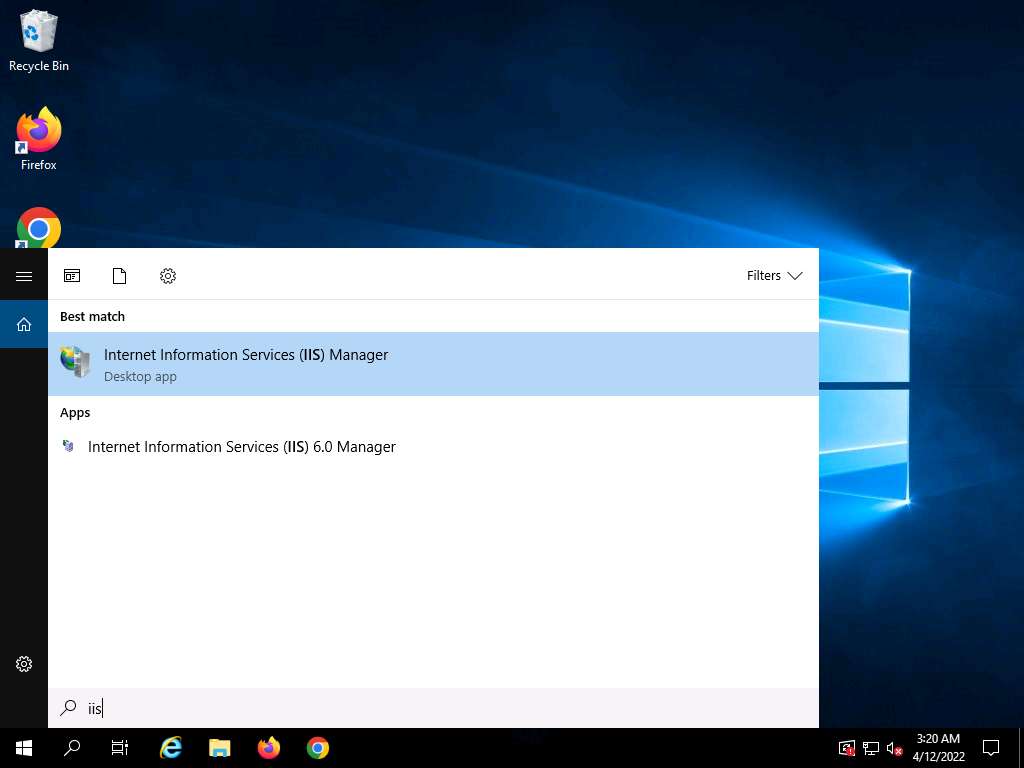
Screenshot Click the Type here to search icon present in the bottom-left of Desktop and type iis. Select Internet Information Services (IIS) Manager from the results.
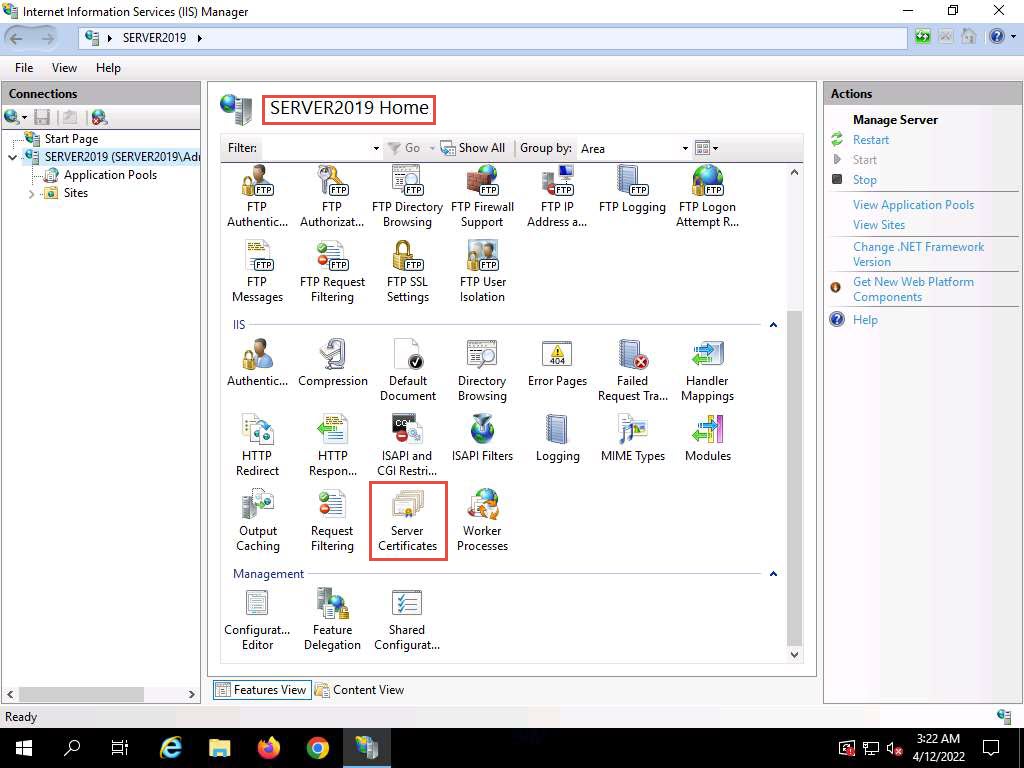
Screenshot The Internet Information Services (IIS) Manager window appears; click the machine name (SERVER2019 (SERVER2019\Administrator)) under the Connections section from the left-hand pane.
In SERVER2019 Home, double-click Server Certificates in the IIS section.
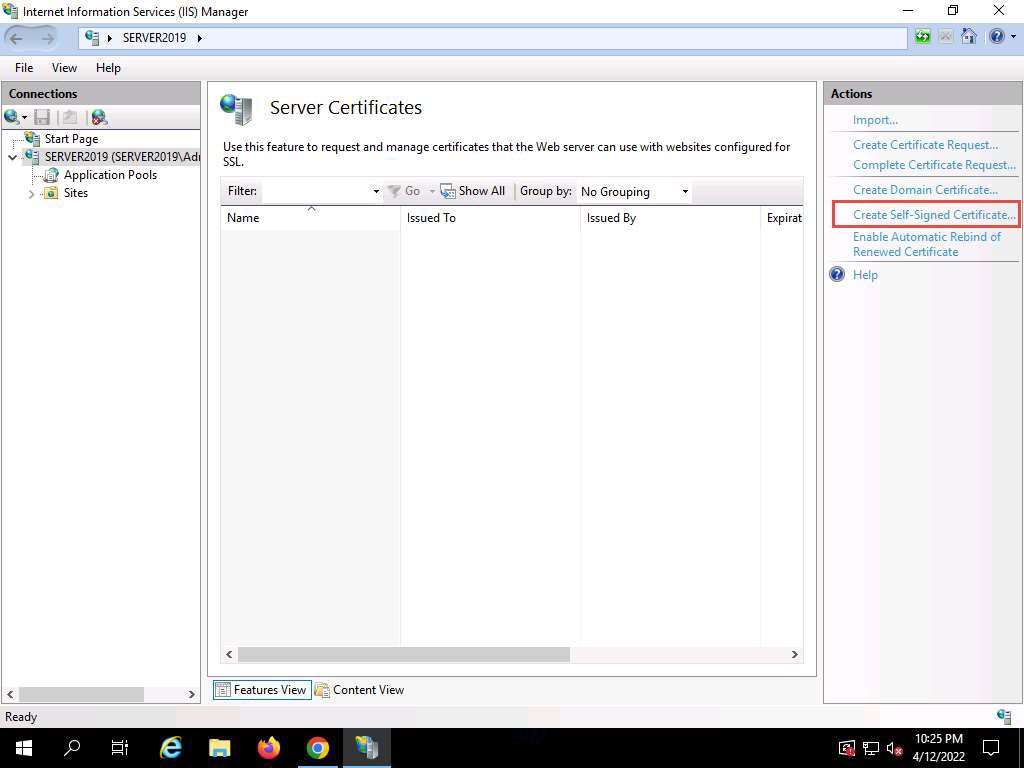
sdc4ouhe.jpg The Server Certificates wizard appears; click Create Self-Signed Certificate… from the right-hand pane in the Actions section.
33.jpg The Create Self-Signed Certificate window appears; type GoodShopping in the Specify a friendly name for the certificate field. Ensure that the Personal option is selected in the Select a certificate store for the new certificate field; then, click OK.
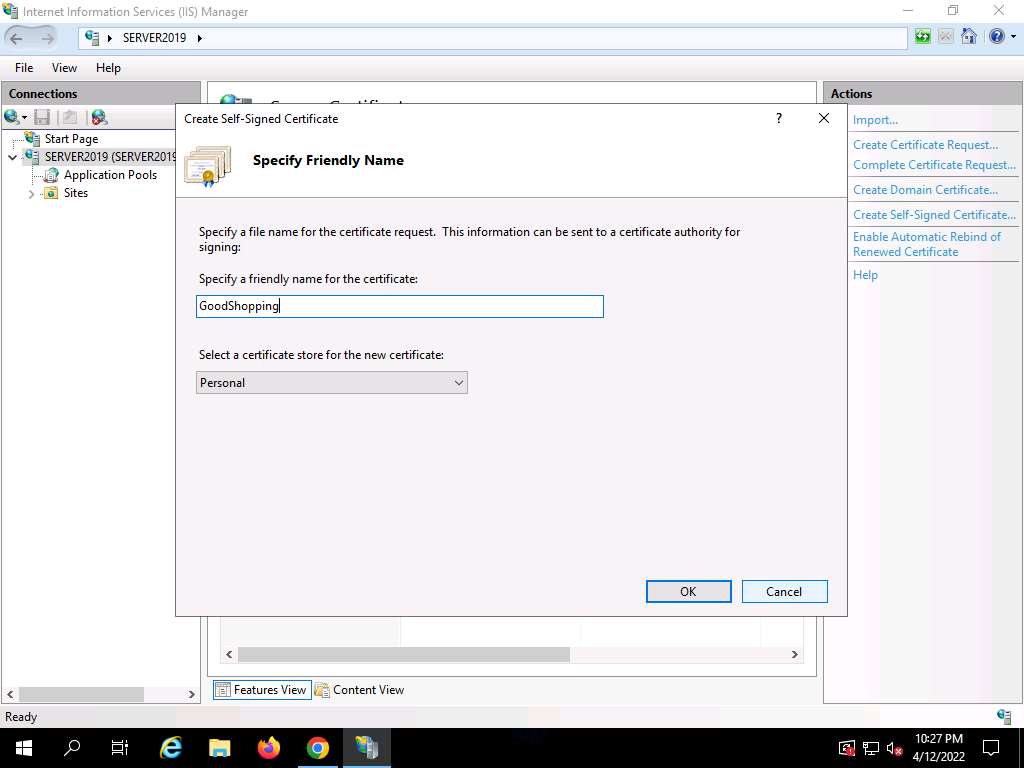
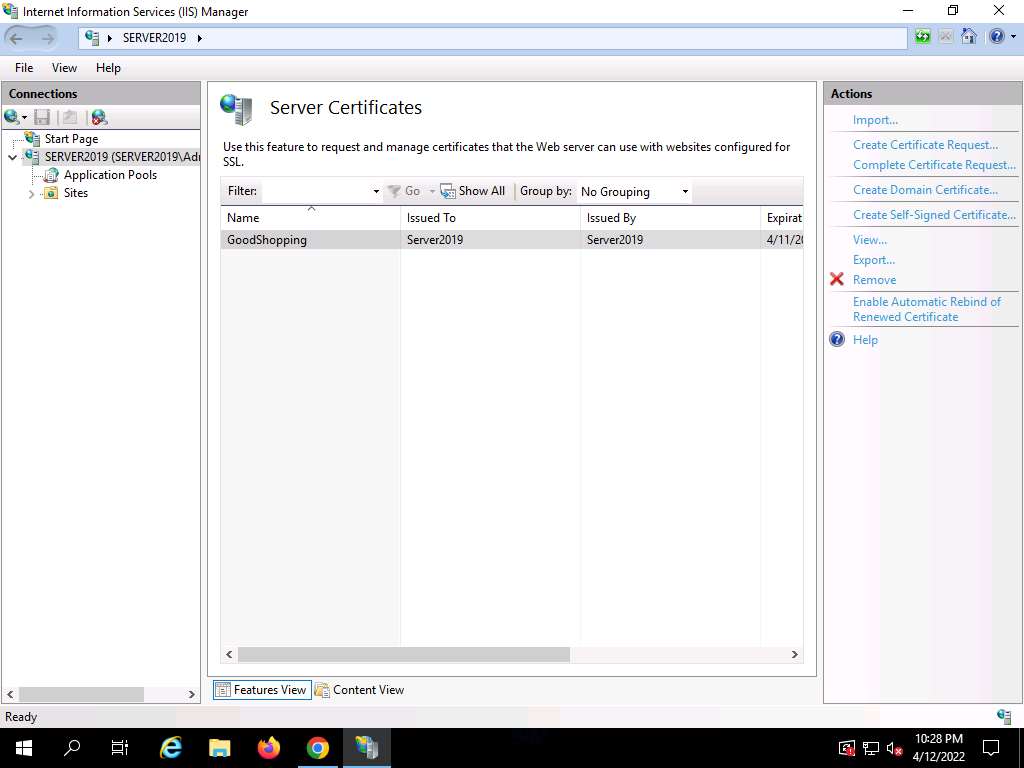
Screenshot A newly created self-signed certificate will be displayed in the Server Certificates pane, as shown in the screenshot.
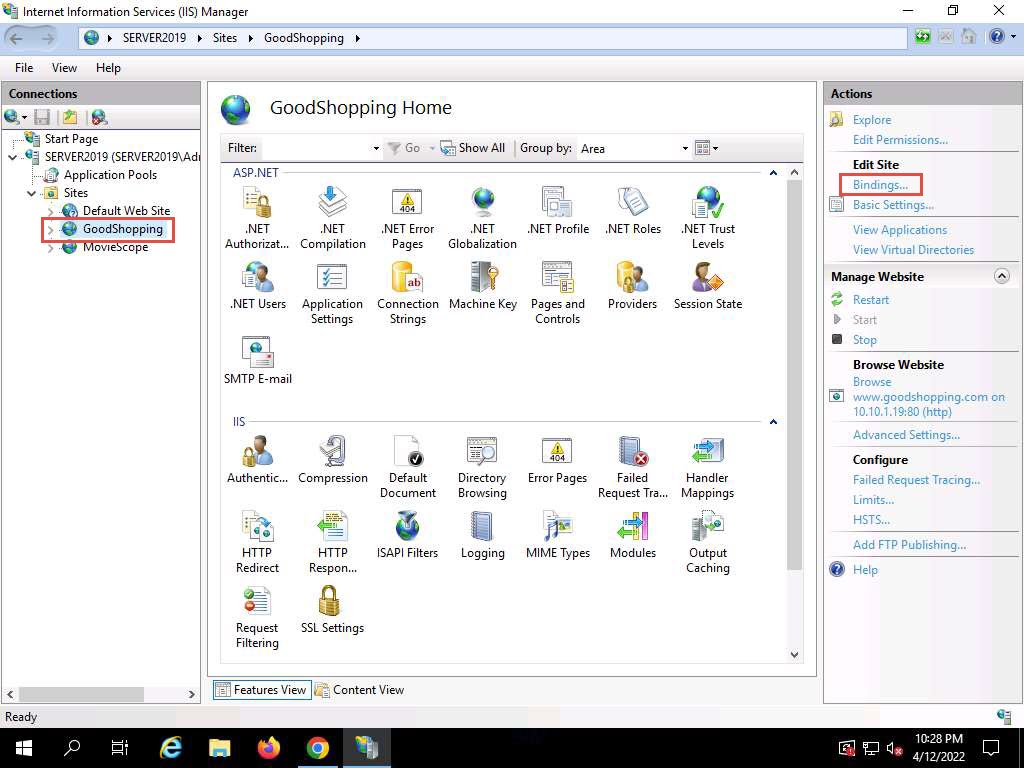
Screenshot Expand the Sites node from the left-hand pane, and select GoodShopping from the available sites. Click Bindings… from the right-hand pane in the Actions section.
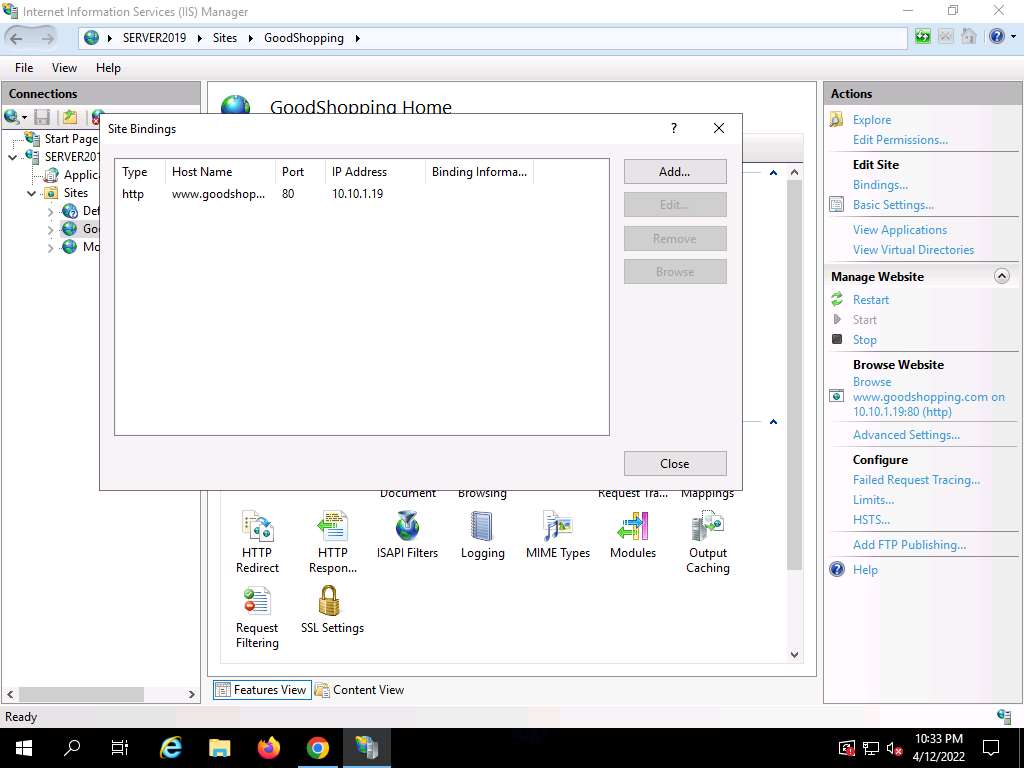
44.jpg The Site Bindings window appears; click Add….
Screenshot The Add Site Binding window appears; choose https from the Type field drop-down list. Once you choose the https type, the port number in the Port field automatically changes to 443 (the channel on which HTTPS runs).
Choose the IP address on which the site is hosted (here, 10.10.1.19).
Under the Host name field, type www.goodshopping.com. Under the SSL certificate field, select GoodShopping from the drop-down list, and click OK.
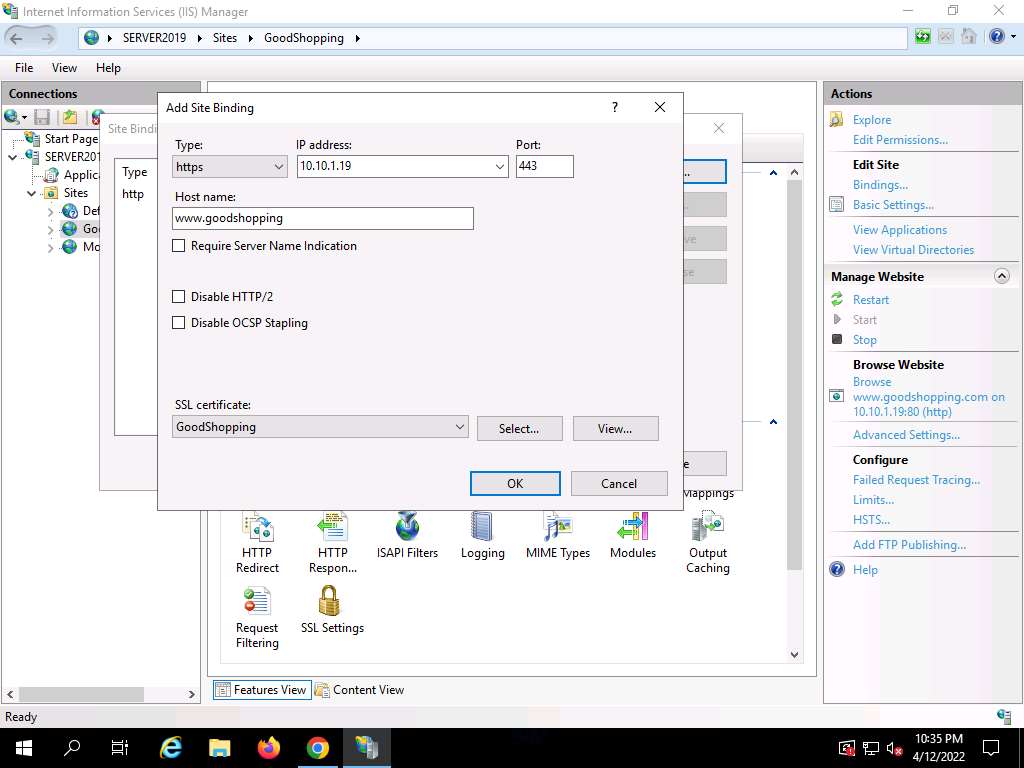
Screenshot The newly created SSL certificate is added to the Site Bindings window; then, click Close.
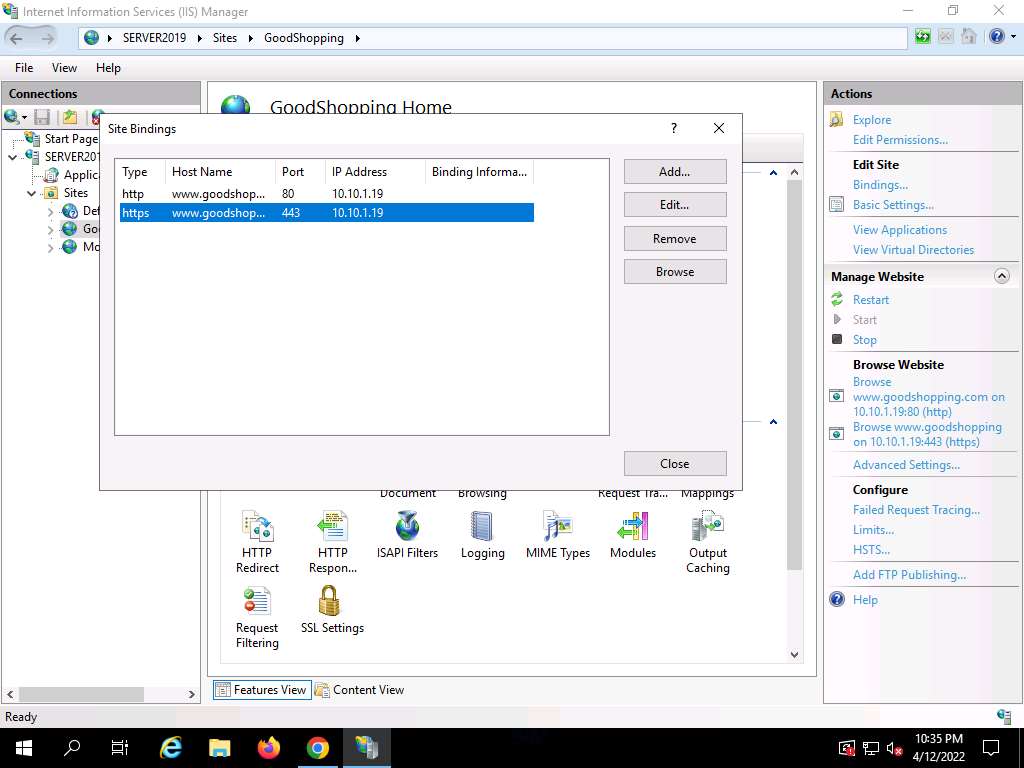
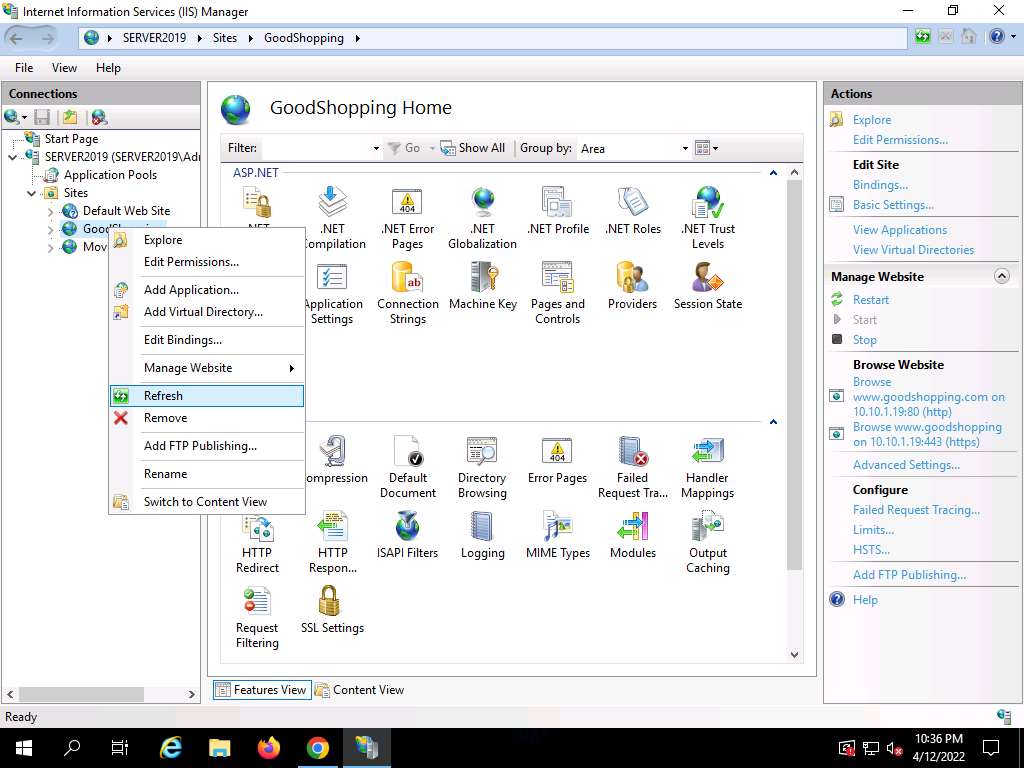
Screenshot Now, right-click the name of the site for which you have created the self-signed certificate (here, GoodShopping) and click Refresh from the context menu.
Screenshot Minimize the Internet Information Services (IIS) Manager window.
Open the Google Chrome browser place the cursor in the address bar and type https://www.goodshopping.com, and press Enter.
The Your connection is not private message appears, click ADVANCED to proceed.
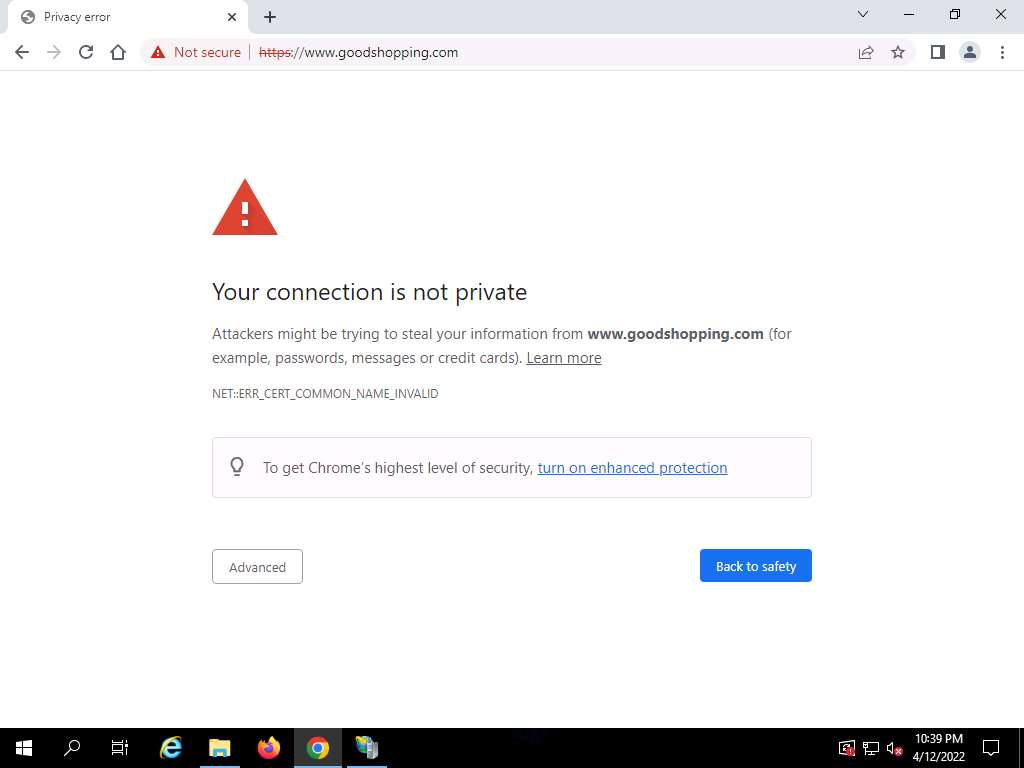
Screenshot Click Proceed to www.goodshopping.com (unsafe).
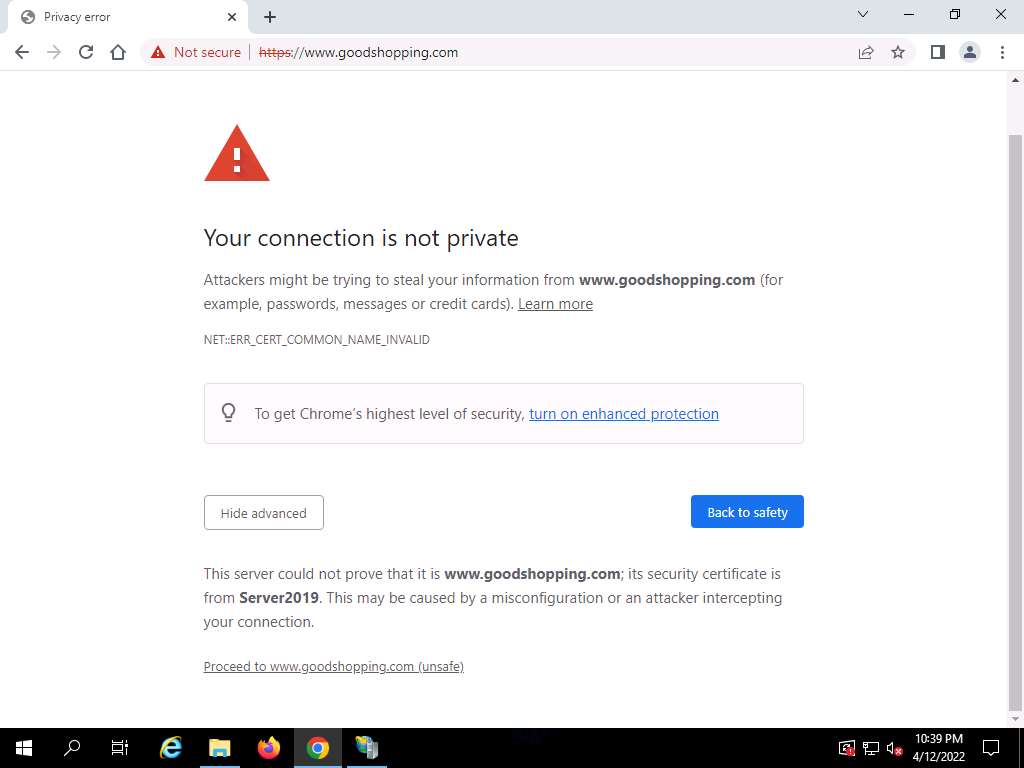
Screenshot Now you can see Goodshopping webpage with ssl certificate assigned to it, as shown in the screenshot.

Screenshot This concludes the demonstration of creating and using a self-signed certificate.
Lab 3: Perform Email Encryption
Overview of Email Encryption
Email encryption hides the email content from eavesdroppers by encrypting it into an unreadable form. Emails can be encrypted and decrypted by means of a digital signature mechanism that uses public and private keys: the public key is shared, while the private key is kept private.
There are numerous methods that can be employed for email encryption, including:
Digital Signature: Uses asymmetric cryptography to simulate the security properties of a signature in digital, rather than written form
Secure Sockets Layer (SSL): Uses RSA asymmetric (public key) encryption to encrypt data transferred over SSL connections
Transport Layer Security (TLS): Uses a symmetric key for bulk encryption, an asymmetric key for authentication and key exchange, and message authentication codes for message integrity
Pretty Good Privacy (PGP): Used to encrypt and decrypt data that provides authentication and cryptographic privacy
GNU Privacy Guard (GPG): Software replacement of PGP and free implementation of the OpenPGP standard that is used to encrypt and decrypt data
Task 1: Perform Email Encryption using RMail
RMail is an email security tool that provides open tracking, proof of delivery, email encryption, electronic signatures, large file transfer functionality, etc. RMail works seamlessly with users’ existing email platforms, including Microsoft Outlook and Gmail, amongst others. Using this tool, you can encrypt sensitive emails and attachments for security or legal compliance.
You can also use other email encryption tools such as
Virtru (https://www.virtru.com)
ZixMail (https://www.zixcorp.com)
Egress Secure Email and File Transfer (https://www.egress.com)
Proofpoint Email Protection (https://www.proofpoint.com)
Lab 4: Perform Disk Encryption
Overview of Disk Encryption
Disk encryption is useful when the user needs to send sensitive information through email. In addition, disk encryption can prevent the real-time exchange of information from threats. When users exchange encrypted information, it minimizes the chances of compromising the data; the only way an attacker could access the information is by decrypting the message. Furthermore, encryption software installed on a user’s system ensures the security of the system. Install encryption software on any systems that hold valuable information or on those exposed to unlimited data transfer.
Task 1: Perform Disk Encryption using VeraCrypt
VeraCrypt is a software used for establishing and maintaining an on-the-fly-encrypted volume (data storage device). On-the-fly encryption means that data is automatically encrypted just before it is saved, and decrypted just after it is loaded, without any user intervention. No data stored on an encrypted volume can be read (decrypted) without using the correct password/keyfile(s) or correct encryption keys. The entire file system is encrypted (e.g., file names, folder names, free space, metadata, etc.).
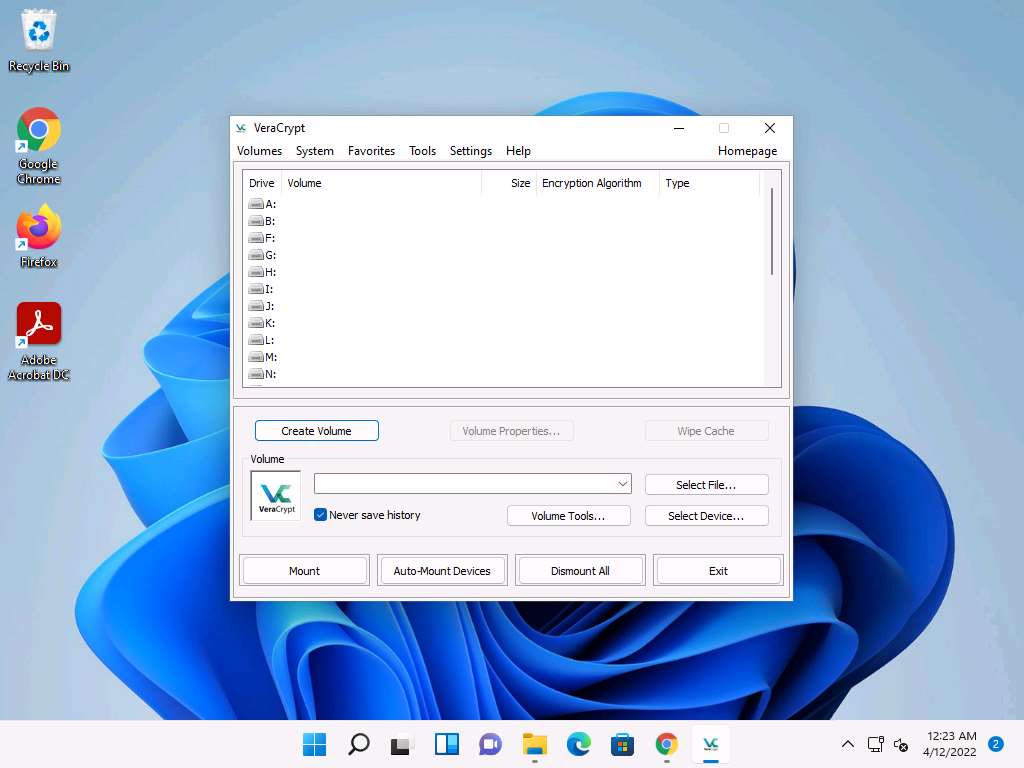
The VeraCrypt main window appears; click the Create Volume button.
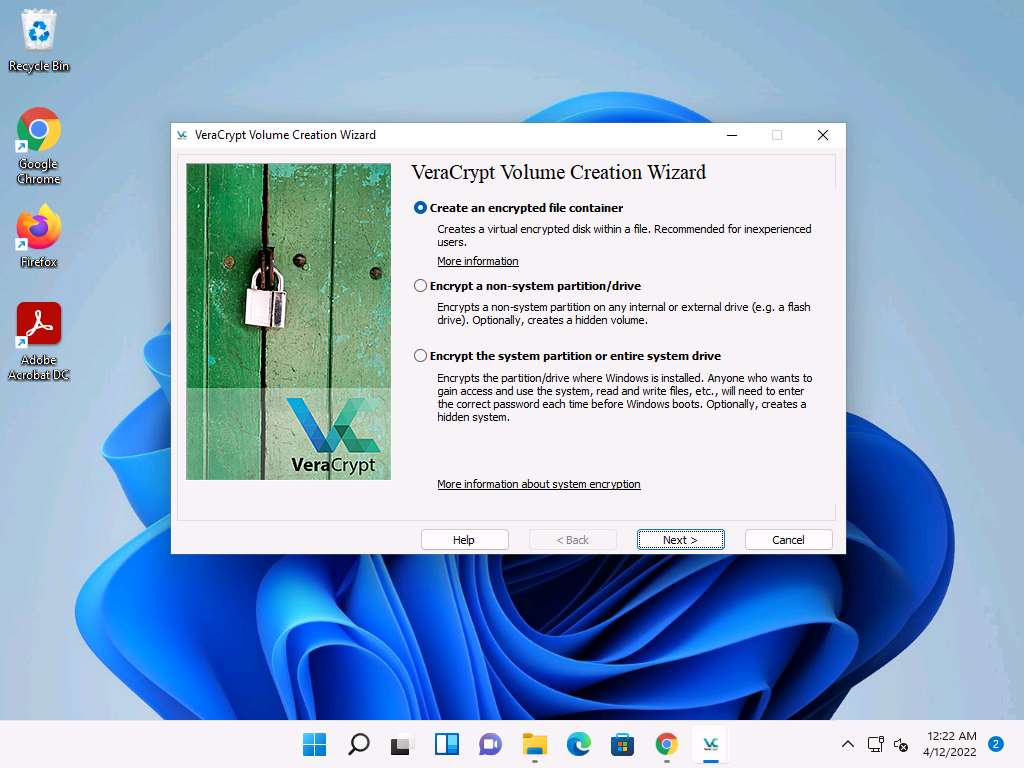
Screenshot The VeraCrypt Volume Creation Wizard window appears. Ensure that the Create an encrypted file container radio-button is selected and click Next to proceed.
Screenshot In the Volume Type wizard, keep the default settings and click Next.
In the Volume Location wizard, click Select File….
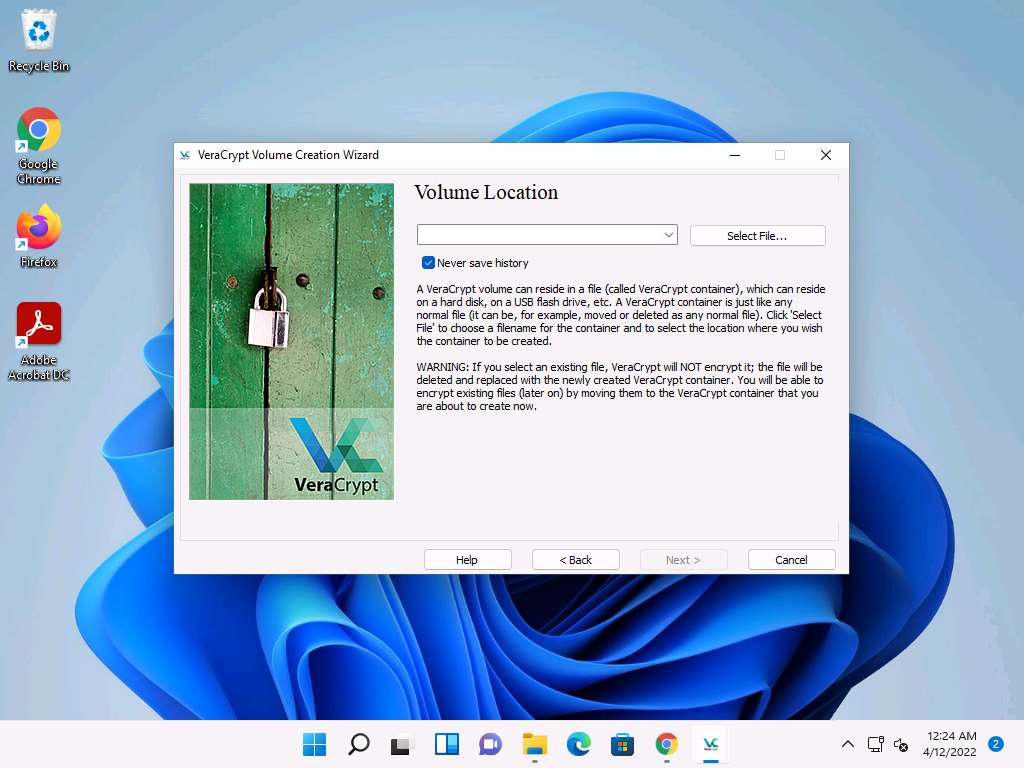
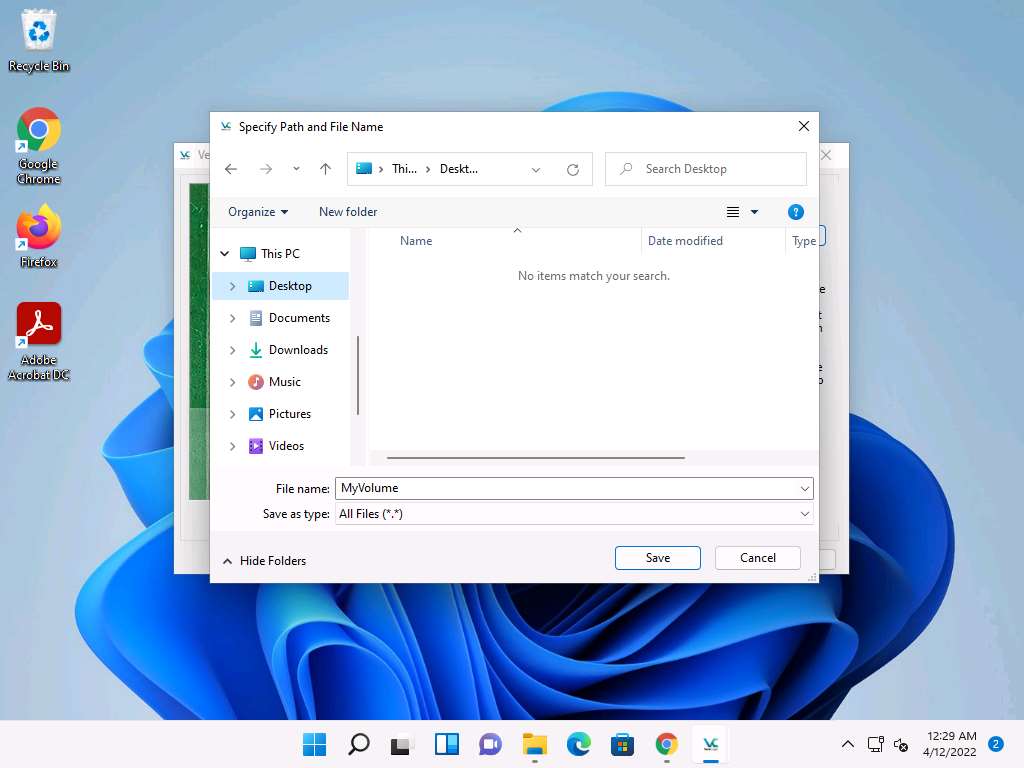
Screenshot The Specify Path and File Name window appears; navigate to the desired location (here, Desktop), provide the File name as MyVolume, and click Save.
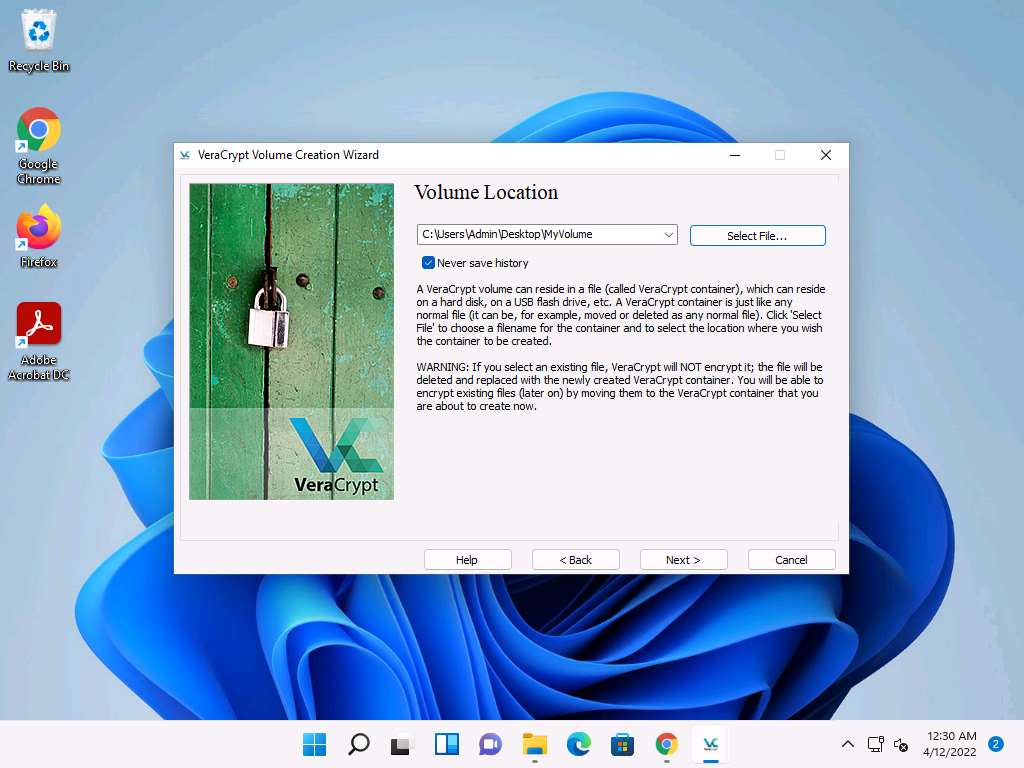
Screenshot After saving the file, the location of a file containing the VeraCrypt volume appears under the Volume Location field; then, click Next.
Screenshot In the Encryption Options wizard, keep the default settings and click Next.
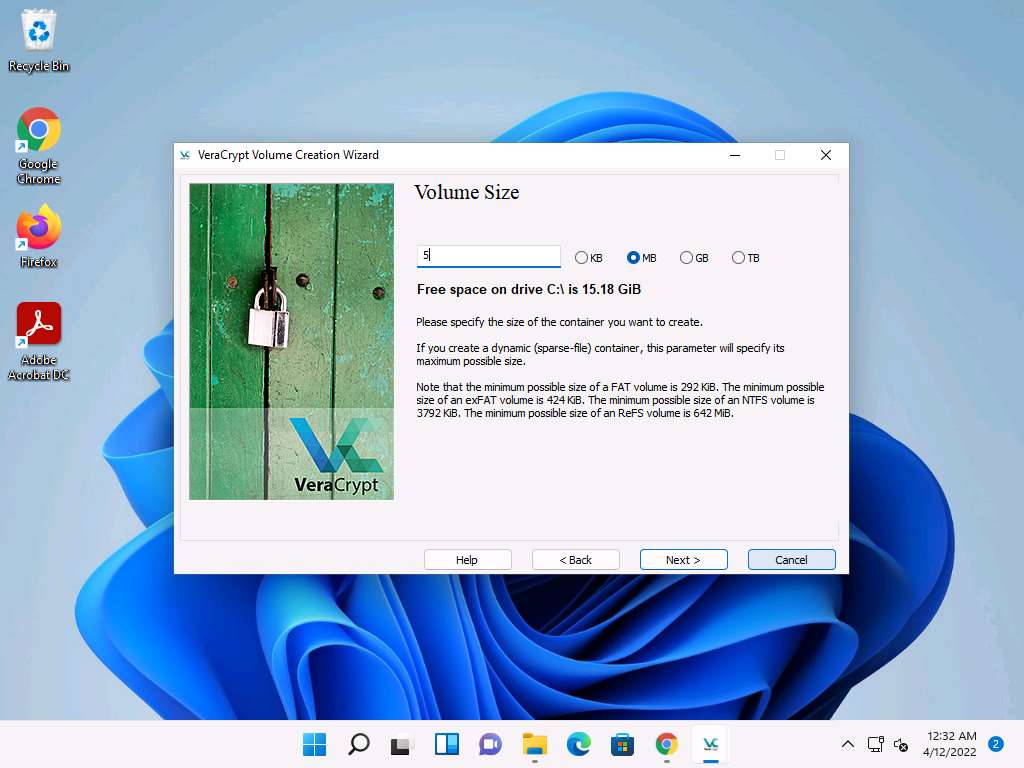
In the Volume Size wizard, ensure that the MB radio-button is selected and specify the size of the VeraCrypt container as 5; then, click Next.
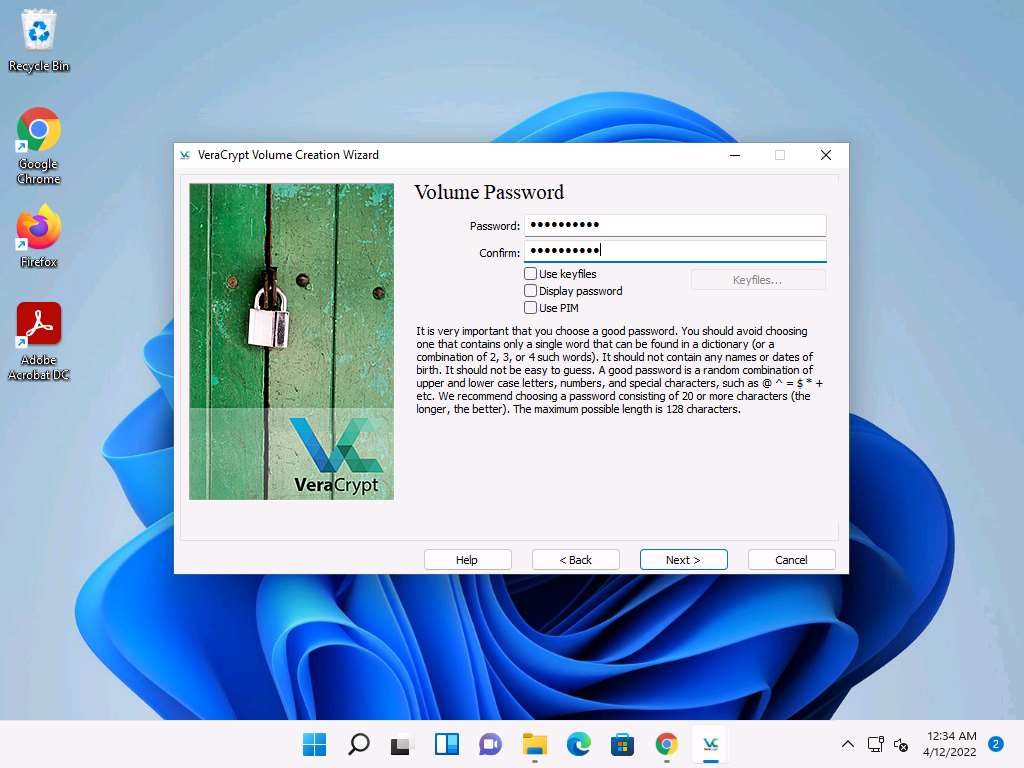
Screenshot The Volume Password wizard appears; provide a strong password in the Password field, retype in the Confirm field, and click Next. The password provided in this lab is qwerty@123.
Screenshot A VeraCrypt Volume Creation Wizard warning pop-up appears; then, click Yes.
The Volume Format wizard appears; ensure that FAT is selected in the Filesystem option and Default is selected in Cluster option.
Check the checkbox under the Random Pool, Header Key, and Master Key section.
Move your mouse as randomly as possible within the Volume Creation Wizard window for at least 30 seconds and click the Format button.
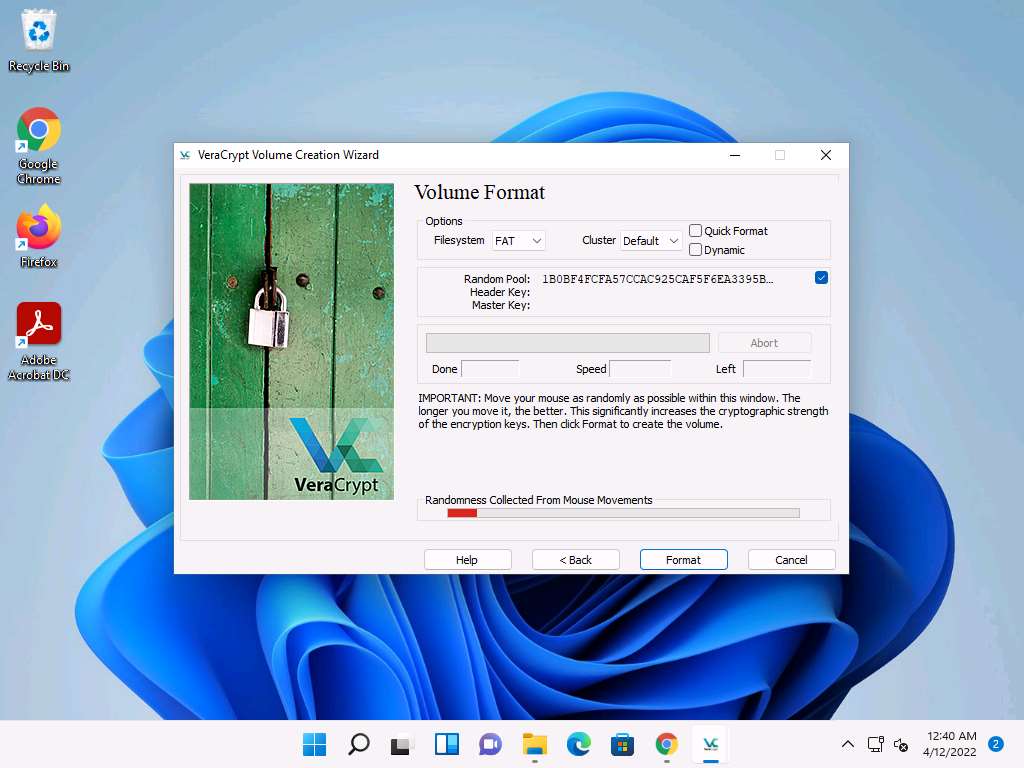
Screenshot After clicking Format, VeraCrypt will create a file called MyVolume in the provided folder. This file depends on the VeraCrypt container (it will contain the encrypted VeraCrypt volume).
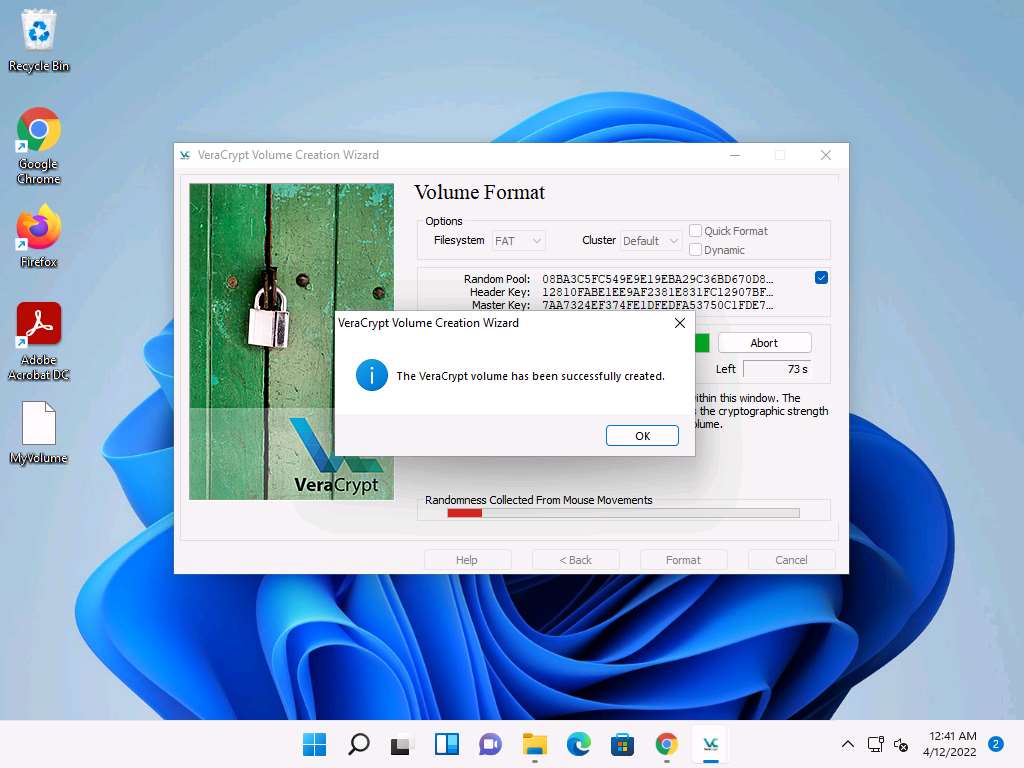
Depending on the size of the volume, volume creation may take some time.
Once the volume is created, a VeraCrypt Volume Creation Wizard dialog-box appears; click OK.
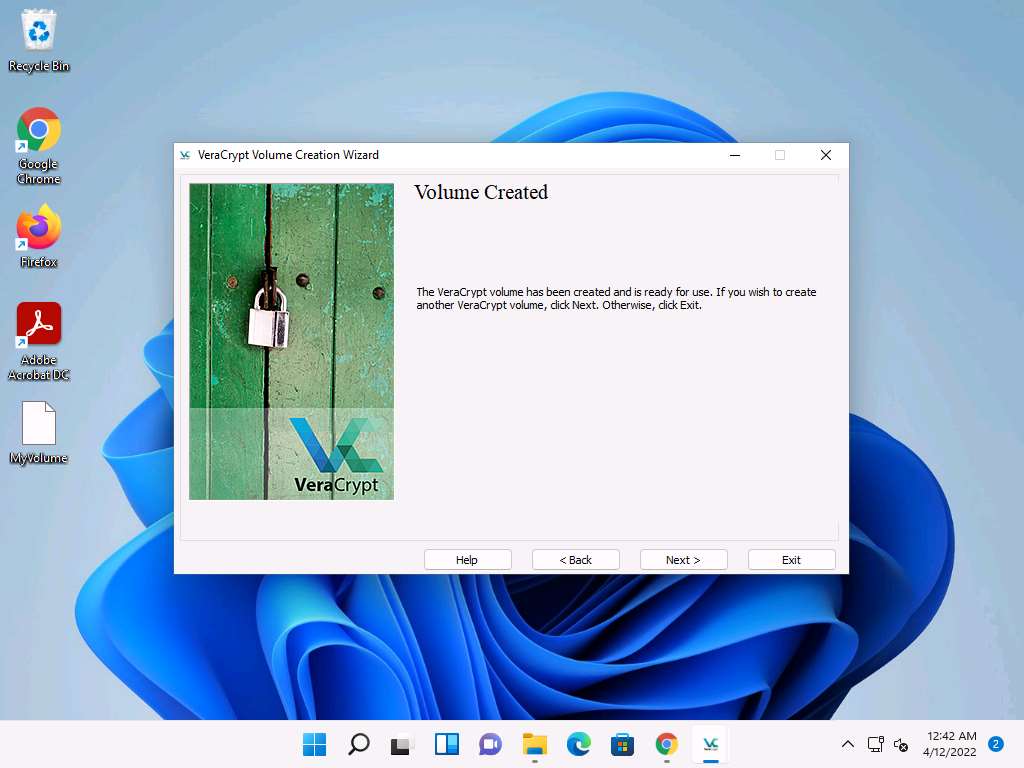
Screenshot In the VeraCrypt Volume Creation Wizard window, a Volume Created message appears; then, click Exit.
Screenshot The VeraCrypt main window appears; select a drive (here, I:) and click Select File….
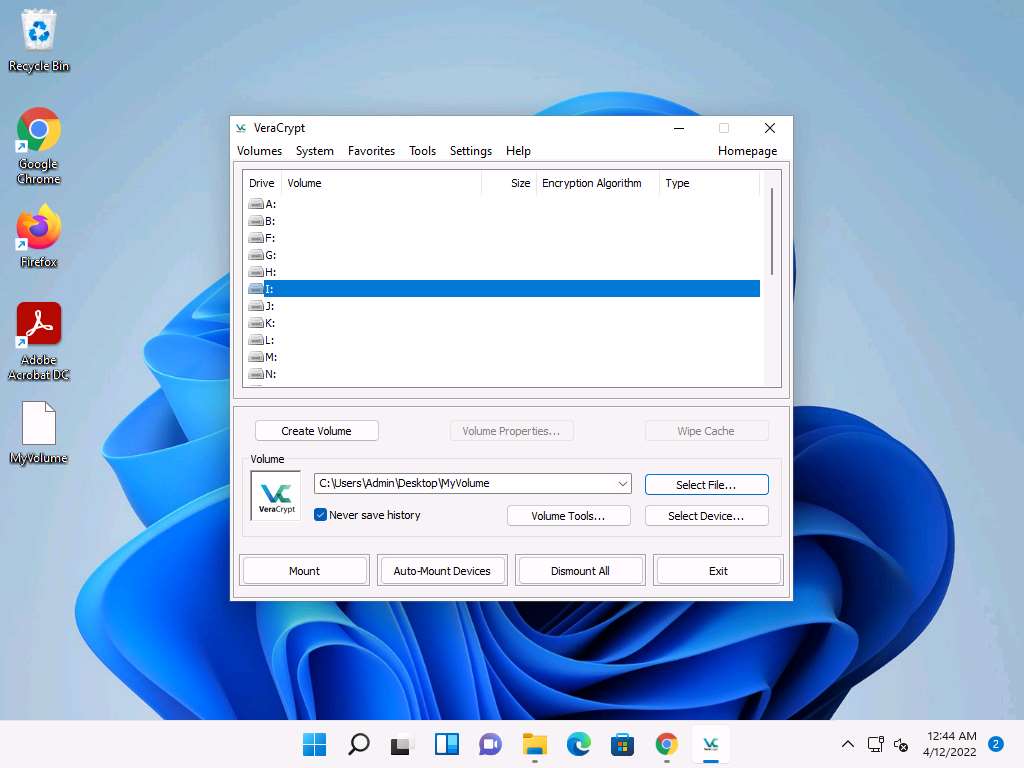
Screenshot The Select a VeraCrypt Volume window appears; navigate to Desktop, click MyVolume, and click Open.
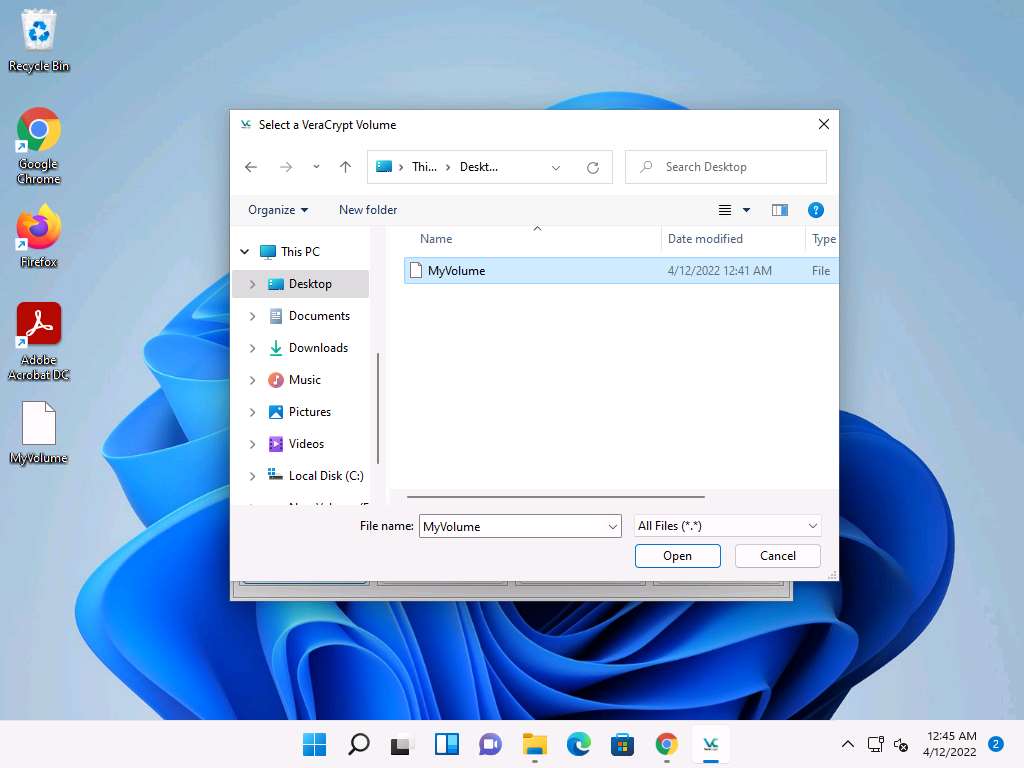
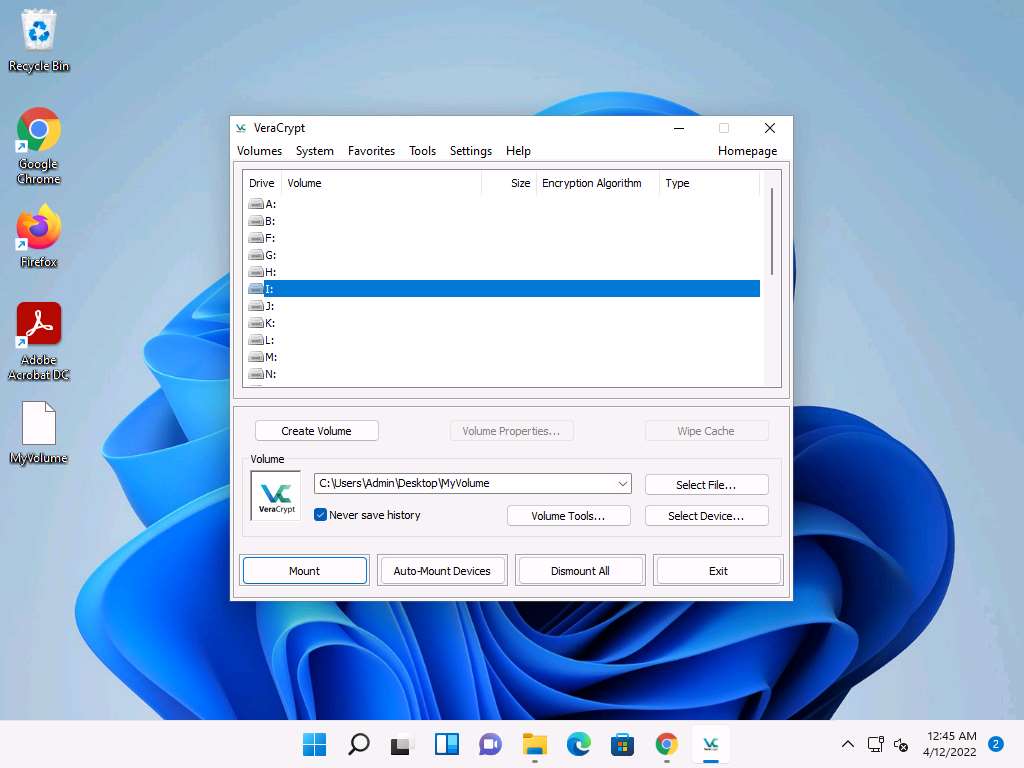
Screenshot The window closes, and the VeraCrypt window appears displaying the location of selected volume under the Volume field; then, click Mount.
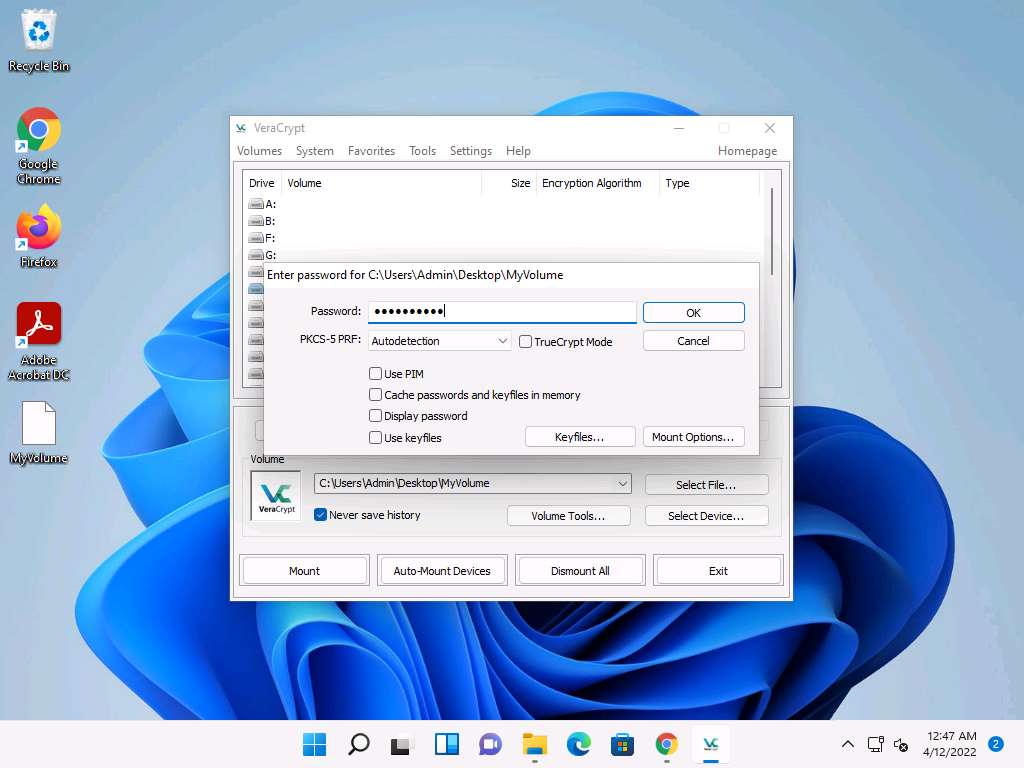
Screenshot The Enter password dialog-box appears; type the password you specified in Step#11 into the Password field and click OK.
The password specified in this task is qwerty@123.
Screenshot After the password is verified, VeraCrypt will mount the volume in I: drive, as shown in the screenshot:
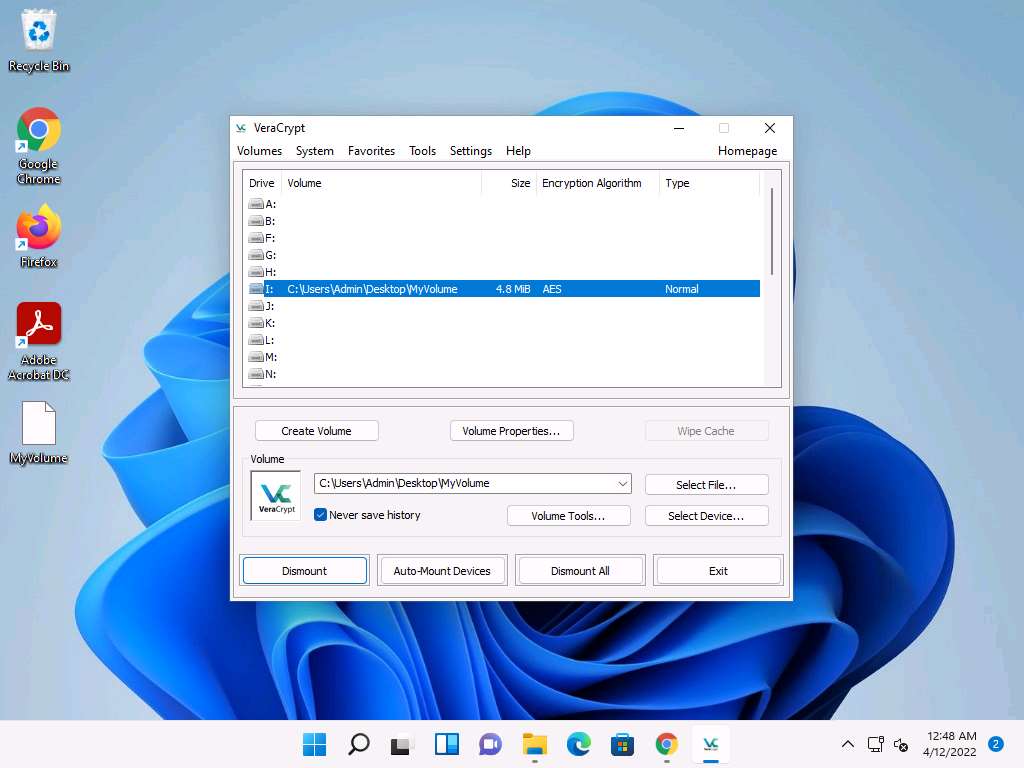
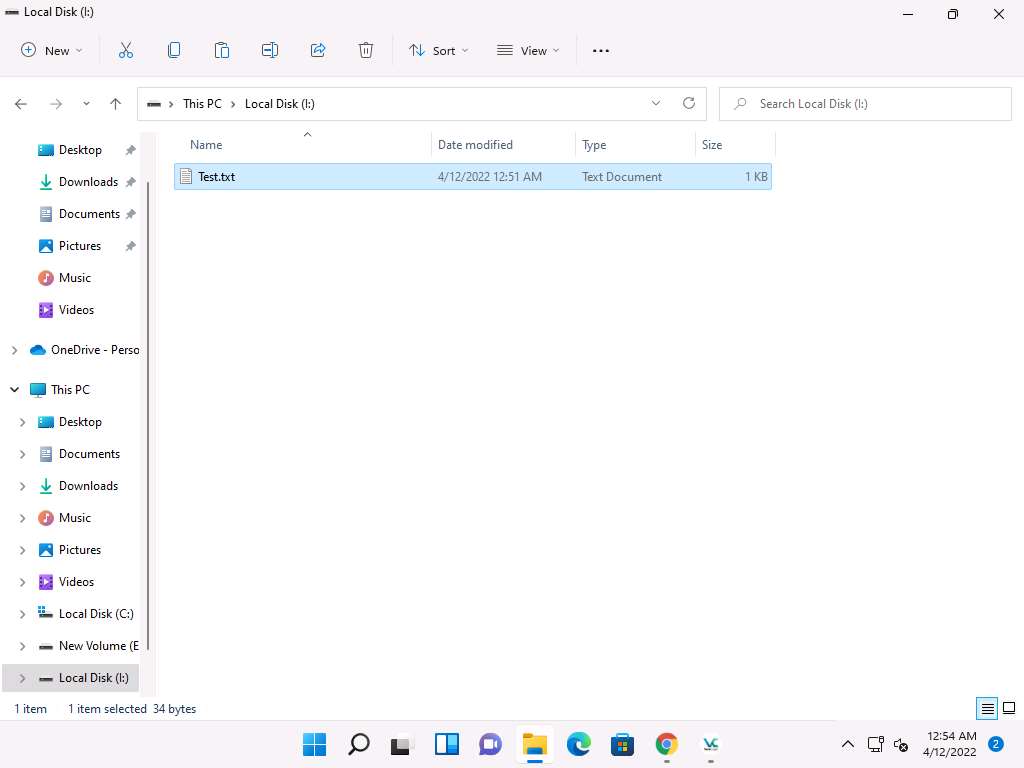
Screenshot MyVolume has successfully mounted the container as a virtual disk (I:). The virtual disk is entirely encrypted (including file names, allocation tables, free space, etc.) and behaves similarly to a real disk. You can copy or move files to this virtual disk to encrypt them.
Create a text file on Desktop and name it Test. Open the text file and insert text.
Click File in the menu bar and click Save.
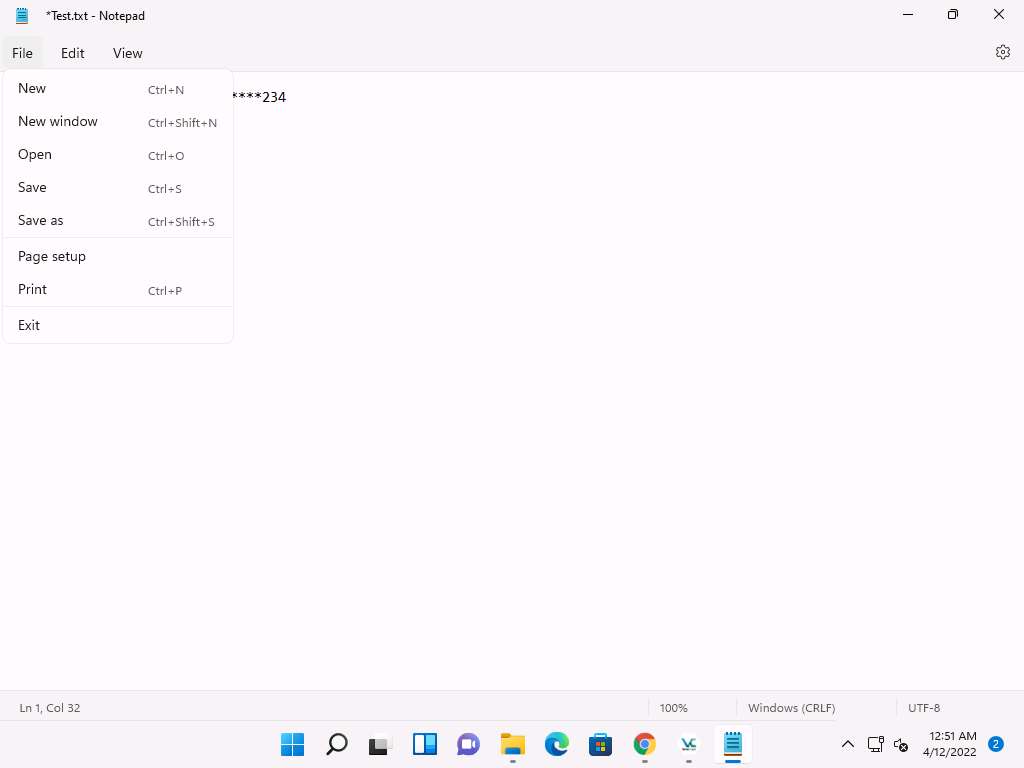
Screenshot Copy the file from Desktop and paste it into Local Disk (I:). Close the window.
Screenshot Switch to the VeraCrypt window, click Dismount, and then click Exit.
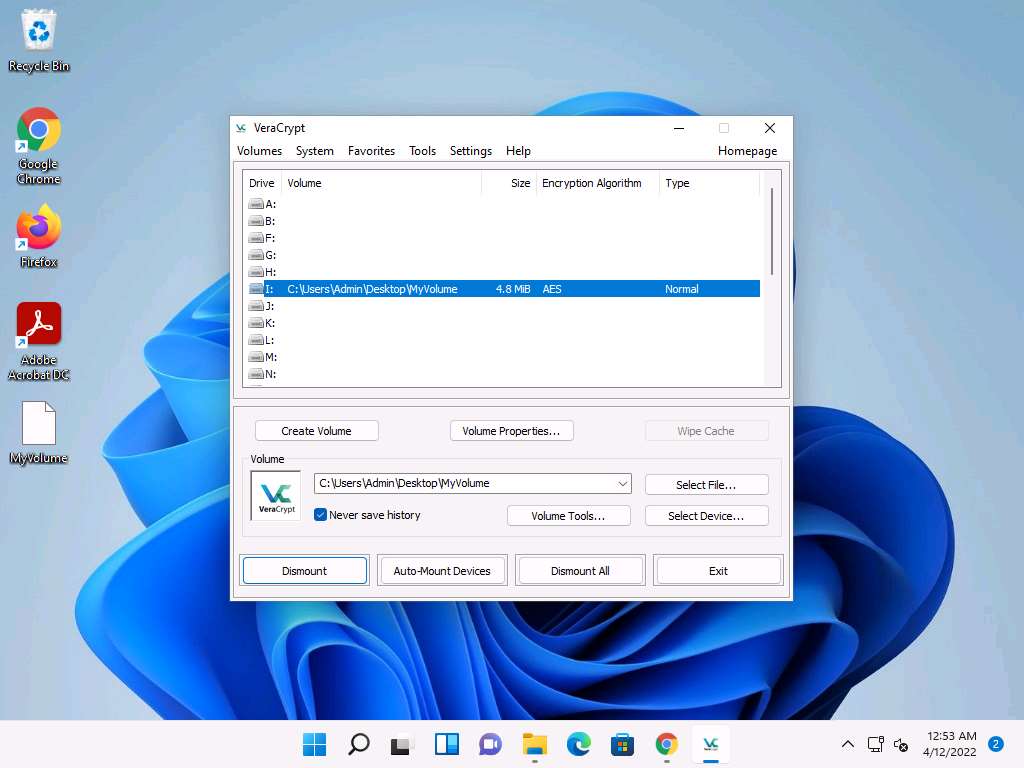
Screenshot The I: drive located in This PC disappears.
This lab is used to demonstrate that, in cases of system hacks, if an attacker manages to gain remote access or complete access to the machine, he/she will not be able to find the encrypted volume—including its files—unless he/she is able to obtain the password. Thus, all sensitive information located on the encrypted volume is safeguarded.
This concludes the demonstration of performing disk encryption using VeraCrypt.
Close all open windows and document all the acquired information.
Task 2: Perform Disk Encryption using BitLocker Drive Encryption
BitLocker provides offline-data and OS protection for your computer, and helps to ensure that data stored on a computer that is running Windows® is not revealed if the computer is tampered with when the installed OS is offline. BitLocker uses a microchip that is called a Trusted Platform Module (TPM) to provide enhanced protection for your data and to preserve early boot-component integrity. The TPM can help protect your data from theft or unauthorized viewing by encrypting the entire Windows volumes.
Task 3: Perform Disk Encryption using Rohos Disk Encryption
Rohos Disk Encryption creates hidden and password-protected partitions on a computer or USB flash drive, and password protects/locks access to your Internet applications. It uses a NIST-approved AES encryption algorithm with a 256-bit encryption key length. Encryption is automatic and on-the-fly.
You can also use other disk encryption tools such as
FinalCrypt (http://www.finalcrypt.org)
Seqrite Encryption Manager (https://www.seqrite.com)
FileVault (https://support.apple.com)
Gillsoft Full Disk Encryption (http://www.gilisoft.com)
Lab 5: Perform Cryptanalysis using Various Cryptanalysis Tools
Overview of Cryptanalysis
Cryptanalysis can be performed using various methods, including the following:
Linear Cryptanalysis: A known plaintext attack that uses a linear approximation to describe the behavior of the block cipher
Differential Cryptanalysis: The examination of differences in an input and how this affects the resultant difference in the output
Integral Cryptanalysis: This attack is useful against block ciphers based on substitution-permutation networks and is an extension of differential cryptanalysis
Task 1: Perform Cryptanalysis using CrypTool
CrypTool is a freeware program that enables you to apply and analyze cryptographic mechanisms, and has the typical look and feel of a modern Windows application. CrypTool includes a multitude of state-of-the-art cryptographic functions and allows you to both learn and use cryptography within the same environment. CrypTool is a free, open-source e-learning application used in the implementation and analysis of cryptographic algorithms.
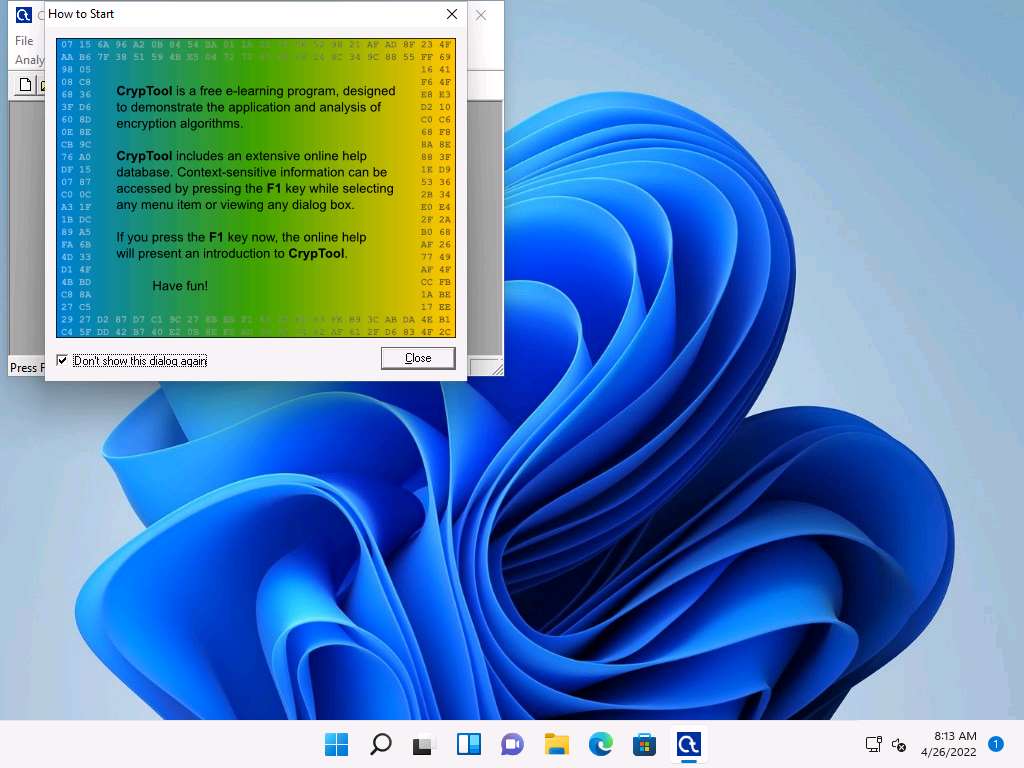
The CrypTool main window appears with a How to Start window. Check the Don’t show this dialog again checkbox and click Close.
Screenshot The CrypTool window appears; close the startingexample-en.txt window.
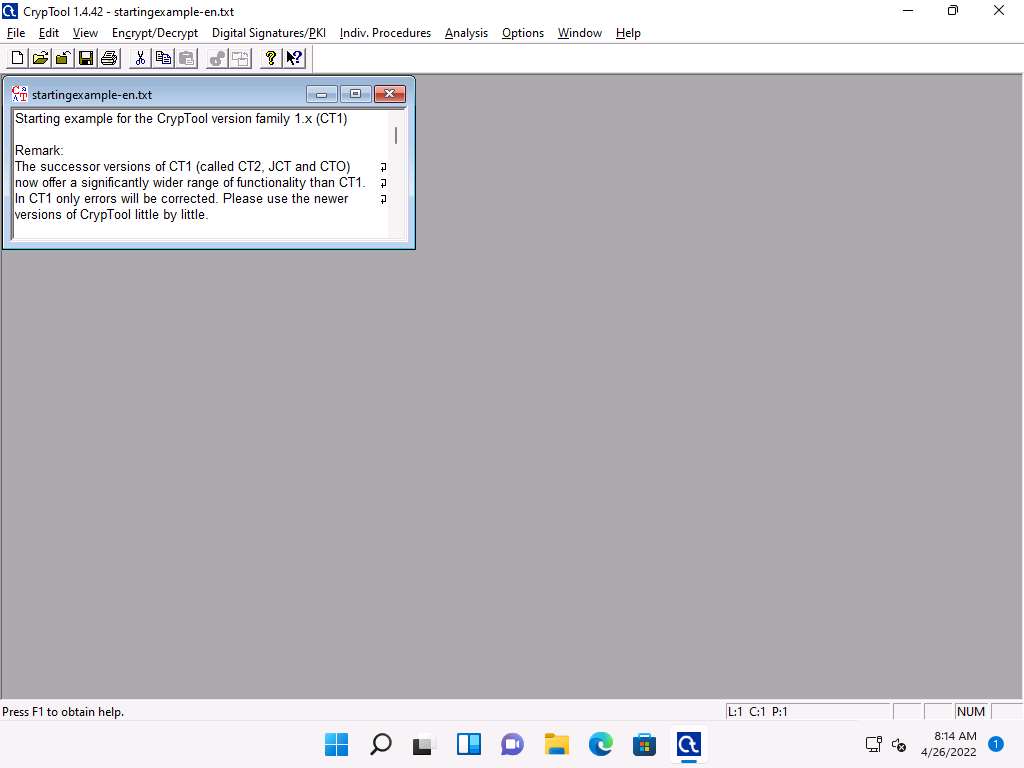
Screenshot Click the File option from the menu bar and select New to create encrypted data.
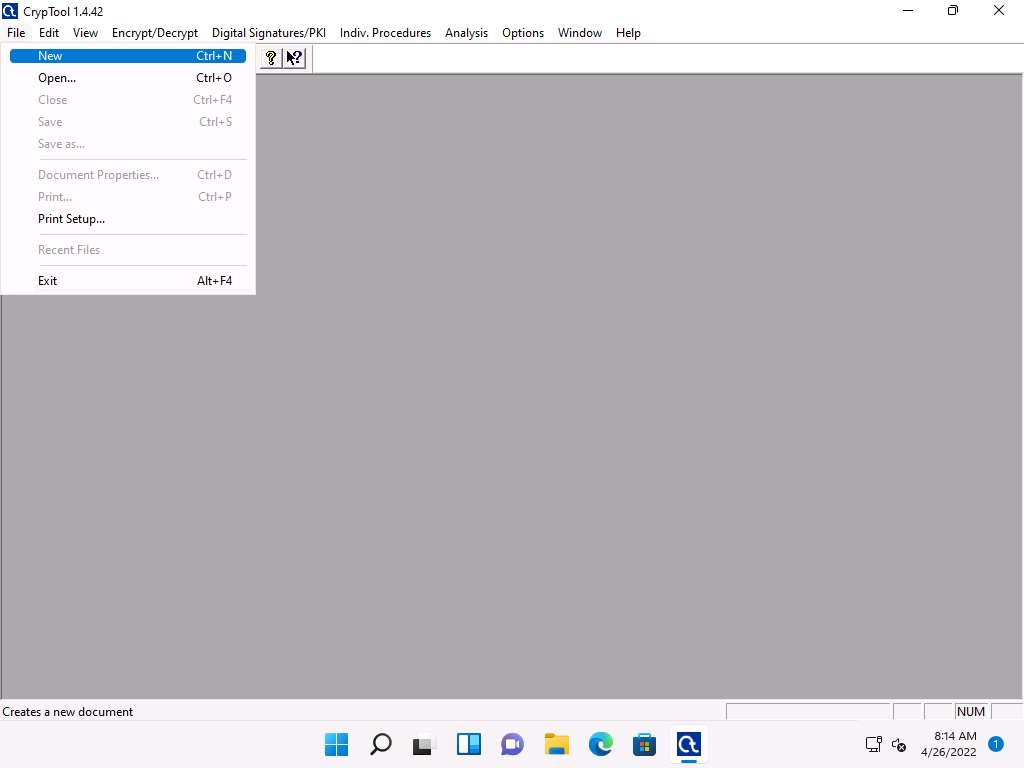
Screenshot The Unnamed1 notepad appears; insert some text into the file. You will be encrypting this content.
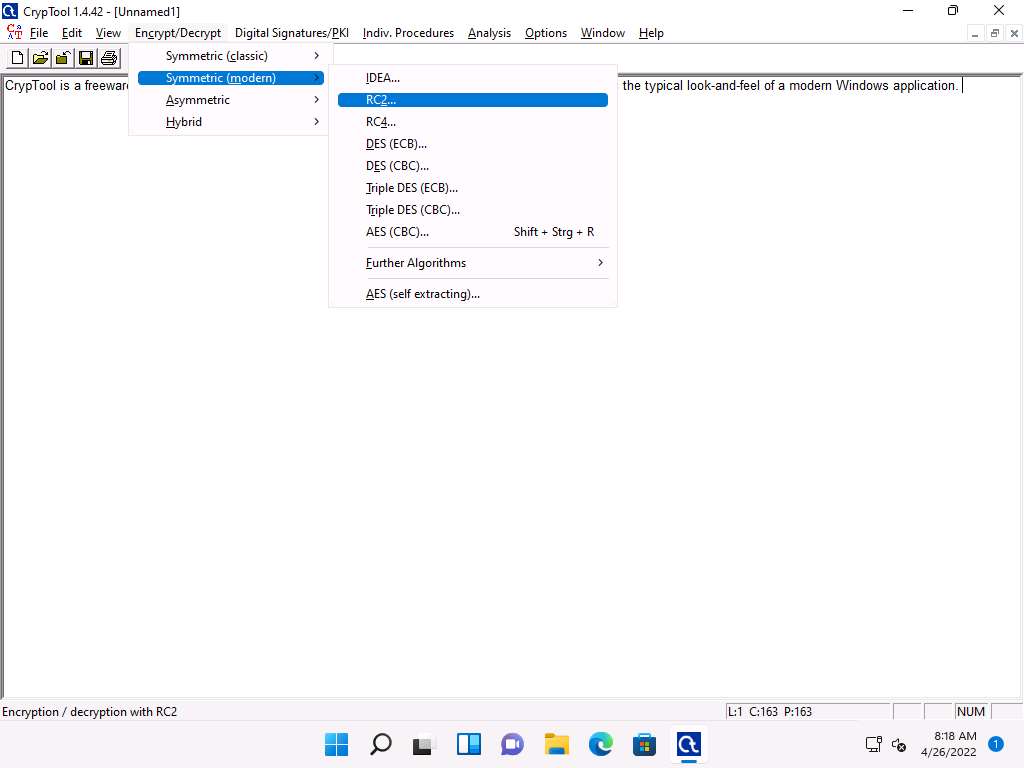
From the menu bar, click Encrypt/Decrypt and navigate to Symmetric (modern) --> RC2….
RC2 is a symmetric-key block cipher. It is a 64-bit block cipher with variable key size and uses 18 rounds.
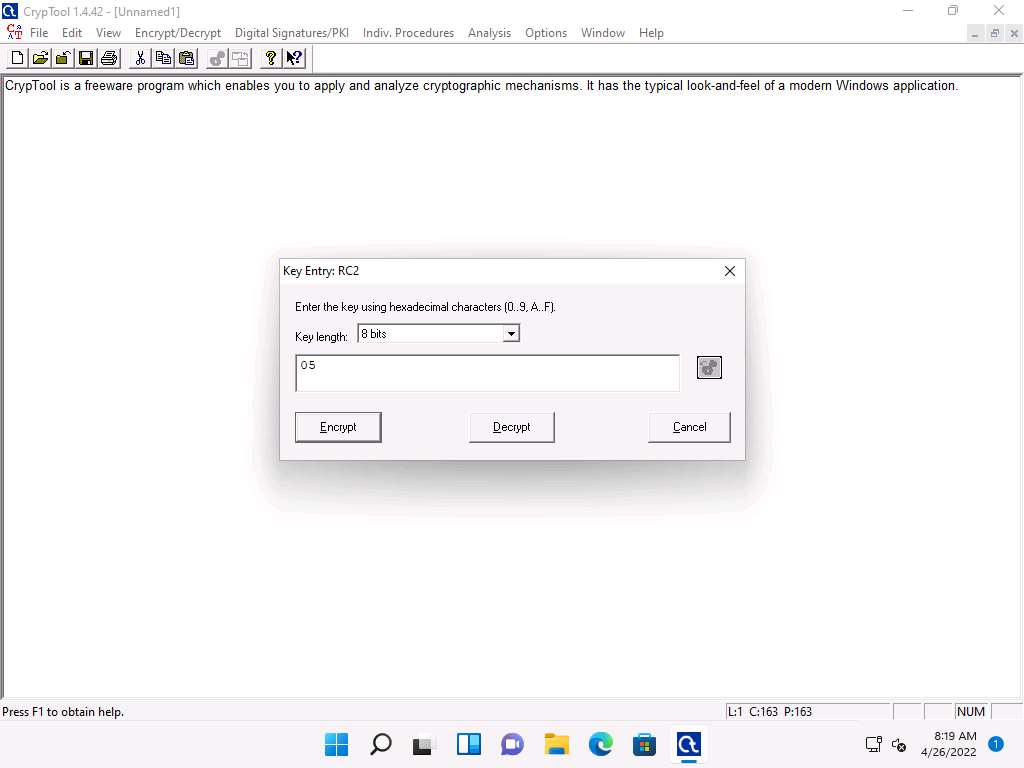
Screenshot The Key Entry: RC2 dialog box appears; keep the Key length set to default (8 bits).
In the text field below Key length, enter 05 as hexadecimal characters, and click Encrypt.
The chosen hexadecimal character acts as a key that you must send to the intended user along with the encrypted file.
Screenshot The RC encryption of Unnamed1 notepad file appears, as shown in the screenshot.
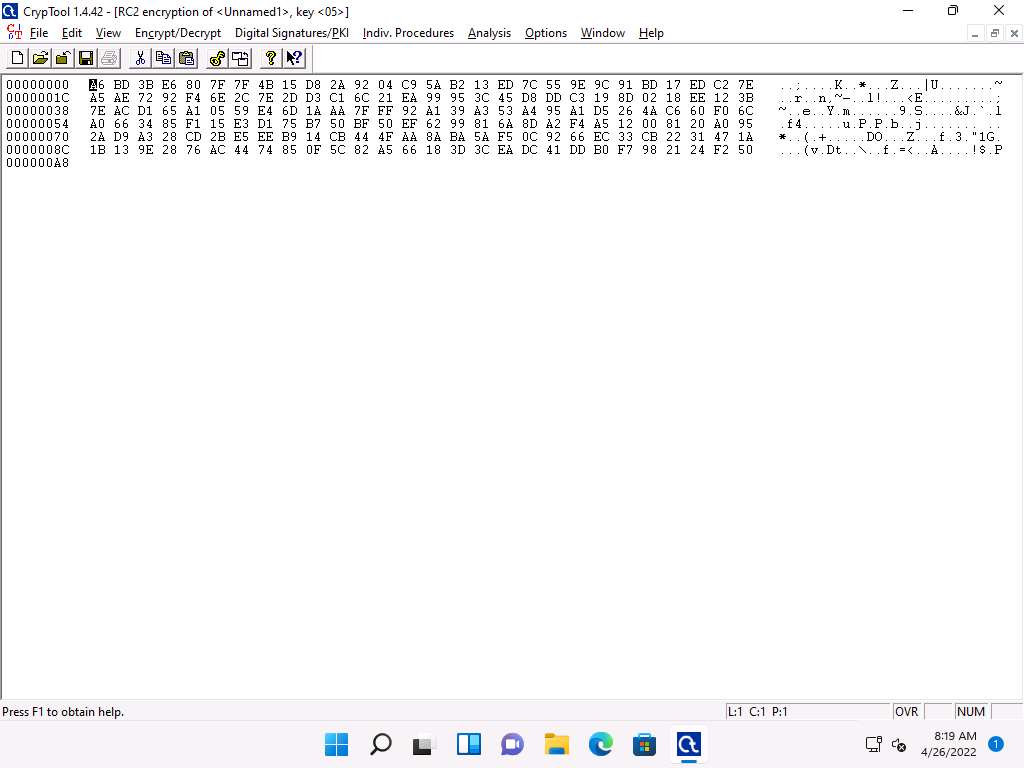
Screenshot To save, click File in the menu bar and select Save.
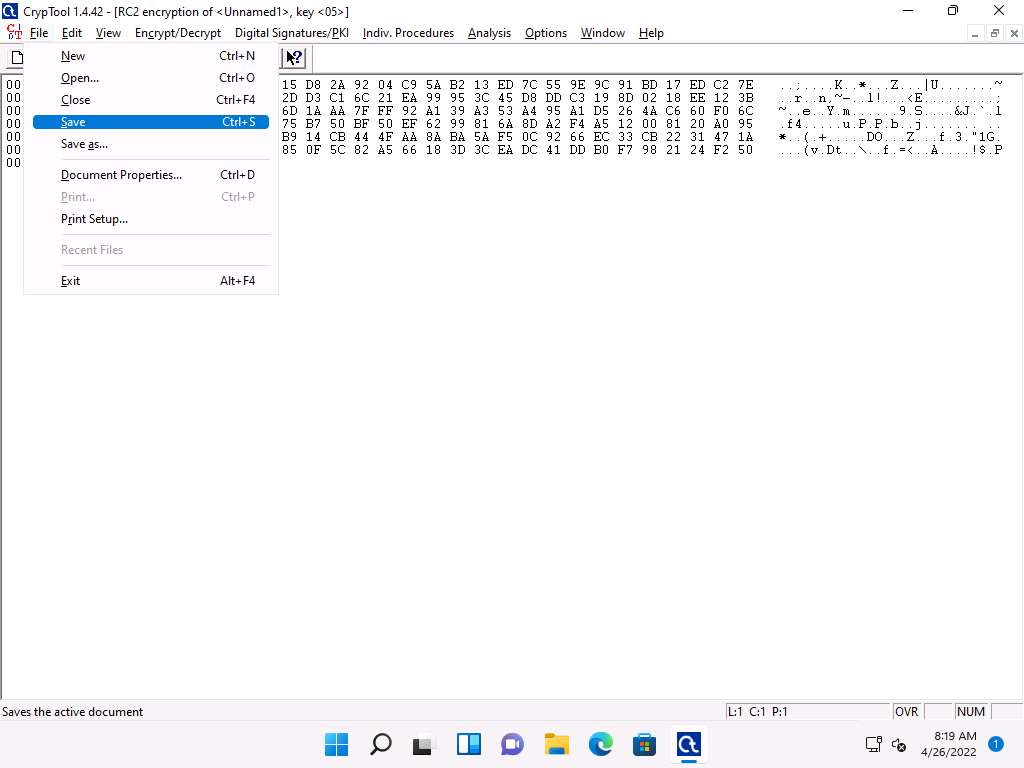
Screenshot The Save As window appears; choose the save location (here, Desktop) and click Save.
The file name may differ when you perform the task.
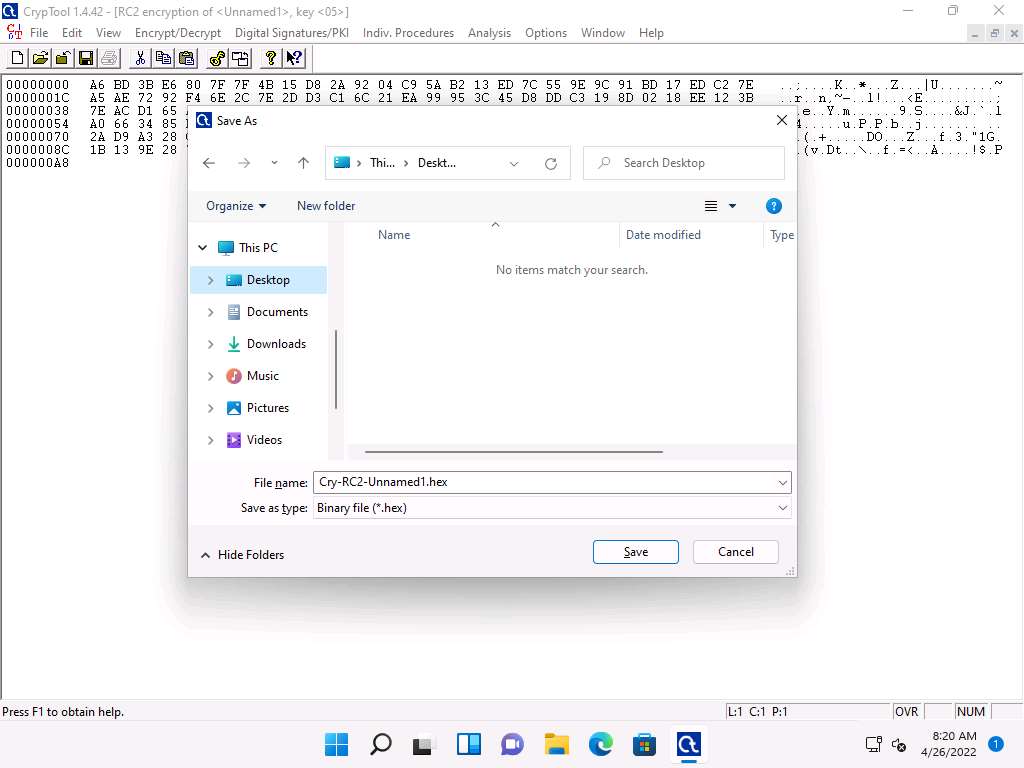
Screenshot Now, you can send this file to the intended person by email or any other means and provide him/her with the hex value, which will be used to decrypt the file.
To share the file, you may copy the encrypted file (Cry-RC2-Unnamed1.hex) from Desktop to E:\CEH-Tools\CEHv12 Module 20 Cryptography\Cryptanalysis Tools\CrypTool.
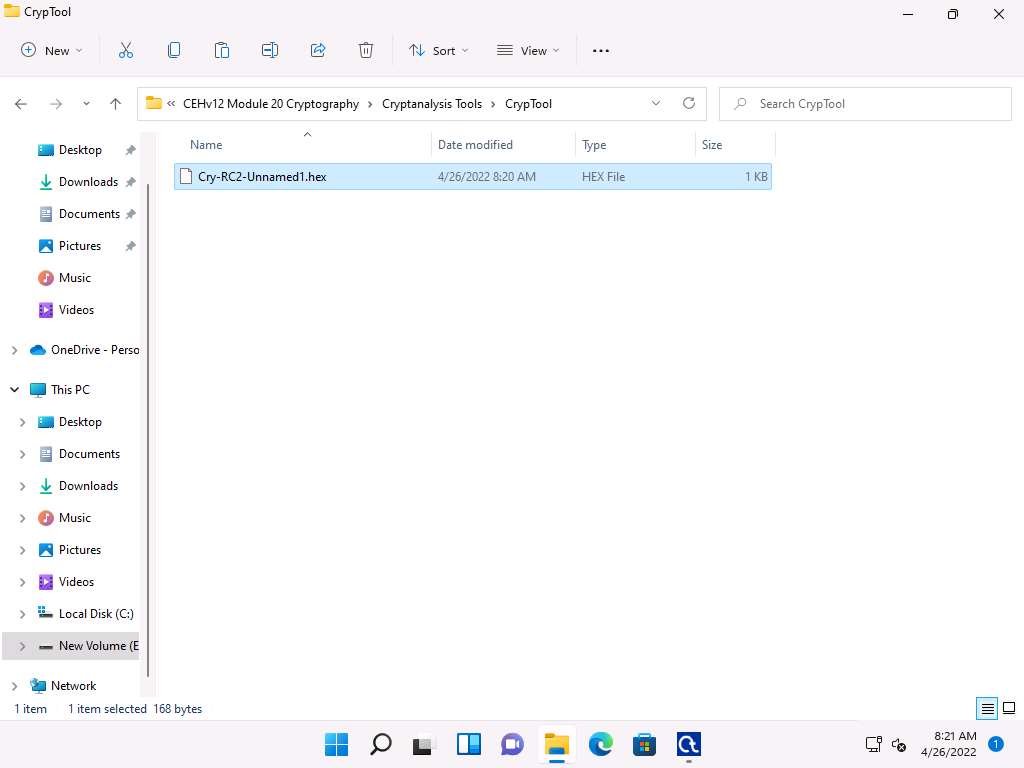
Screenshot Assume that you are the intended recipient (working on Windows Server 2019) of the encrypted file through the shared network drive and the key to open the encrypted data was sent to you via an email. Using this, you can decrypt the encrypted data and see the data in plain-text.
Click on Windows Server 2019 to switch to the Windows Server 2019, click Ctrl+Alt+Delete to activate the machine. By default, Administrator profile is selected, type * Pa$$w0rd* to enter password in the password field and press Enter to login.
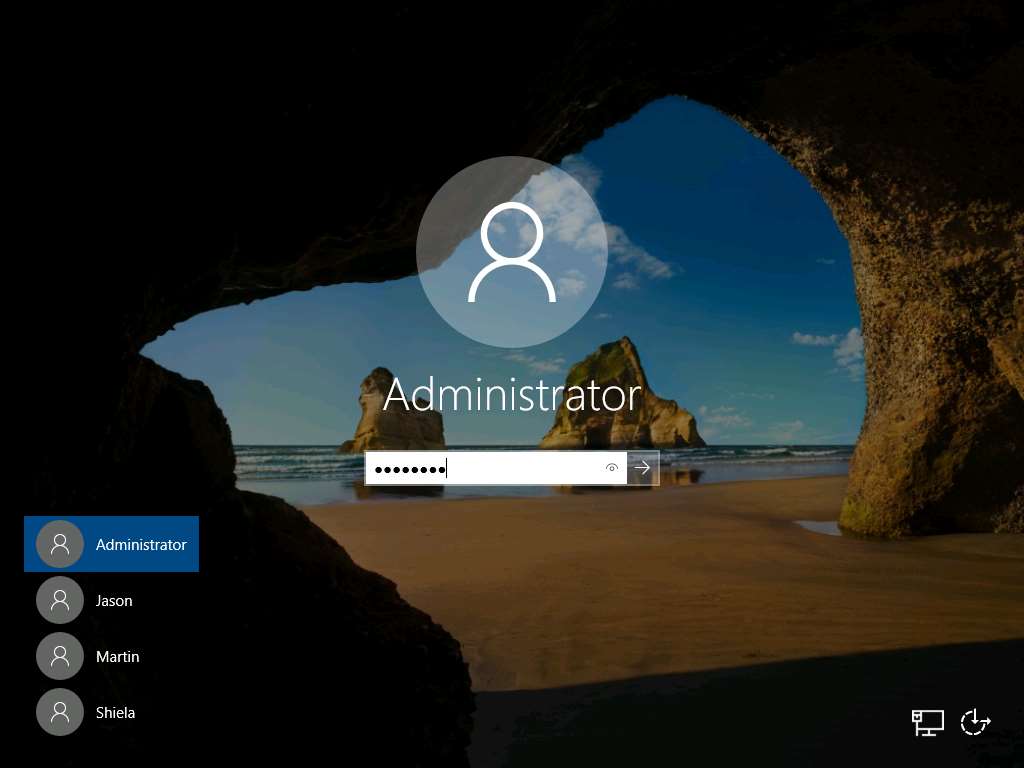
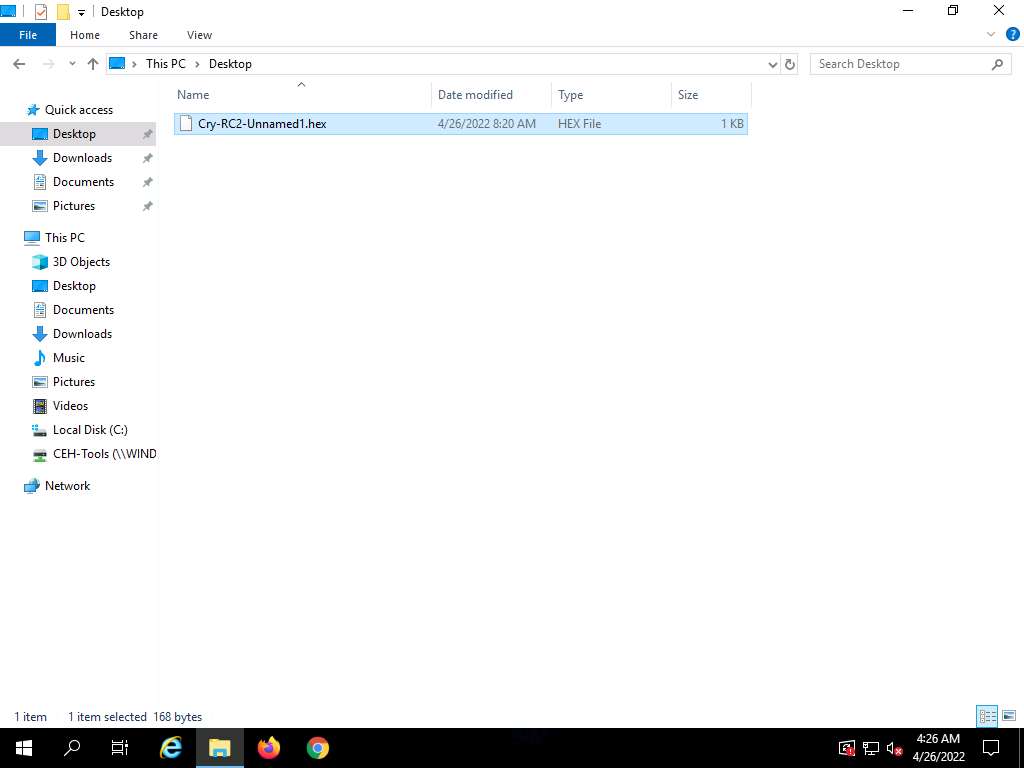
Screenshot Navigate to Z:\CEHv12 Module 20 Cryptography\Cryptanalysis Tools\CrypTool, copy the Cry-RC2-Unnamed1.hex and paste it in the Desktop.
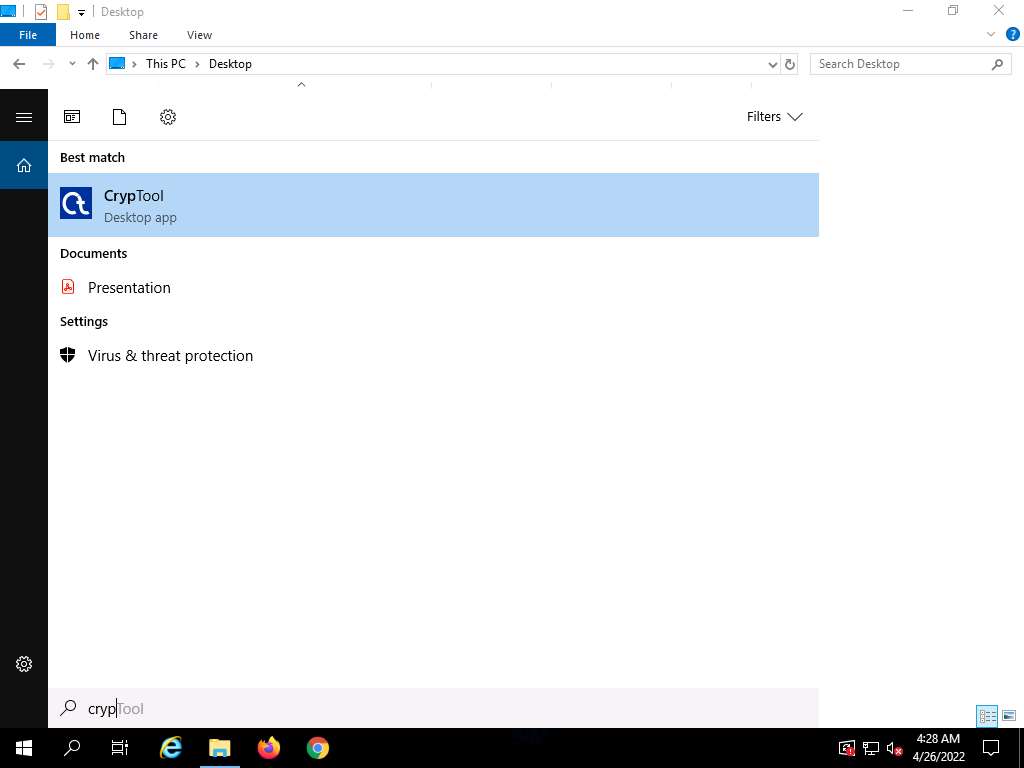
Screenshot Click Type here to search icon on the Desktop. Type cryp in the search field, the CrypTool appears in the results, click on CrypTool to launch it.
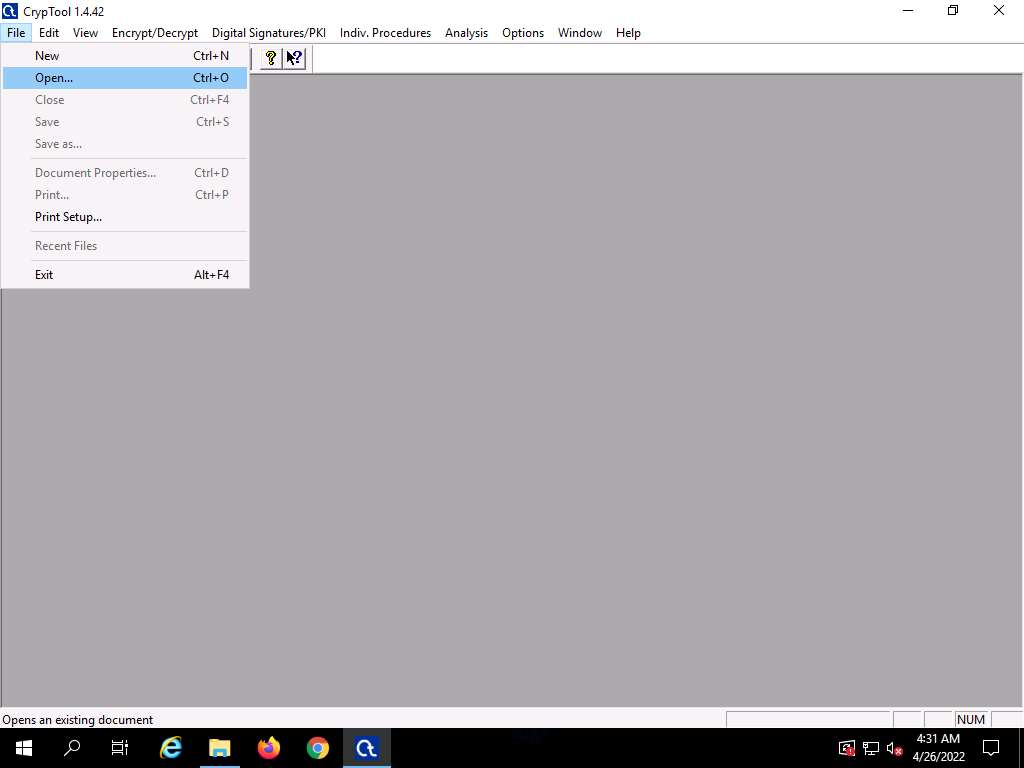
Screenshot In the CrypTool window; click File in the menu bar and select Open…
If a How to Start window. Check the Don’t show this dialog again checkbox and click Close.
Close the startingexample-en.txt window.
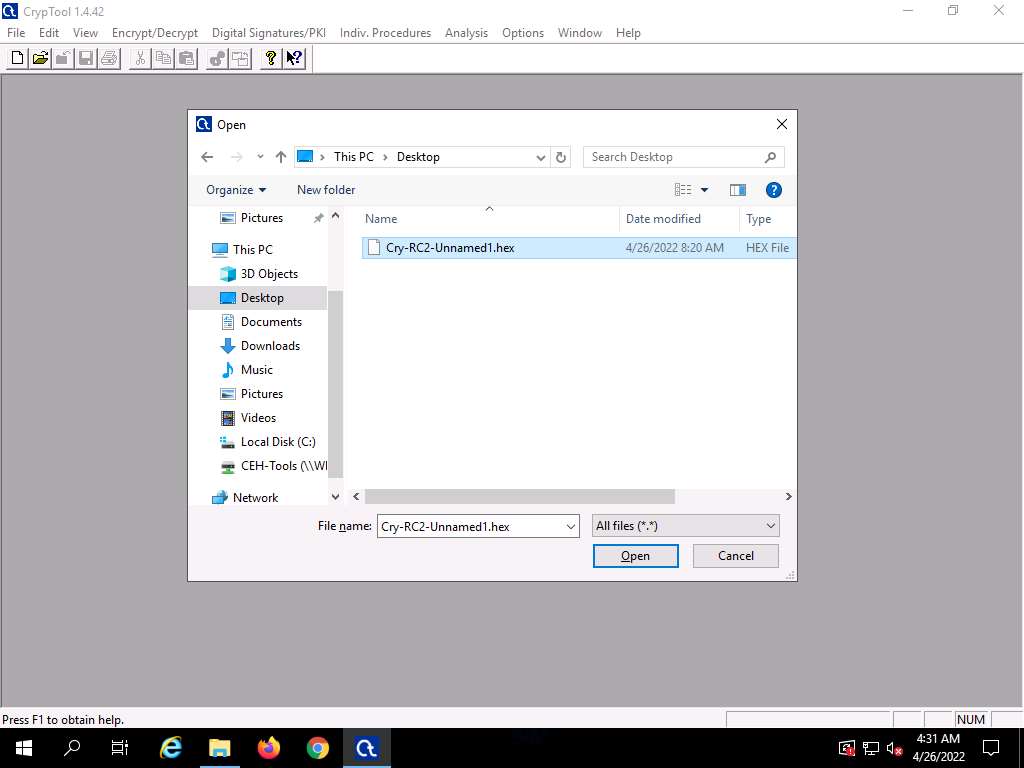
Screenshot The Open window appears; select All files(*.*) from the drop-down list in the file type option, navigate to the location of the file (here, Desktop), select, and then click Open.
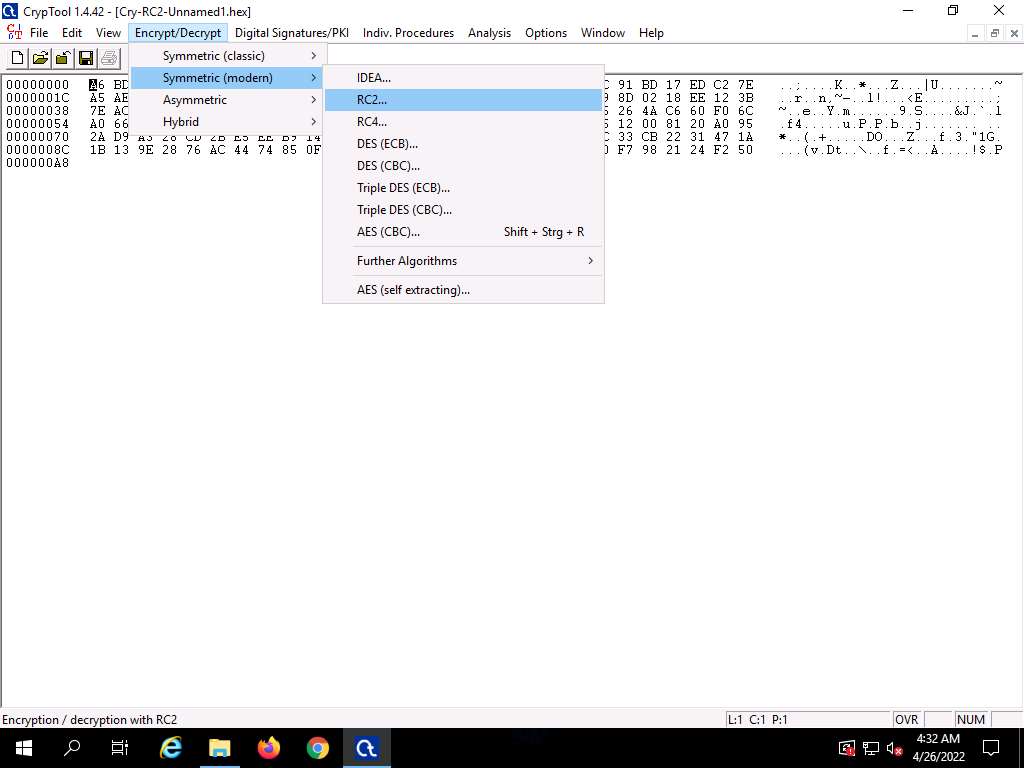
Screenshot From the menu bar, click Encrypt/Decrypt and navigate to Symmetric (modern) --> RC2…
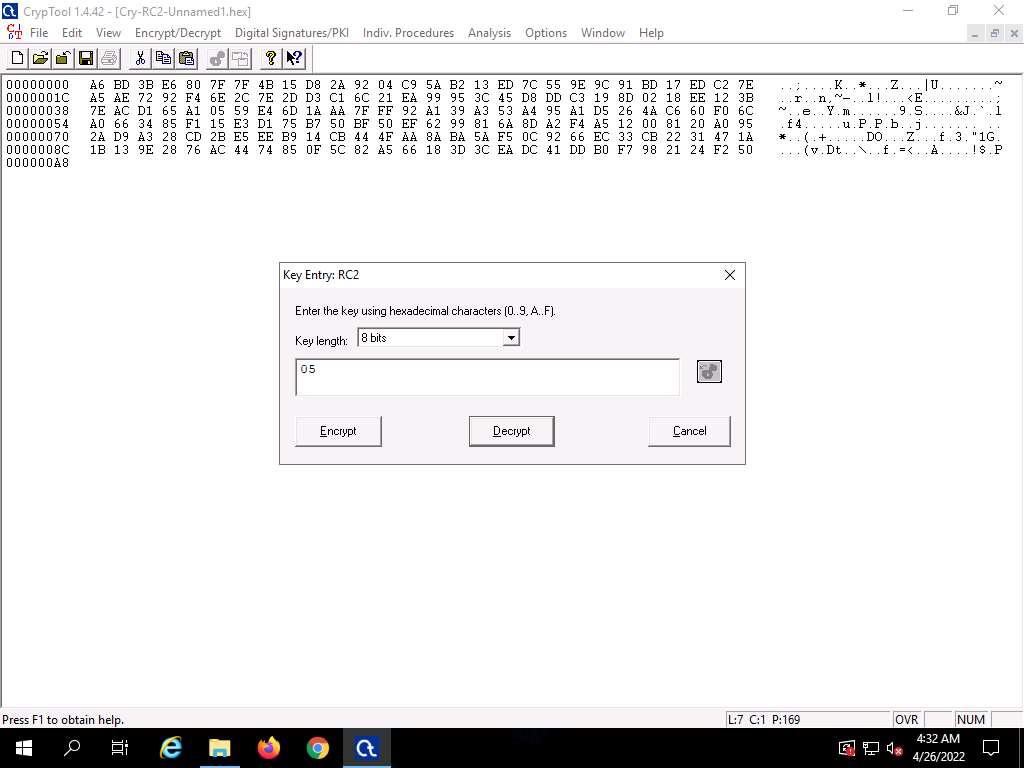
Screenshot The Key Entry: RC2 dialog box appears; leave the Key length set to default (8 bits).
In the text field below Key length, enter 05 as hexadecimal characters, and click Decrypt.
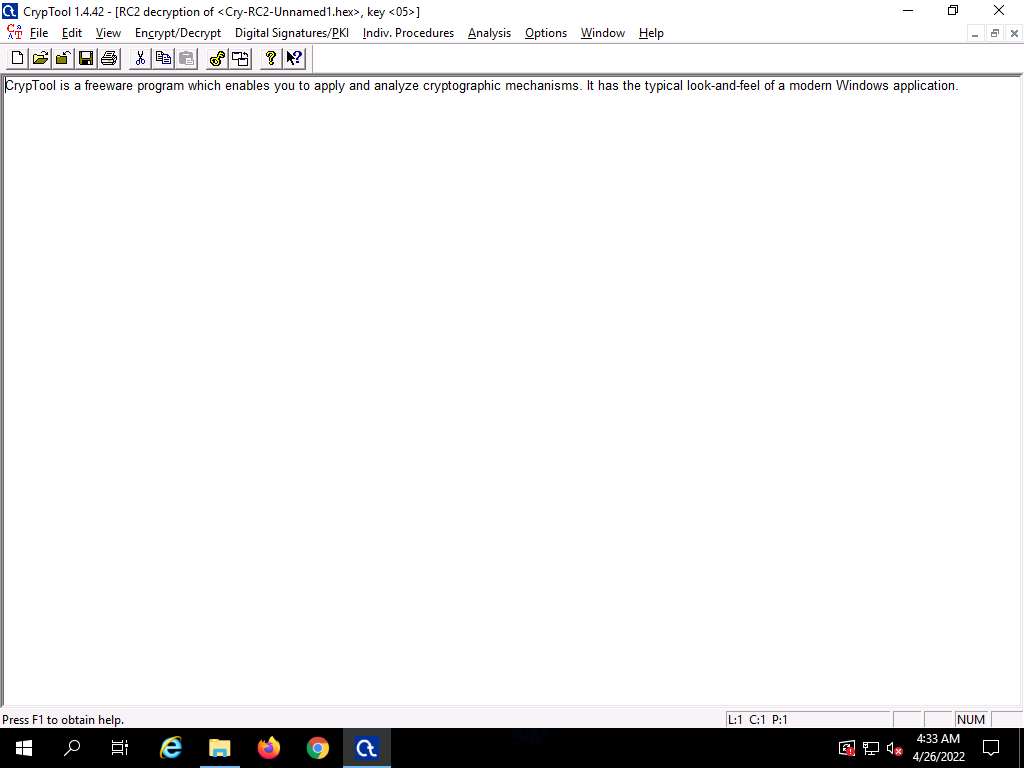
Screenshot The decrypted text appears, as shown in the screenshot:
Screenshot Now, we shall encrypt the data using Triple DES encryption.
Click Windows 11 to switch back to the Windows 11 machine.
In the CrypTool window, close Cry-RC2-Unnamed1.hex window. Leave the Unnamed1 notepad window open.
From the menu bar, click Encrypt/Decrypt and navigate to Symmetric (modern) --> Triple DES (ECB)…
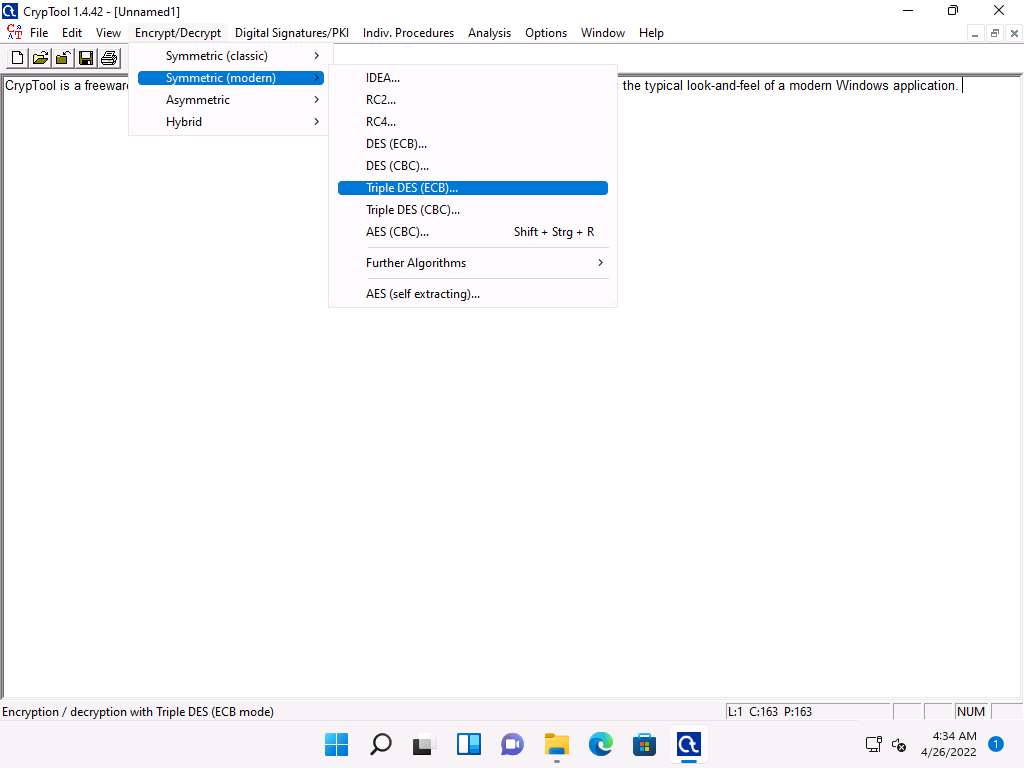
Screenshot The Key Entry: Triple DES (ECB) dialog-box appears; leave the Key length set to default (128 bits (effectively 112 bits)).
In the text field below Key length, enter the combinations of 12 as hexadecimal characters, and click Encrypt.
The chosen hexadecimal characters act like a key that you must send to the intended user along with the encrypted file.
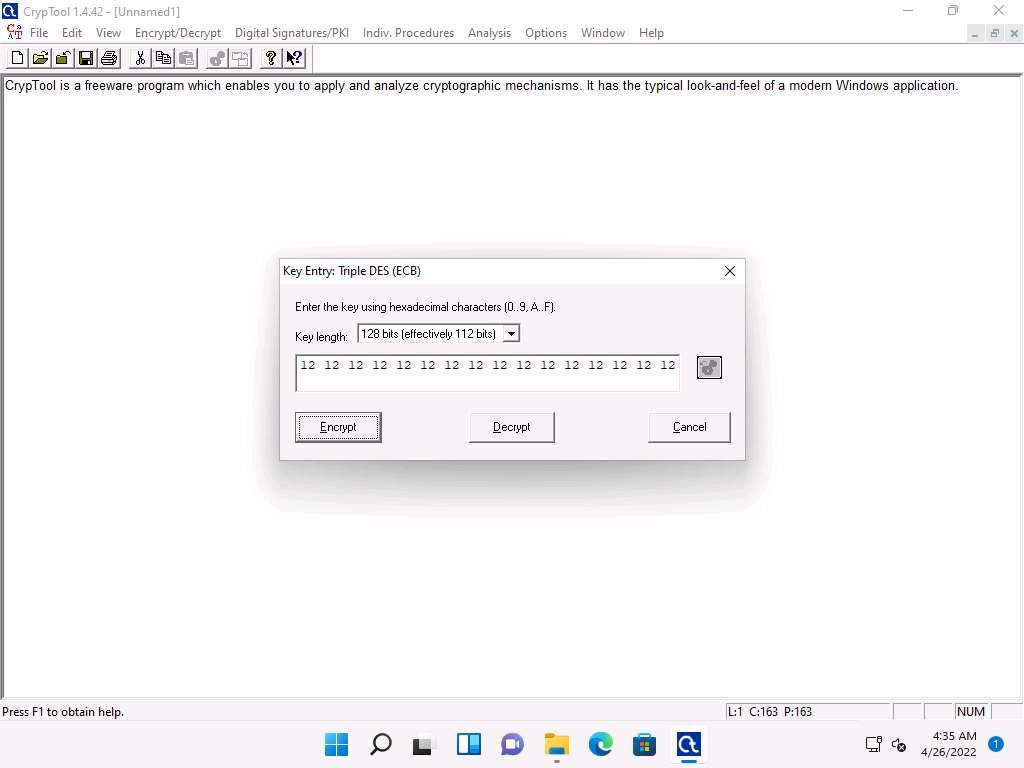
Screenshot The Triple DES (ECB) encryption of Unnamed1 notepad appears, as shown in the screenshot.
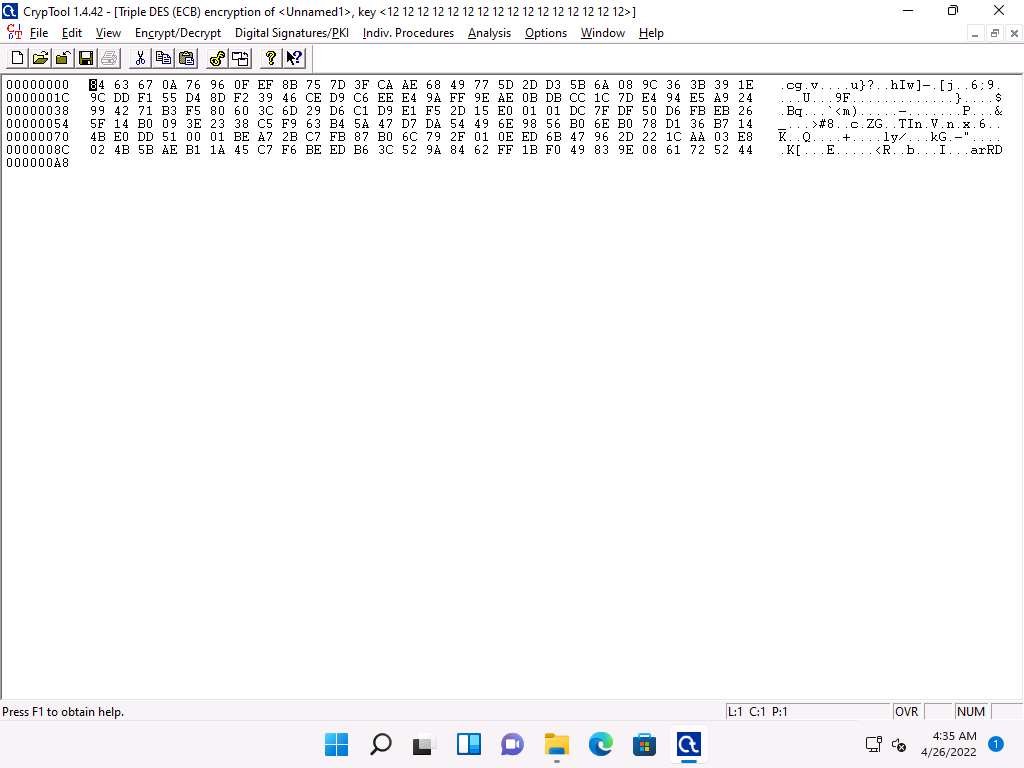
Screenshot To save the file, click File in the menu bar and select Save.
The Save As window appears; choose the save location (here, Desktop) and click Save.
The file name may differ in your lab environment.
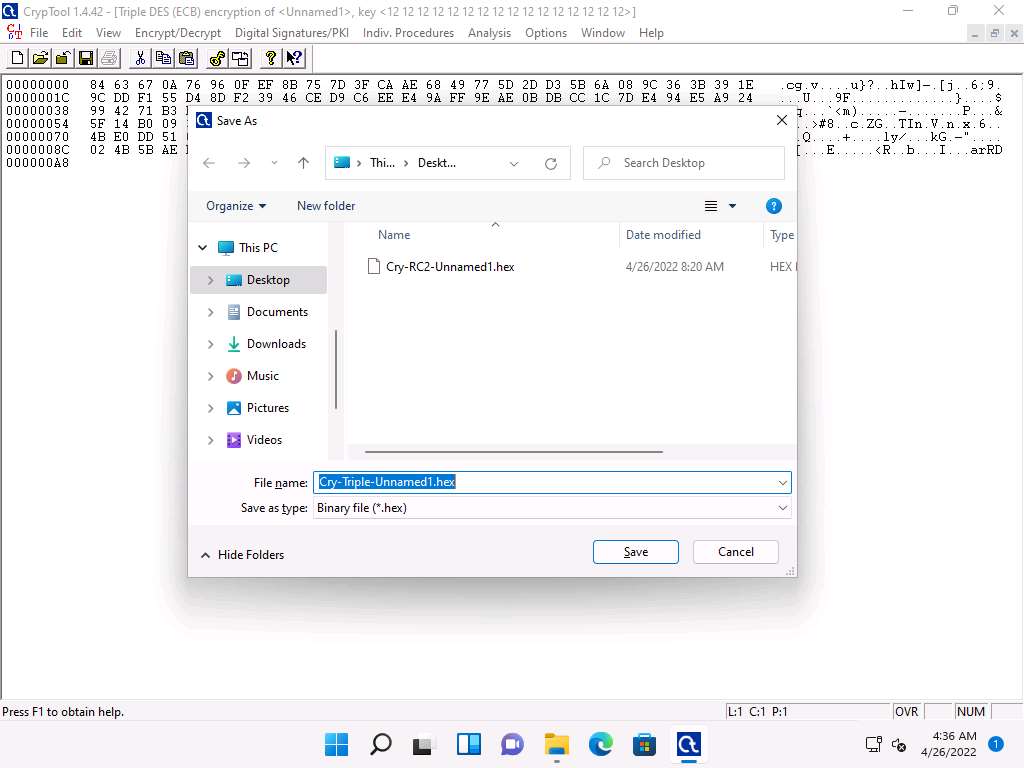
Screenshot To share the file, you may copy the encrypted file (Cry-Triple-Unnamed1.hex) from Desktop to E:\CEH-Tools\CEHv12 Module 20 Cryptography\Cryptanalysis Tools\CrypTool.
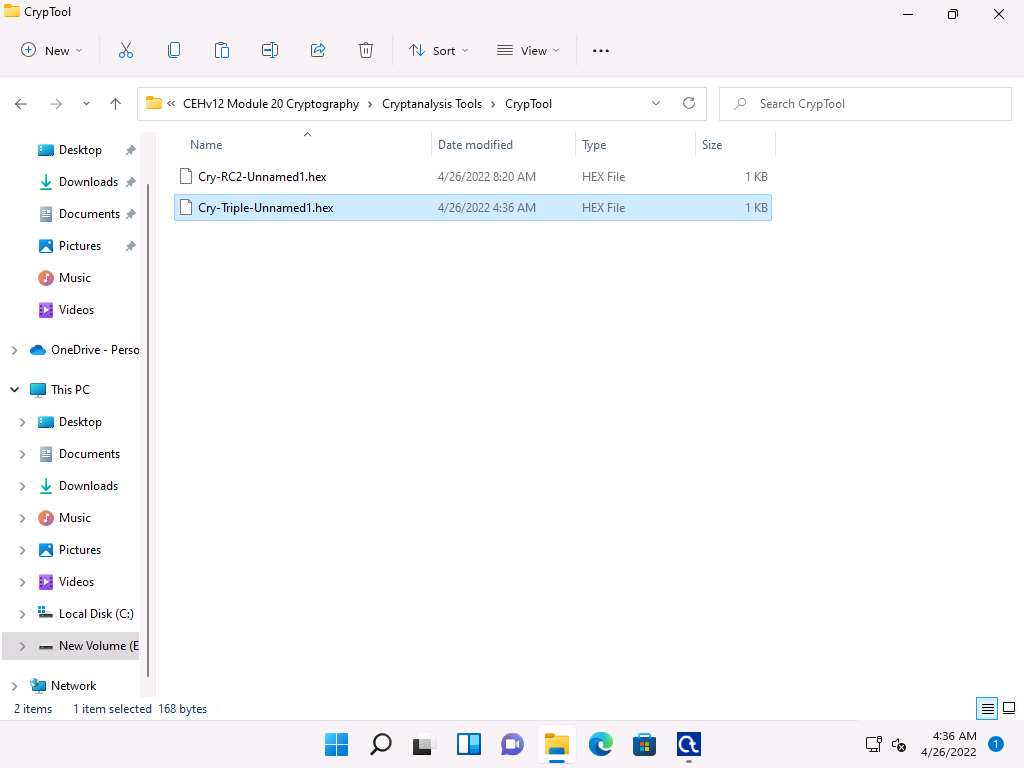
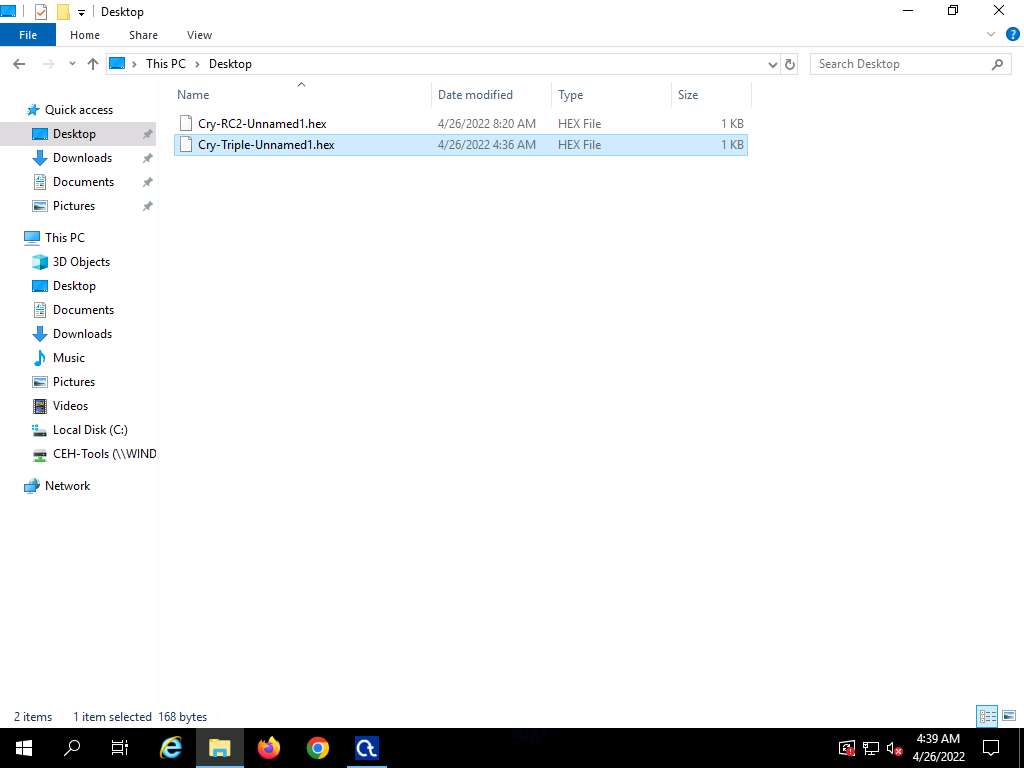
Screenshot Click Windows Server 2019 to switch to Windows Server 2019; copy the encrypted hex file (Cry-Triple-Unnamed1.hex) from Z:\CEHv12 Module 20 Cryptography\Cryptanalysis Tools\CrypTool and paste on Desktop.
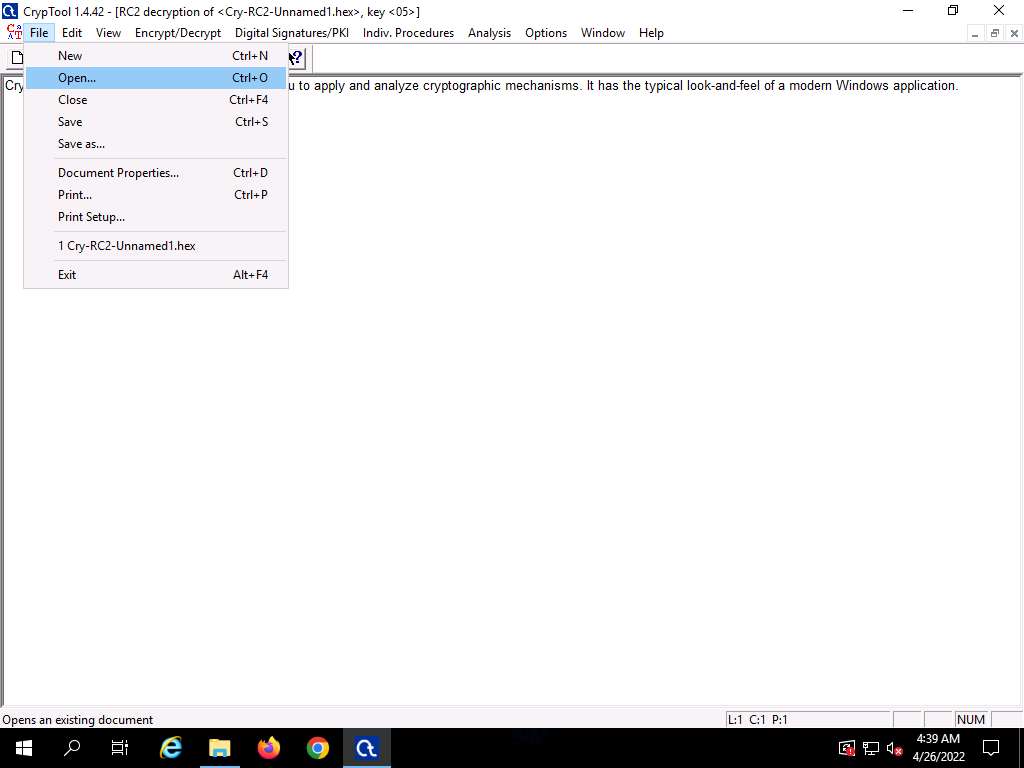
Screenshot Switch to the CrypTool window to decrypt the data; click File in the menu bar and select Open…
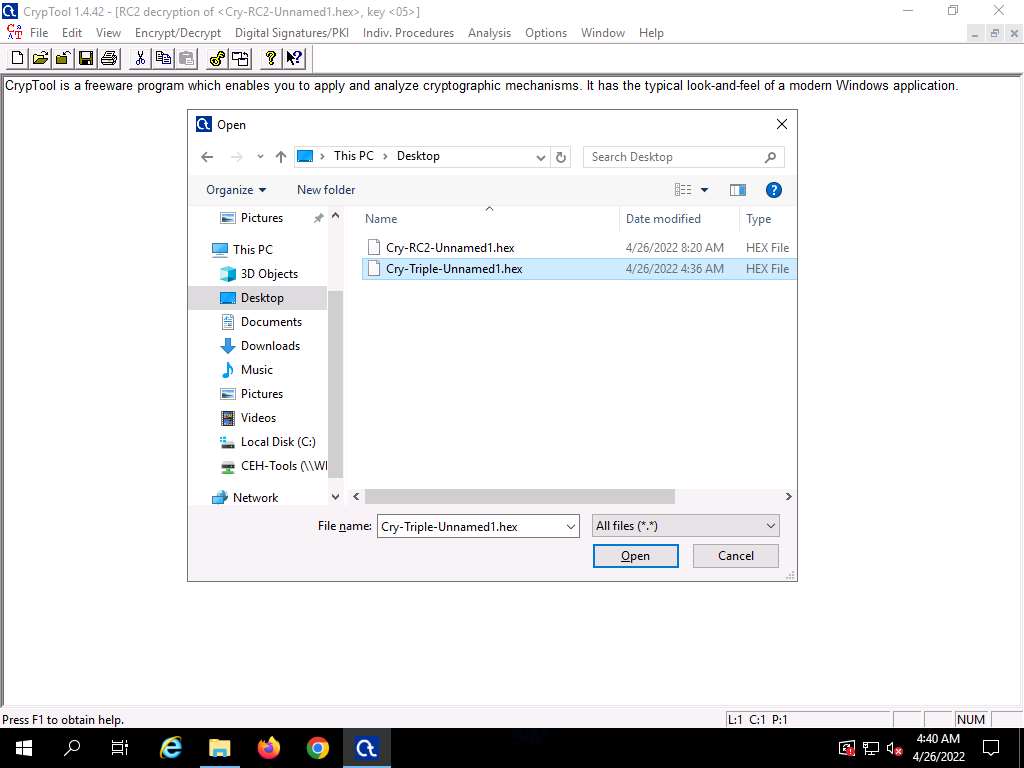
Screenshot The Open window appears; select All files(*.*) from the drop-down list in the file type option, navigate to the location of the file (here, Desktop), select, and click Open.
Screenshot From the menu bar, click Encrypt/Decrypt and navigate to Symmetric (modern) -- > Triple DES (ECB)…
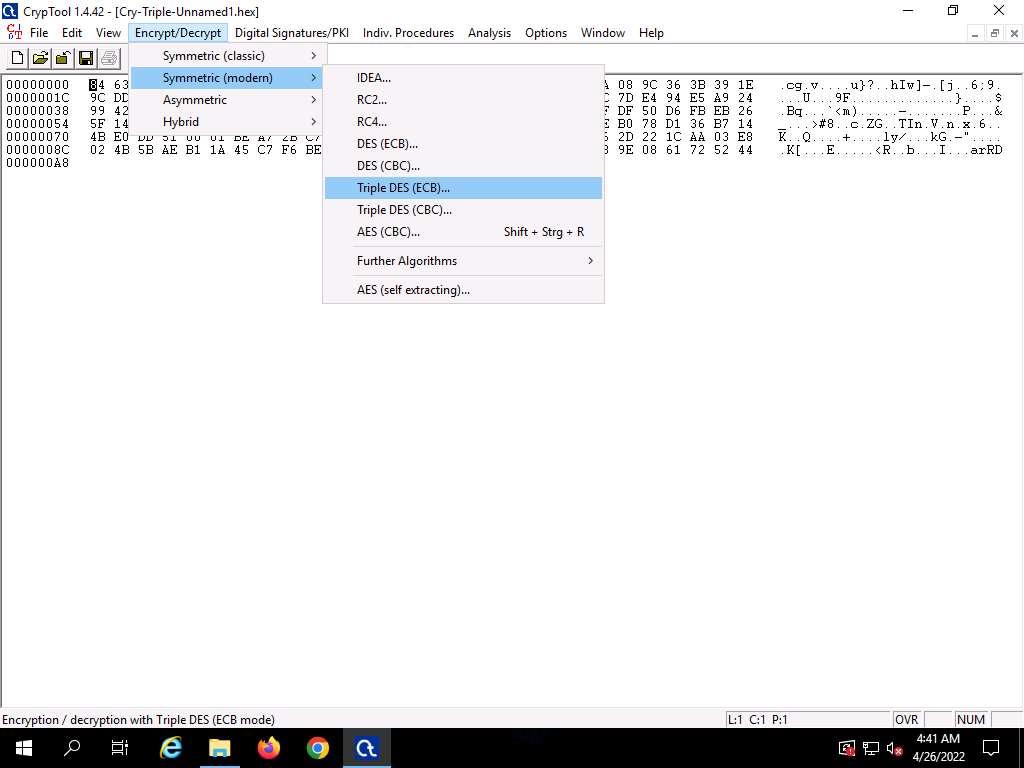
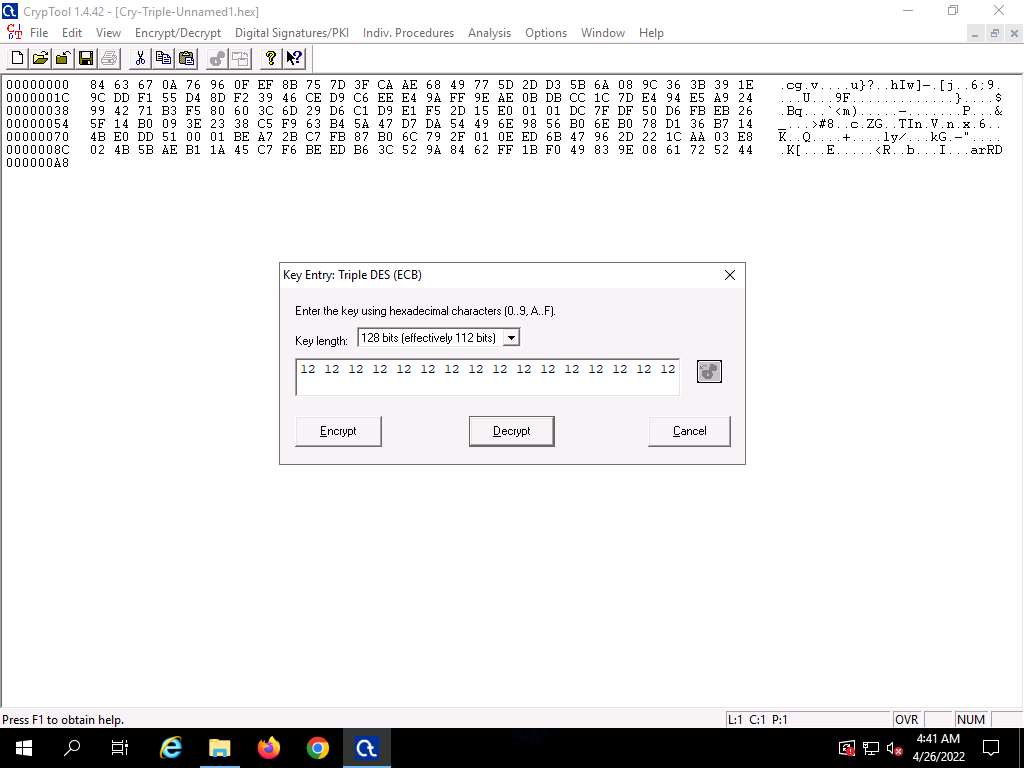
Screenshot The Key Entry: Triple DES (ECB) dialog-box appears; keep the Key length set to default (128 bits (effectively 112 bits)).
In the text field below Key length, enter the combinations of 12 as hexadecimal characters and click Decrypt.
Screenshot The decrypted text appears, as shown in the screenshot.
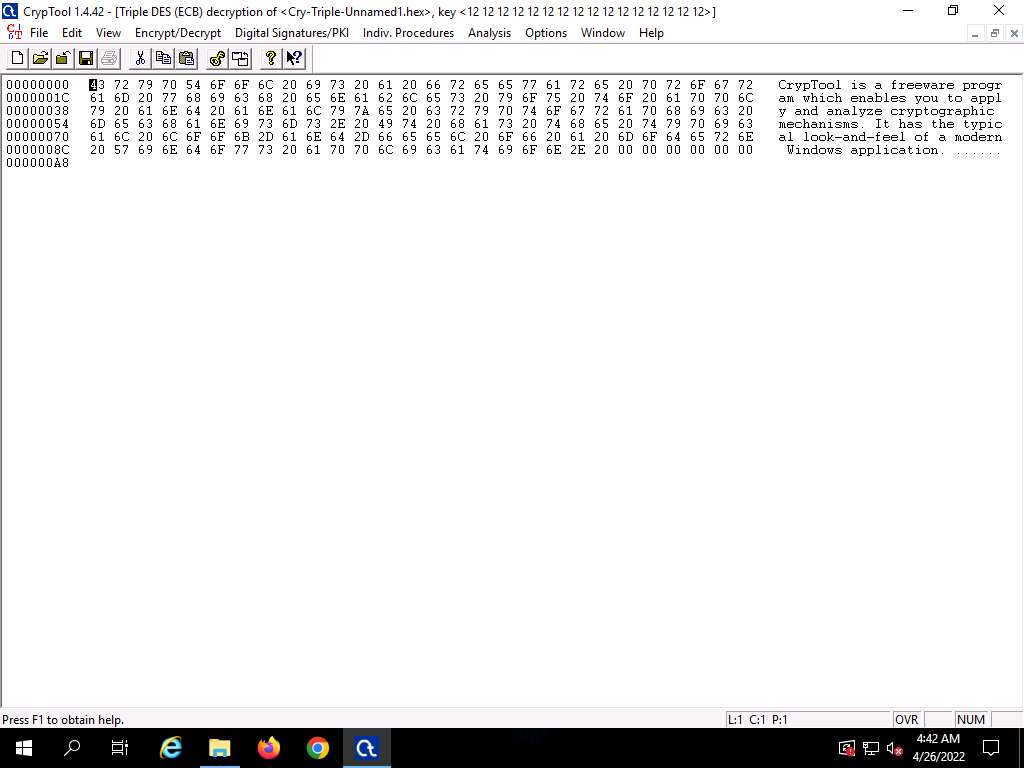
Screenshot Using this method, files can be encrypted using CrypTool and shared with an individual in a secure manner, so that no one can intercept the data.
Task 2: Perform Cryptanalysis using AlphaPeeler
AlphaPeeler is a powerful tool for learning cryptology. It can be useful as an instructor’s teaching aid and to create assignments for classical cryptography. You can easily learn classical techniques such as frequency analysis of alphabets, mono-alphabetic substitution, Caesar cipher, transposition cipher, Vigenere cipher, and Playfair cipher. AlphaPeeler Professional (powered by crypto++ library) also includes DES, Gzip/Gunzip, MD5, SHA-1, SHA-256, RIPEMD-16, RSA key generation, RSA crypto, RSA signature & validation, and generation of secret share files.
AlphaPeeler Professional initializes and the AlphaPeeler main window appears, as shown in the screenshot.
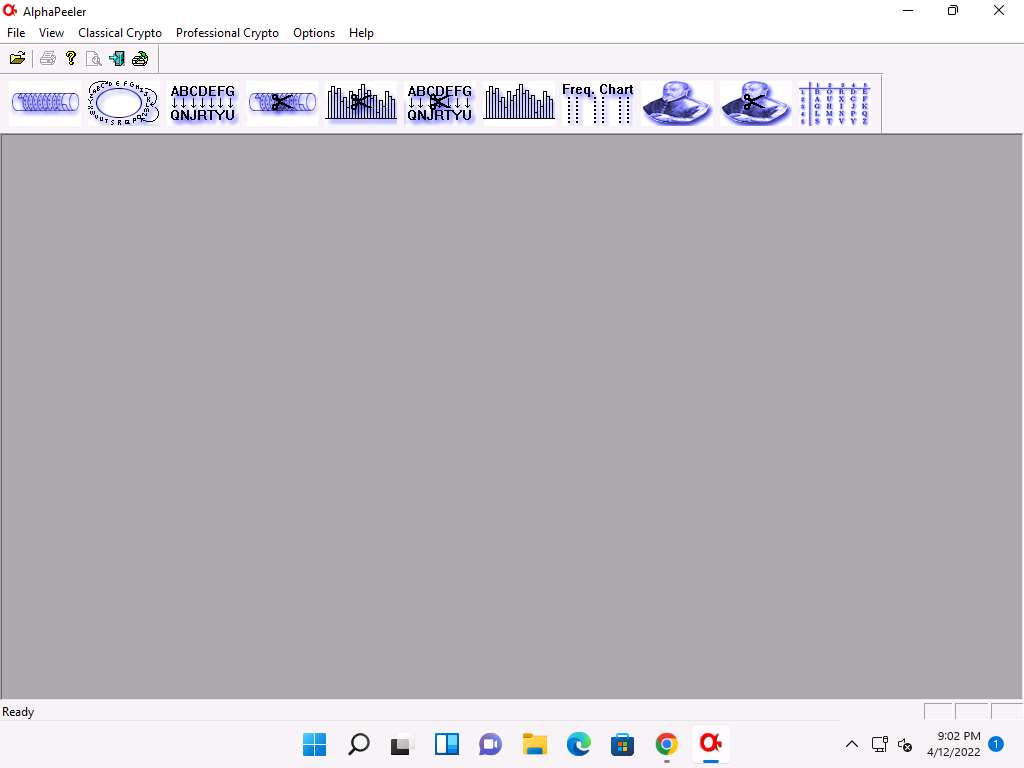
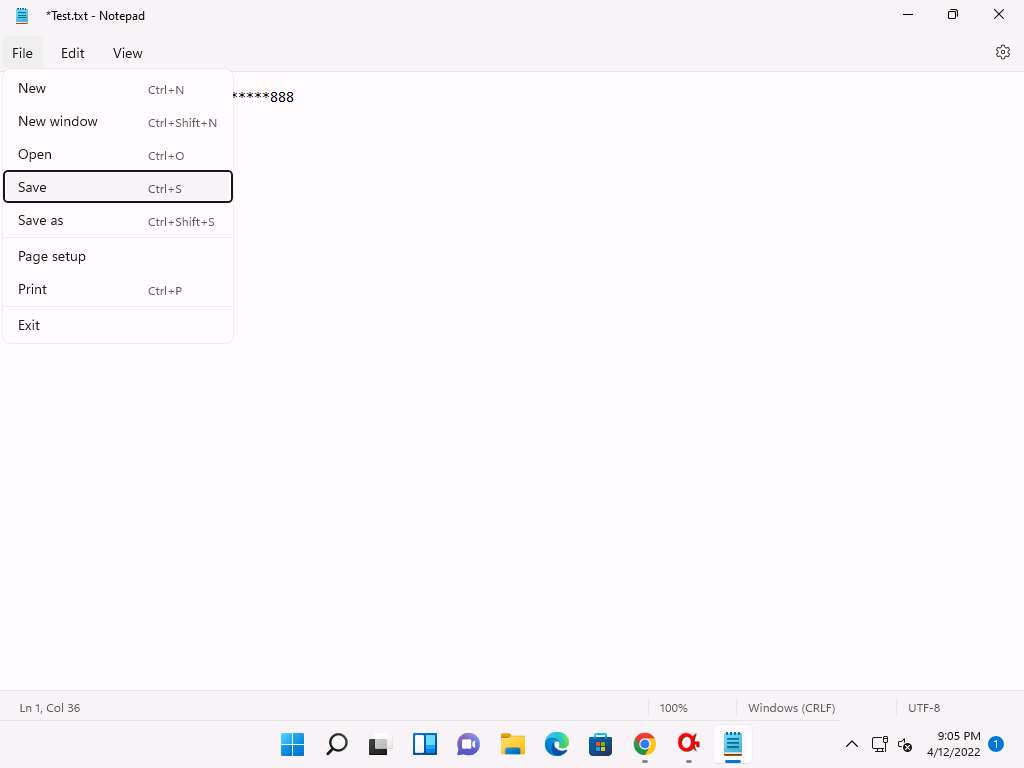
Screenshot Now, minimize the AlphaPeeler window and create a text file on Desktop. Name it Test, open the file, and insert some text.
Click File in the menu bar and click Save.
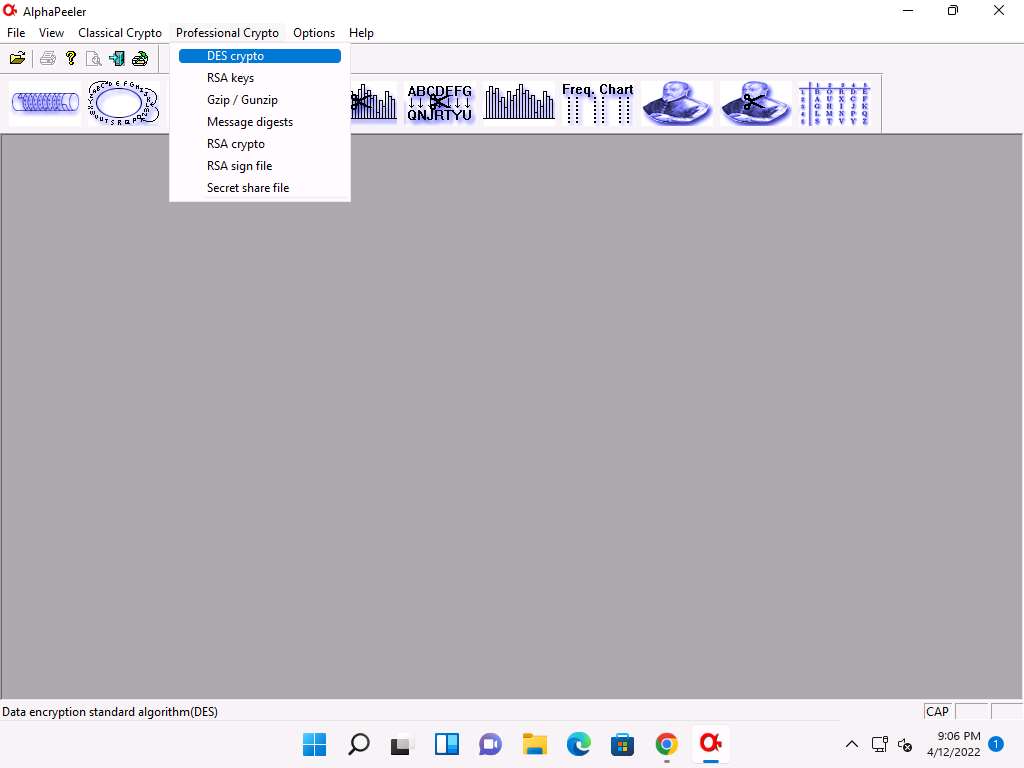
Screenshot Switch back to the AlphaPeeler window; click Professional Crypto from the menu bar and select DES crypto from the options.
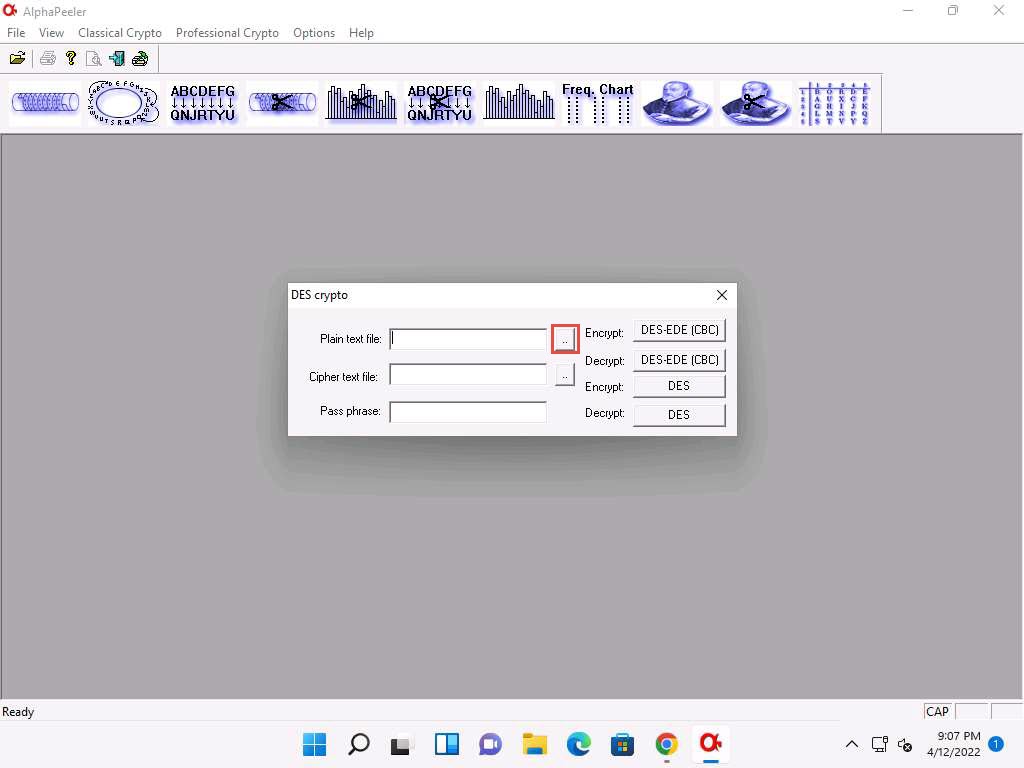
Screenshot The DES crypto pop-up appears; click the ellipsis icon under the Plain text file option.
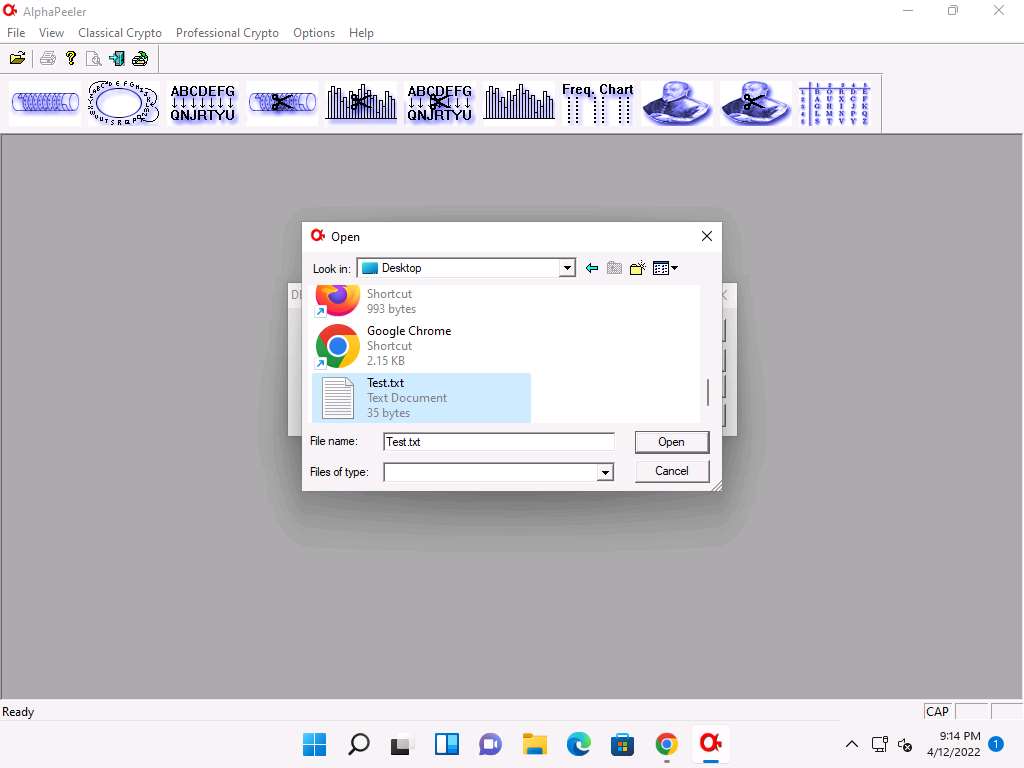
22.jpg The Open window appears; navigate to Desktop and select Test.txt file; then, click Open.
Here, we are selecting the file that we will encrypt and this will act as an input file.
Screenshot In the DES crypto pop-up; click the ellipsis icon under the Cipher text file option.
The Open window appears; select the save location (here, E:\CEH-Tools\CEHv12 Module 20 Cryptography\Cryptanalysis Tools\AlphaPeeler) and name the file as Confidential.txt; then, click Open.
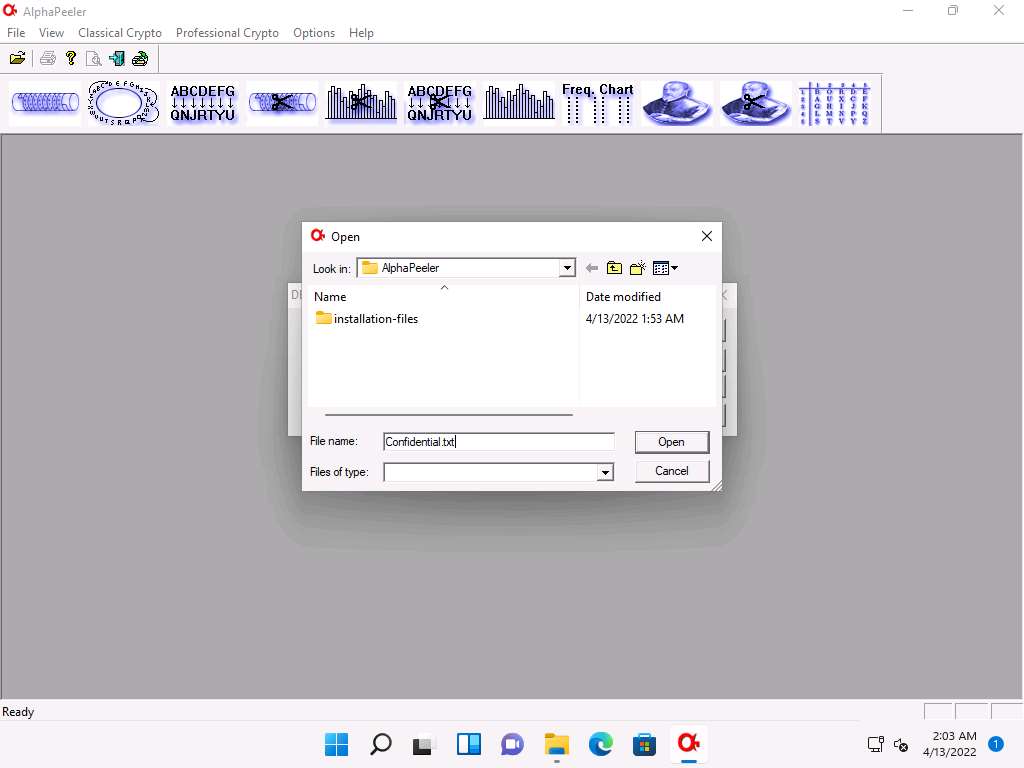
Screenshot In the DES crypto pop-up; insert the password into the Pass phrase field and click DES-EDE (CBC) button under Encrypt option to encrypt the text file.
Here, the password provided is test@123.
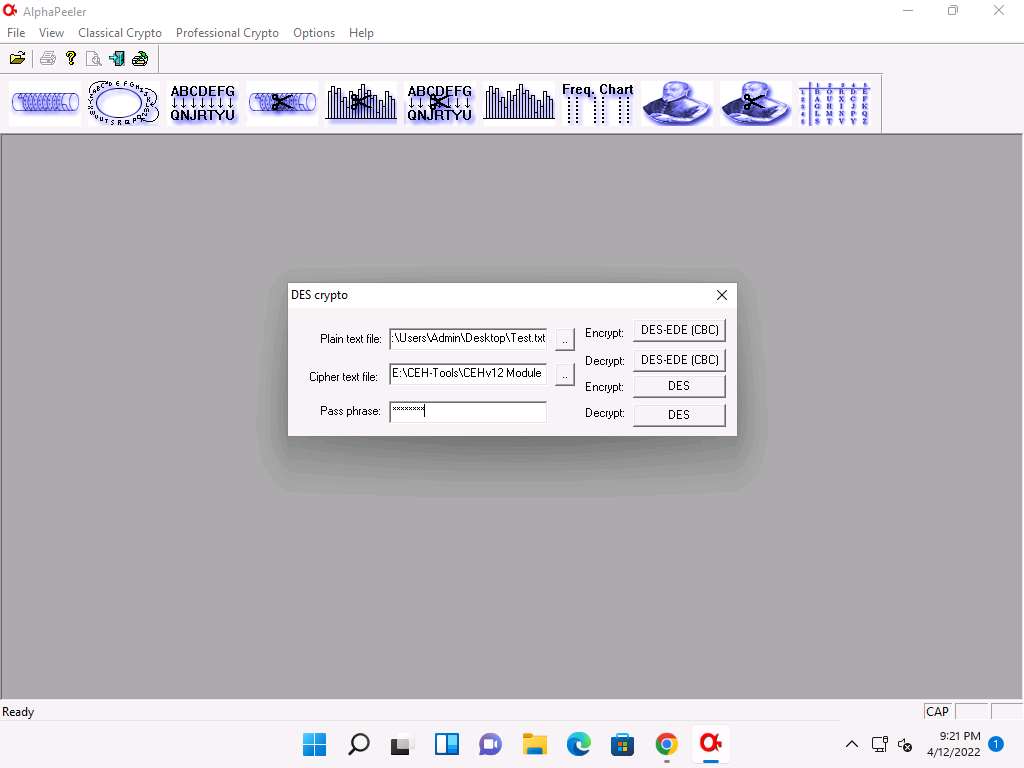
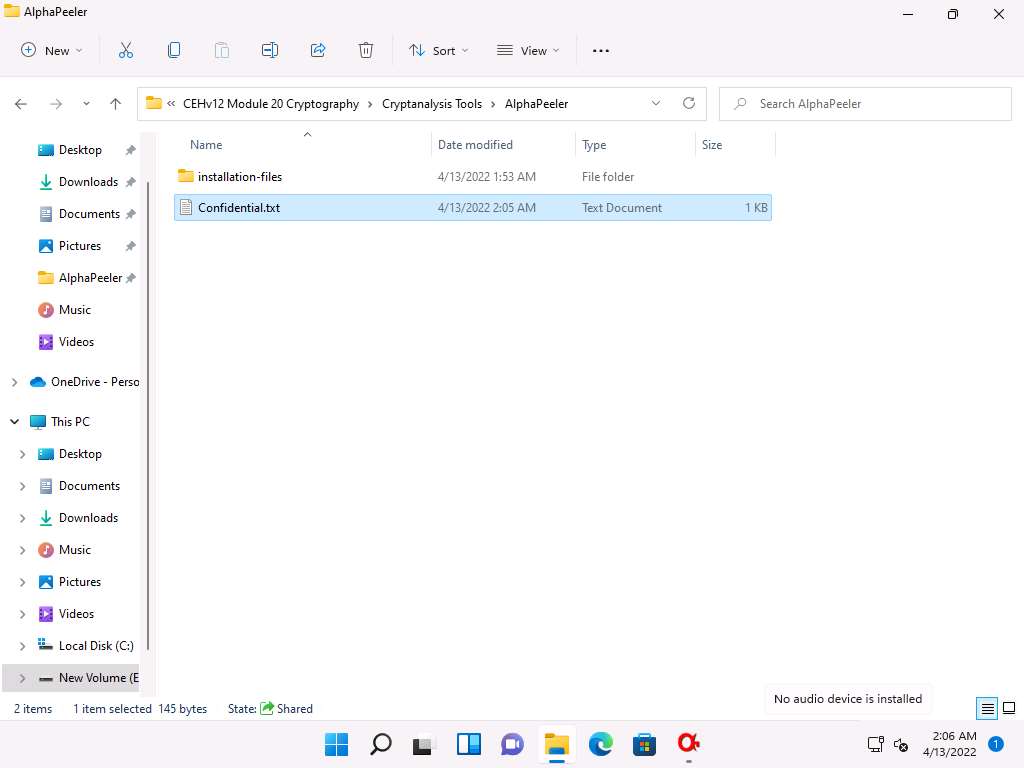
Screenshot A new file Confidential.txt appears at location E:\CEH-Tools\CEHv12 Module 20 Cryptography\Cryptanalysis Tools\AlphaPeeler, as shown in the screenshot.
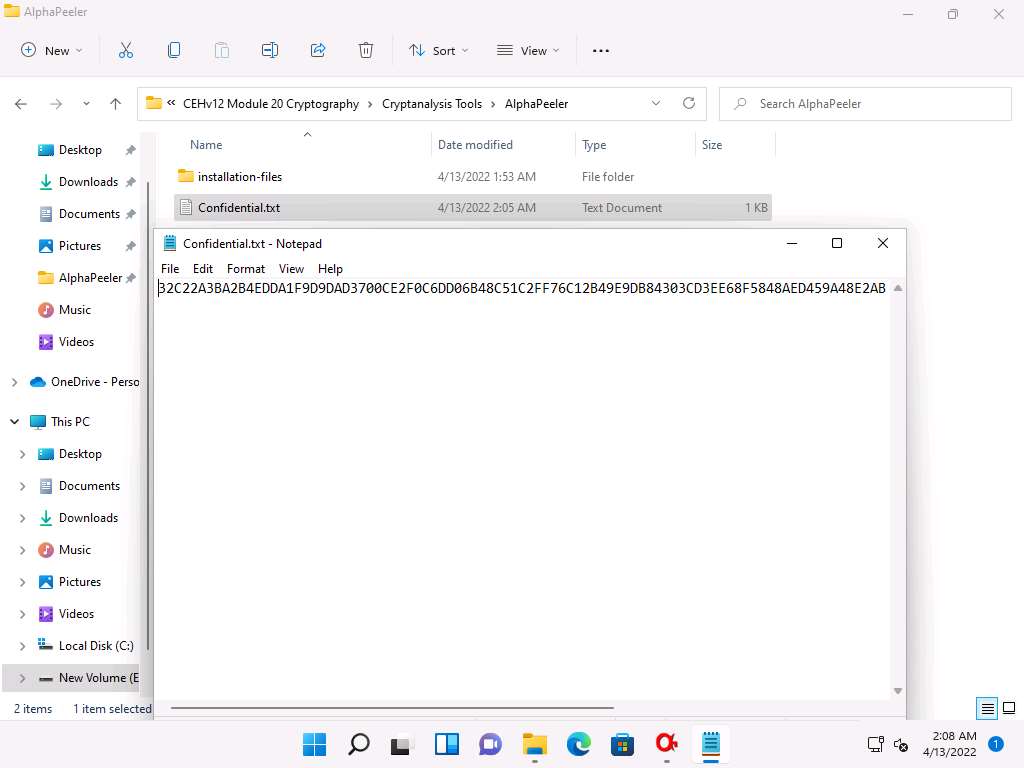
Screenshot Double-click Confidential.txt to open, and you can observe that the file’s content is encrypted.
Here, the encrypted file is shared through shared network drive E:\CEH-Tools\ CEHv12 Module 20 Cryptography and the key to open the encrypted data was sent to you via an email. Using this, you can decrypt the encrypted data and view the data in plain-text.
Screenshot Close the DES crypto pop-up and the AlphaPeeler window.
Click on Windows Server 2019 to switch to Windows Server 2019; Click Search icon (
 ) on the Desktop. Type alpha in the search field, the AlphaPeeler appears in the results, double click to launch it.
If an Open File - Security Warning pop-up appears, click Run.
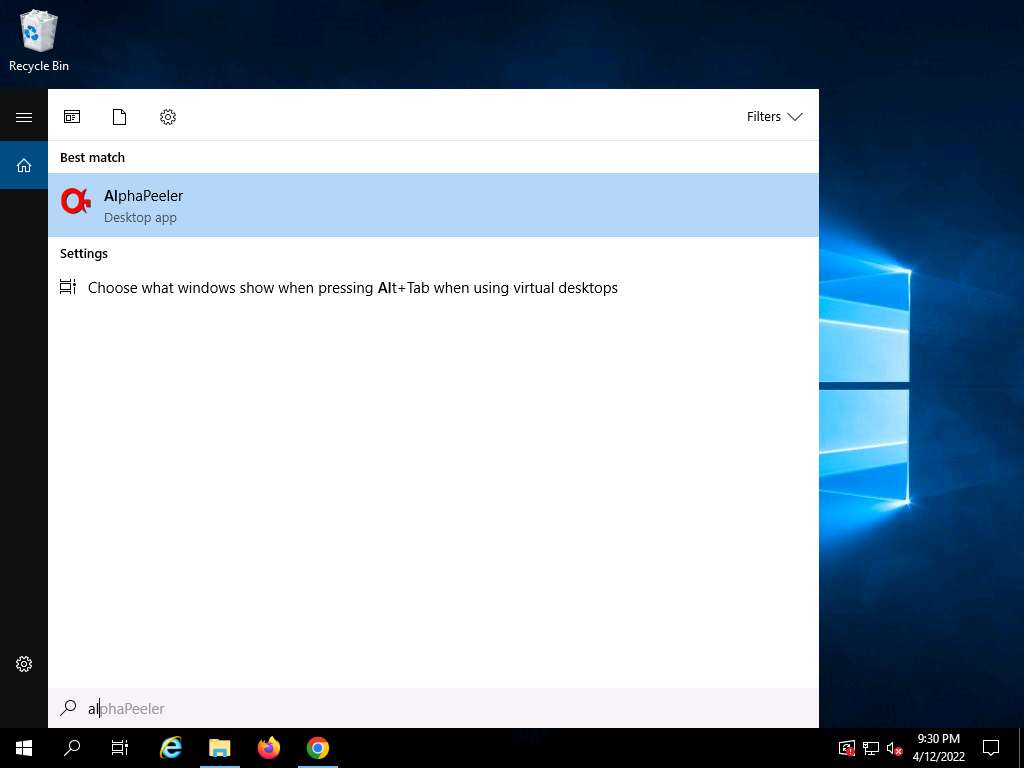
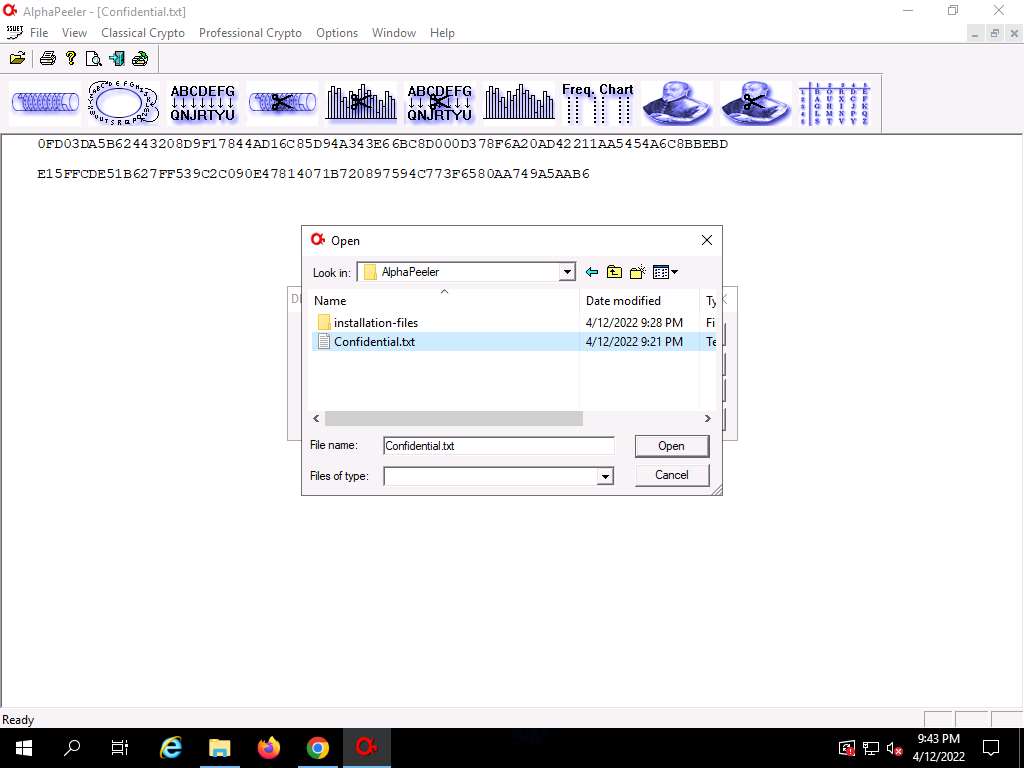
Screenshot The AlphaPeeler main window appears; click File from the menu bar and click Open…

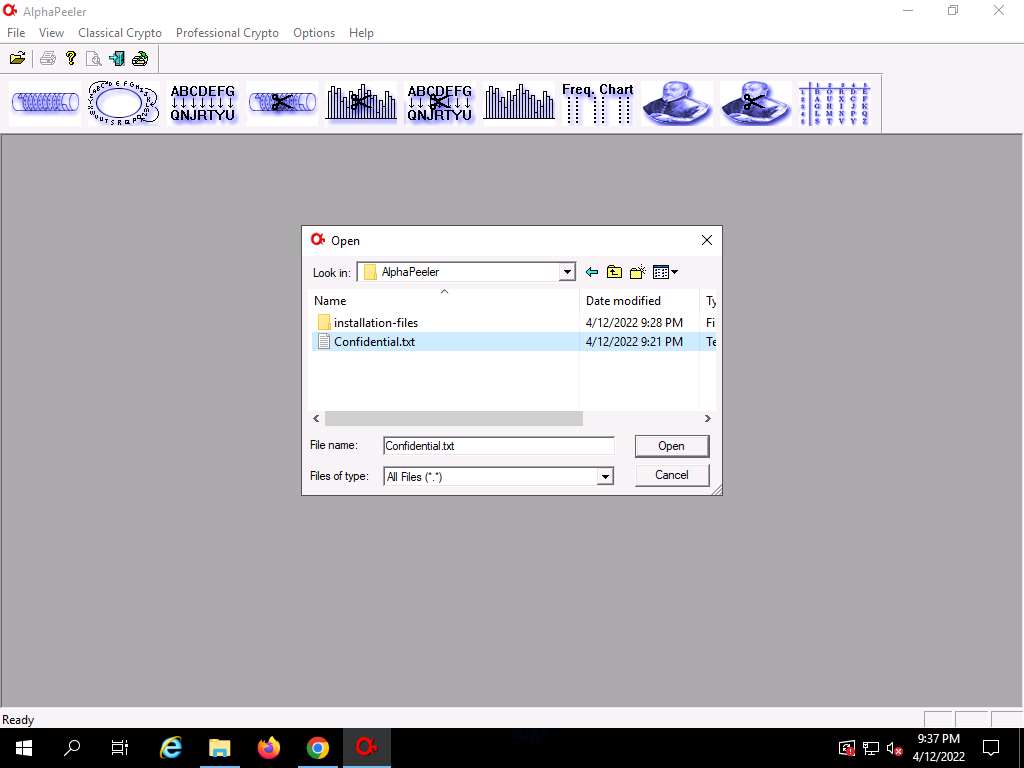
Screenshot The Open window appears; in the Look in field, navigate to the location of Z:\CEHv12 Module 20 Cryptography\Cryptanalysis Tools\AlphaPeeler and select Confidential.txt file; then, click Open.
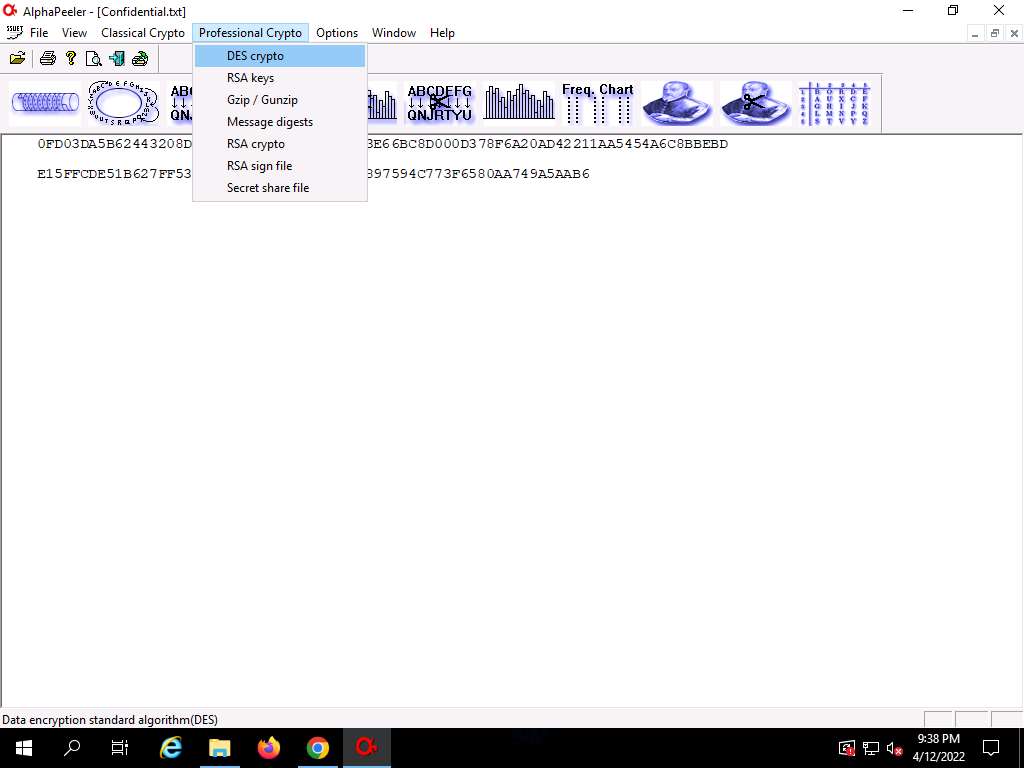
Screenshot The Confidential.txt file appears; click Professional crypto from the menu bar and select the DES crypto option.
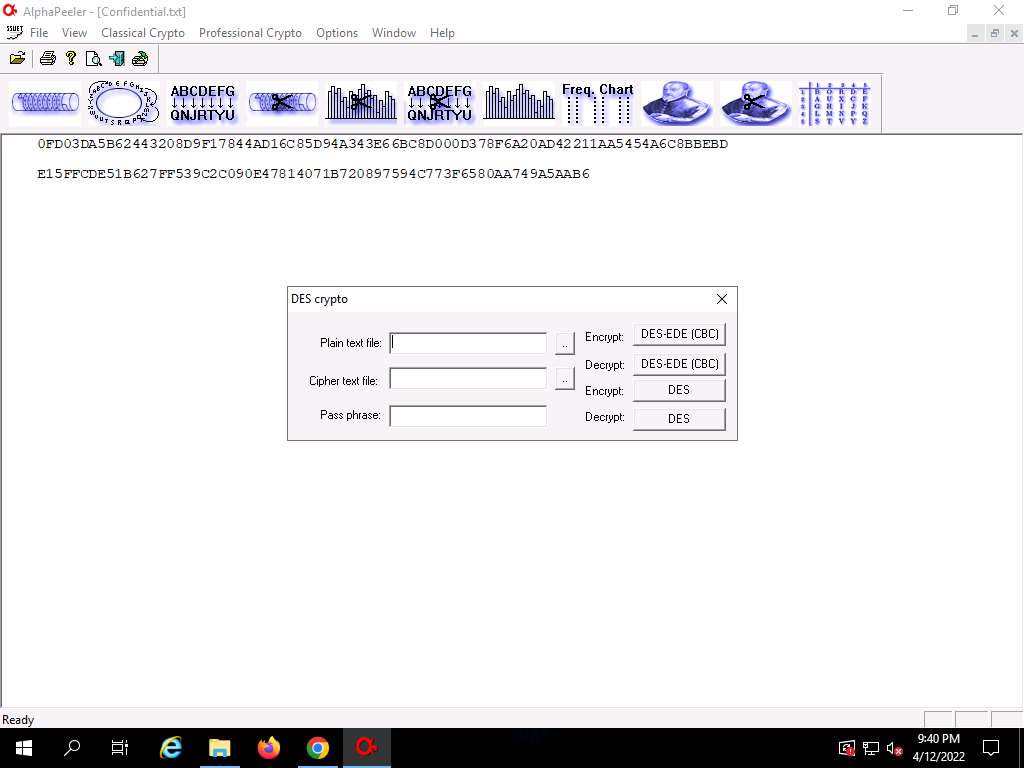
Screenshot The DES crypto pop-up appears; click the ellipsis icon next to the Plain text file option.
Screenshot The Open window appears; navigate to Desktop and name the file Result.txt; then, click Open.
Here, we are creating an output file that will be in plain-text.
In the DES crypto pop-up; click the ellipsis icon under the Cipher text file option.
The Open window appears; select the encrypted file (Confidential.txt) located at Z:\CEHv12 Module 20 Cryptography\Cryptanalysis Tools\AlphaPeeler and click Open.
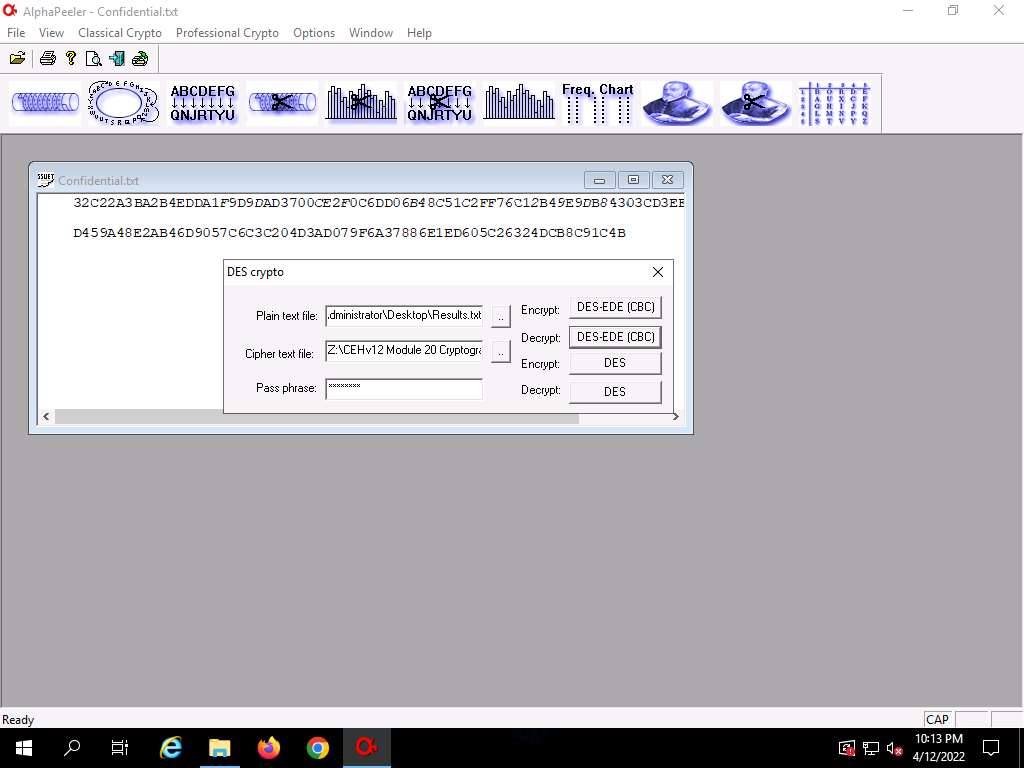
Screenshot In the DES crypto pop-up, enter the password that you provided in Step#10 into the Pass phrase field and click the DES-EDE (CBC) button next to Decrypt to decrypt the text file.
Here, the password provided is test@123.
Screenshot Navigate to Desktop and double click the Result.txt file. You can observe the file content in plain-text, as shown in the screenshot.
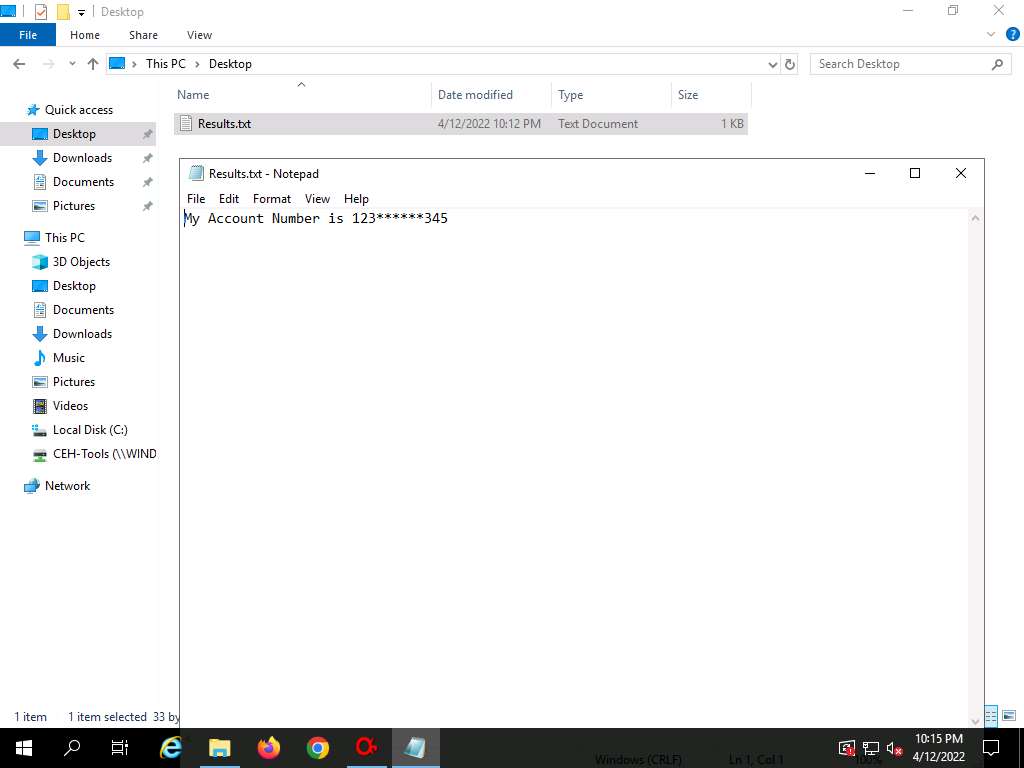
Screenshot This concludes the demonstration of performing cryptanalysis using AlphaPeeler.
You can also use other cryptanalysis tools such as
Cryptosense (https://cryptosense.com)
RsaCtfTool (https://github.com)
Msieve (https://sourceforge.net)
Cryptol (https://cryptol.net)
Hacker's Mantra:A lot of hacking is playing with other people, you know, getting them to do strange things. - Steve Wozniak